Your cart is currently empty!
Author: admin

How to Sit with Sciatica: 5 Tips for Relieving Chronic Pain
While sitting with sciatica can literally be a pain in the buttocks, there are some surprisingly simple ways you can treat and manage your pain. I’m here to teach you how to sit with sciatica for short-term sciatica relief and address the root causes for long-term sciatica relief.
Sciatica pain can worsen with certain positions or movements, and sitting is often one of the worst offenders. That’s why it’s important to learn the best sitting position for sciatica so you can go about your day pain-free.
As with most chronic pain, however, there is usually an underlying cause that we overlook. Beyond learning how to sit with sciatica, implementing healthy habits to address the cause of your sciatica can help to improve your overall pain levels.
If sciatica pain is getting in the way of your workday or comfort levels as you relax each night, read on to learn how to manage your sciatica pain while sitting.
What are the causes of sciatica pain?
Sciatica or sciatic pain is pain that radiates or pulses out from your sciatic nerve. Your sciatic nerve runs from your lower back and branches through your hip, buttocks, and down each leg.
Most people living with sciatic nerve pain tend to only have pain on one side of the body or down one leg.
While there are several different causes of sciatic nerve pain, finding out the cause of your pain is the first step when it comes to finding a treatment. Some of the most common causes of sciatica include:
- Herniated discs
- Bone spurs
- Prolonged sitting and tight iliopsoas muscles
- Tight piriformis muscles
Now, as someone that lives with sciatica, you may be wondering, what does sitting have to do with sciatic pain?
A lot, actually. You see, the entire reason the sciatic nerve is causing you any pain is that it is pinched by something. That’s why if you have a slipped disc or a bone spur that pinches the nerve, you experience sciatica pain.
Well, the same thing happens when you sit for too long. While sitting, your iliopsoas muscles (your primary hip flexors) are in a shortened position, and they can start to become too tight.
It may seem strange that tight muscles could cause nerve pain, but this happens because of the location and importance of these muscles.
The iliopsoas or hip flexor muscles are vital to nearly every body movement from sitting, standing, walking, and turning the trunk of your body. They go through an immense amount of strain throughout the day with little to no rest.
The iliopsoas is made up of two muscles: the iliacus and the psoas. The iliacus is located very close to the hip joint and attaches to the pelvis while the psoas attaches to the lower spine and runs down to connect with the iliacus before they both attach to your upper leg bones.
The proximity to the joint and their distinct connection points is what makes muscle tightness especially troubling. When the iliopsoas muscles are allowed to stay tight, over time, they will begin to pull on the connection points, effectively pulling your pelvis out of alignment and creating a pelvic rotation, or pelvic tilt.
With the pelvis out of alignment, other nearby parts of your body tighten in response, creating tension which impacts your sciatic nerve. This pelvic misalignment is also a reason people may have hip pain while sitting.
When your psoas muscles are tight, they put your lower back into extension, side-bending, and/or rotation. While this is occurring, your tight iliacus is pulling your pelvis forward, causing tightness in your piriformis muscle at the back of your hip as well. Since your sciatic nerve runs under or through (yes, all our bodies are different!) the piriformis muscle, tension in this muscle can compress the sciatic nerve, creating that deep pain or numbness down that leg.
So now that you know some reasons why you could be experiencing sciatica in the first place, let’s delve into how to sit with sciatica pain.
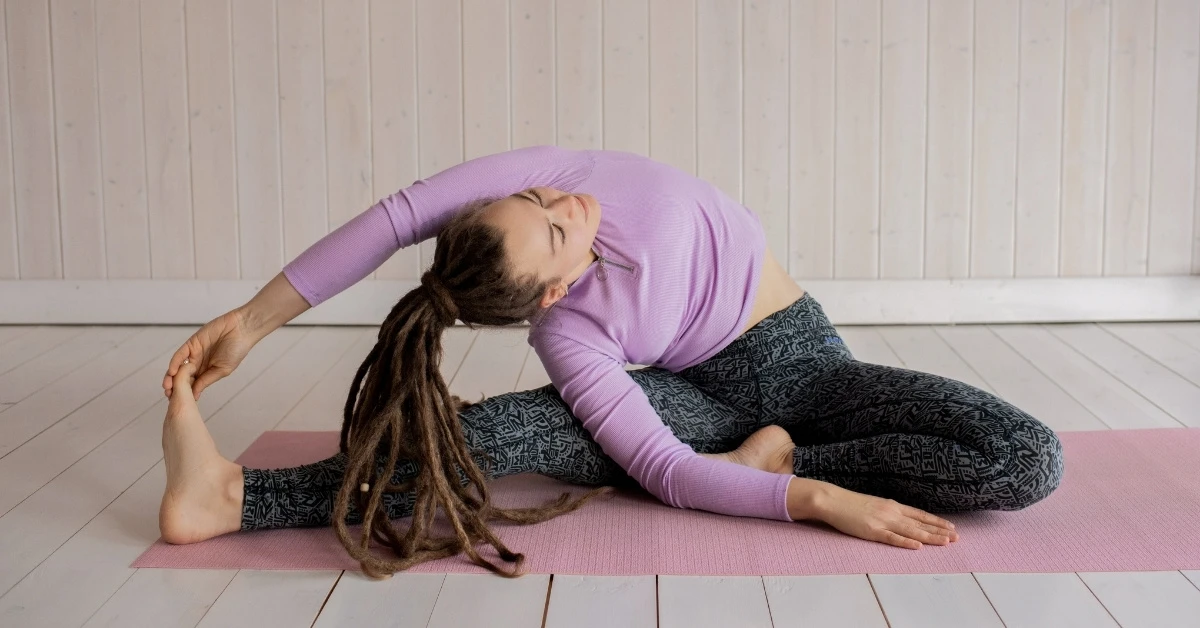
How to sit with sciatica
We have all heard of the importance of having good posture, but did you know that posture can dramatically affect your hip pain and sciatica pain when sitting?
The best sitting positions for hip pain are also very similar to the best sitting positions for sciatica pain, and that is because of how they both relate to tight iliopsoas muscles and how your posture impacts muscle tightness.
Sciatic pain can be aggravated more by sitting, which is why knowing how to sit with sciatica (and taking breaks!) is often a focus for those living with this chronic pain.
One thing to remember when training your body how to sit with sciatica is that even when you are in the optimal sitting position, your body still needs breaks. No matter how you sit with sciatica, being seated still puts your muscles in a contracted, shortened position.
To minimize your sciatica pain throughout the day, not only do you need to know how to sit with sciatica, but you should also invest in taking a break every 30 minutes from sitting.
I know, this seems like a lot, but it doesn’t need to be a long break. Simply getting up to do some light stretching or taking a walk around the block is all you need.
You can also choose to switch from sitting to standing every 30 minutes. The easiest way to do this is to invest in an ergonomic chair and office desk that is adjustable.
Once you have the right setup and start to build a daily schedule that doesn’t keep you stuck in the same position for too long, then you also need to know the best sitting position for sciatica.
3 simple steps to learning how to sit with sciatica pain
- Make sure your chair fits your body and is the correct height. You want your knees lower than your hips, so your spine can more easily keep its natural curve.
- No feet on the coffee table! Say no to the ottoman! It seems like you’re offering your body a fully relaxed position, but your legs straight out (especially if your feet are flexed and your head is looking down at your screen), you’re actually stretching your nerves from head to toe. Muscles like to be stretched, but nerves do not.
- Plant both your feet on the floor. Avoid crossing your legs or leaning to one side.
And there you have it! That’s how to sit with sciatica pain.
While you are in this sitting position, you also need to focus on general body alignment. This means keeping your shoulders in alignment over your hips and your head in alignment with your neck and spine.
In addition, your work equipment can be equally helpful when learning how to sit with sciatica. Your alignment will be easier if you have an entire ergonomic setup that includes proper computer and keyboard placement and arm positioning.
Beyond how to sit with sciatica: release muscle tightness for long term sciatica pain relief
Learning to sit with sciatica is only one piece of the puzzle when it comes to managing your sciatic nerve pain. Building in other healthy daily activities and habits to manage and mitigate pain is the key to long-term sciatica pain relief.
Here are three tips to relieve your chronic sciatica pain:
1. Move more
Be intentional about the amount of movement you have in your day. This does not have to be time-consuming, but you should try to change positions every 15-30 minutes. Such frequent movement can be hard to remember, so you may need to set a timer.
Movement during your workday can be as simple as changing from sitting to standing at your desk or even taking a short walk. Walking is a very effective way to wake up your iliopsoas muscles. It also increases your blood flow which means better nutritive fluids to your spinal discs.
2. Stretch
Movement during the day can also include some light and gentle stretching. I want to emphasize that this should be very gentle stretching.
The reason being is that when you are sitting and the iliopsoas muscles are in the shortened position, you can do more harm than good by aggressively stretching them when they are not ready.
Light stretching in between changing positions, or even some additional stretching after your short walk, is ideal because your muscles are more warmed up.
3. Release muscle tightness
I saved the best for last. Since knowing how to sit with sciatica pain isn’t enough to prevent pain from occurring throughout your day, you need to treat the core cause of that pain head on. To do this, you need a way to release your iliopsoas muscle tightness.
Unless you have someone else to help you perform a pressure release of the iliacus and psoas muscles, you are not going to be able to properly release the muscles. So, in order to build this into your schedule, you’ll need to use a specialized muscle release tool like the Hip Hook.
I designed the Hip Hook and the Hip Release Ball specifically to treat the all too common issue of tight iliopsoas muscles, and all the havoc they create on the body.
With a little time, and dedication to a healthy routine, using the Hip Hook to release the iliacus muscle daily can lead to less pain when sitting.
With sciatica pain in particular, I recommend using the Hip Release Ball along with using the Hip Hook. This is because you can also release the piriformis muscle on the back of your hip, which is essential in sciatica pain relief.
When the front of your hip is released, but not the back, your muscles will tighten up much faster again. So, invest time on both sides of your hips to balance out the muscle release and lessen your sciatica pain when sitting in no time.
In fact, you might find yourself saying: “What sciatica pain?”
Because by learning how to sit with sciatica, and implementing some simple stretching and muscle relief techniques, your sciatic pain may soon be a thing of the past.

Frequently asked questions about sitting with sciatica
Does walking help sciatica pain?
Walking can help relieve some of the pain associated with sciatica, however it doesn’t address the root cause. Releasing muscle tension in the piriformis and iliopsoas muscles before walking will triple your rewards.
What should I avoid if I have sciatica pain?
High impact athletic activities or any specific movements that cause your sciatica pain to flare up should be avoided – but be mindful not to remove exercise or movement altogether. Focus on a combination of muscle release and stretching in place of high-impact activities.
Hypermobility and Ehlers-Danlos Syndrome Treatment
Did you know that too much flexibility can be a bad thing?
Extra-flexible joints are often celebrated and flexibility is a quality that many people strive toward. But if your joints and hip flexors are too flexible and are regularly being overstretched, it can create lasting issues and chronic tightness in your body.
Hypermobility is more common than most people think.
It’s not a trait reserved only for double-jointed people, gymnasts, and professional athletes. In fact, many people with hypermobile joints don’t even realize it because we may not really understand what a normal or healthy range of motion looks like.
So, let’s take a look at what hypermobility syndrome, now known as hypermobility spectrum syndrome, really is, who it affects the most, and what natural treatment options are available.
What is hypermobility syndrome?
Hypermobility spectrum syndrome has had many names, including “benign joint hypermobility syndrome.” Whichever name you’ve heard before, it refers to the same condition: over-flexible or extra-flexible joints.
While you may associate joint issues to an older demographic, hypermobility largely affects children and adolescents.
In fact, it is estimated that anywhere from 10-15% of healthy children will have hypermobile joints.
In hypermobility syndrome, joints easily move beyond their normal range of motion. These joints will appear “loose,” and children experiencing hypermobility may be seen as “double-jointed.” It can happen in any of your joints. But I am particularly interested in how hypermobility impacts your hip alignment and your iliopsoas muscles, which run from your pelvic bone to your thigh bone.
For many young people who have hyperflexibility, they will grow out of it as they enter adulthood.
However, if they continue to overstretch and overwork their hip muscles and joints – or are experiencing hypermobility as a result of a more severe condition, they may need to seek out professional treatment and intervention in order to prevent hip flexor pain and tightness.
Treatments for hypermobile joints are tailored to the individual. They usually revolve around strengthening joint areas and relieving painful symptoms.
So, if you read the symptoms below and suspect that you or your child has hypermobility syndrome, it’s important to consult a health professional or a physical therapist to help restore healthy joint function and support proper alignment.
Types of joint hypermobility syndromes
Three causes of joint pain and hyperflexible joints are:
1. Ehlers-Danlos syndrome
Ehlers-Danlos syndrome (EDS) is a group of inherited disorders that directly affect connective tissues, joints, skin, and blood vessels.
Ehlers-Danlos syndrome is a very rare condition with around 20,000 diagnoses or less per year and determining whether or not a child has Ehlers-Danlos syndrome requires medical testing. It is often discovered after seeing symptoms like joints that dislocate, over-flexibility, or elastic skin that bruises easily.
Since there are various classifications of Ehlers-Danlos syndrome, not everyone will experience the same symptoms. However, having an unusually large range of joint mobility is one of the most common signifiers. This mobility can be tested with the Beighton score.
Because of excess joint flexibility, dislocation, hip pain, and hip dysplasia can be more common. Infants with Ehlers-Danlos syndrome may even be born with both their hips dislocated.
Ehlers-Danlos hip pain and hip dysplasia
Depending on the severity of their medical condition, children with Ehlers-Danlos may experience frequent dislocation and hip dysplasia.
These frequent dislocations can injure or tear the labrum cartilage. If someone with Ehlers-Danlos syndrome has hip pain, it could be from such a tear. This hip pain will manifest in the front of the hip, and be more prominent when going from sitting to standing or when turning.
Hypermobility can also be exacerbated by unbalanced iliopsoas muscles. The iliopsoas (frequently referred to as the hip flexor) is the most important group of muscles when it comes to hip mobility, functionality, and day-to-day quality of life. The iliopsoas muscle – made up of the iliacus and psoas muscles – connects our hip to our thigh, and runs up into our lower back.
Because the iliopsoas stabilizes our body at the core – and directly impacts our lower back, pelvic bone, hip joint, knees, and the surrounding areas – a tight hip flexor can wreak havoc on your entire body’s alignment. Tight iliopsoas muscles can be a reaction to hypermobility, overworking themselves in an attempt to stabilize your body. They might present as knee pain, lower back pain, hip pain, or the sensation of tightness in the hips and pelvis.
2. Marfan syndrome
Marfan syndrome is a genetic condition that directly affects the body’s connective tissue. Physically, Marfan syndrome is somewhat more recognizable because most people living with this medical condition are tall and thin, with long limbs and scoliosis symptoms. They also typically have unusually flexible joints.
Because the condition is caused by an imbalance of proteins that help develop connective tissues, Marfan syndrome most commonly impacts the heart, blood vessels, bones, joints, and eyes. Other than spinal and heart conditions occurring, Marfan syndrome can cause musculoskeletal abnormalities.
Some of the earliest signs of Marfan syndrome, though, are problems with bones and joints. These skeletal features of Marfan syndrome usually result in long bones and loose, stretchy ligaments – making the joint connections act like overused rubber bands.
The looseness of the joints combined with the body’s natural dependence on the hip joint for support in many daily activities, can lead to Marfan syndrome hip dysplasia.
3. Down syndrome
Down syndrome is one of the most common genetic disorders. The CDC has estimated that 1 in every 700 babies fall somewhere on the spectrum of having Down’s syndrome. And while it is quite common, medical problems and developmental delays vary from child to child.
Due to growth delays caused by the disorder, children with Down’s syndrome often experience issues when it comes to the development of their bones and joints. If parents and doctors can catch these musculoskeletal issues early on in a child’s development, it can drastically decrease the likelihood of joint problems later in life.
Children with joint mobility problems from Down syndrome often experience joint instability. As infants, they may struggle to support their head and neck. As they age and begin to walk, knee and hip joint instability become more of an issue. Joint dislocation in these areas may also be frequent.
6 hypermobility syndrome symptoms
With such varying degrees of joint hypermobility, and severity of medical conditions that cause hypermobility syndrome, not everyone will experience the same symptoms. Symptoms are most obvious during physical activity – but they can even occur while resting.
1. Muscle pain or weakness
Whenever there is a weakness or extra flexibility within a joint, the surrounding muscles must work harder to maintain support. For your hip joint, these muscles are the iliacus and psoas muscles. One main function of these muscles is to provide stability. So, if there is instability in the joint, the iliopsoas muscles will tighten and overcompensate to help establish equilibrium. However, that tightening in one area of your body – or just on one side – can cause your muscles to unnaturally pull on another part of your body.
For example, I often work with individuals who have a slight tipping of the pelvis, or an unnatural curvature in their lower back. Naturally, they are often complaining about back pain. But we often find that the culprit was a tight iliopsoas muscle that has refused to loosen its grip on the upper part of the pelvic bone.
It’s important to know that muscle strain can often feel like the pain is stemming from the joint or bone. However, the pain is often your iliopsoas muscles making themselves known because they are fatigued, torn, too tight, or sprained.
2. Joint pain
Joint pain usually occurs in the ankles, knees, and hips, generally after activity and at night while resting. Since most school sports, recess games, and daily activities involve being on our feet, and our pelvis and core must constantly work to stabilize us, our lower extremity joints take the brunt of the work each day. Certain movements may cause joint pain immediately, whereas other times the activities cause swelling and discomfort after the activity has ended.
3. Joint stiffness
When a joint is overstretched or experiences a small amount of damage, our body works to heal and protect the area. In many cases, inflammation and fluid collects within the joint to protect it and your muscles may work harder to protect it. In this example, inflammation is your body’s natural response to trauma and will heal over time. But when those joints haven’t fully recovered or you can’t get a proper release in your muscles, it can become a chronic issue.
4. Injured or dislocated joints
Being “double-jointed” or being able to dislocate joints easily are tell-tale signs that a person has hypermobility syndrome. With frequent joint dislocation comes a high likelihood of injury. The most common joints to be dislocated are the knees and shoulders, but it is possible for young children – and even adults – to dislocate their hips as well.
When a joint is dislocated, the connective tissues surrounding the joint can be damaged. Ligaments, tendons, and even cartilage can tear, especially if a dislocation occurs forcefully or often. If left untreated, torn cartilage, ligaments, and tendons can lead to more serious injuries or medical issues. For example, injured cartilage can lead to chronic pain in hypermobility syndrome.
5. Low blood pressure
An unlikely symptom of hypermobility syndrome is low blood pressure. Because of soft or weak muscles, blood can’t circulate properly. This can lead to other symptoms like fainting or lightheadedness, especially when going from sitting to standing.
6. Reduced fitness level
With chronic pain, muscle weakness, and joint stiffness, a reduced desire to exercise is common. A reduced fitness level is usually a result of discomfort.
This can lead to a domino effect of other issues like obesity, depression, and loss of muscle tone. With less muscle tone, posture and joint stability also decrease. As posture worsens, back pain, difficulty balancing, and headaches can become more prevalent.
This is why keeping the muscles strong and your joints stable is important if you are prone to hypermobility or are undergoing Ehlers-Danlos syndrome treatment. The muscles need to hold the joints and bones in their correct placement since the connective tissues cannot.
Hypermobility and Ehlers-Danlos syndrome treatment
Knowing how to treat hypermobility syndrome varies from case to case. Since there are many causes, treating hypermobility syndrome symptoms and pain is usually the first step. As symptoms ease, and hypermobility syndrome pain relief is discovered, more targeted treatments can then be introduced.
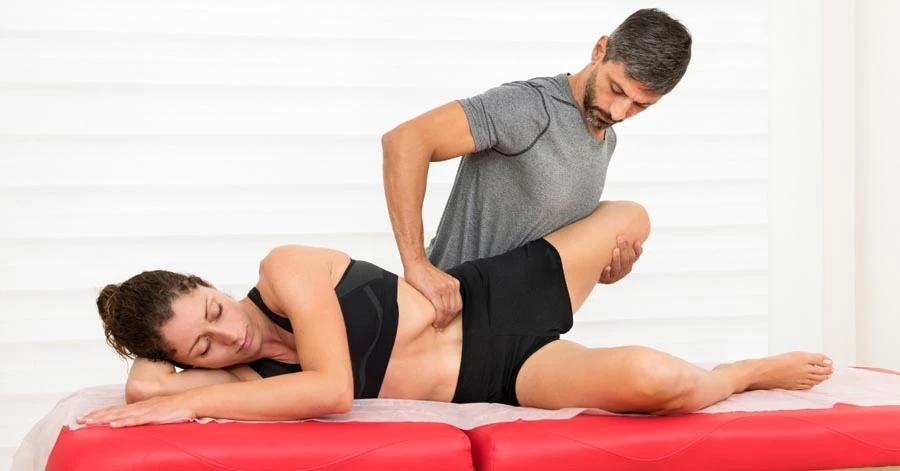
Physical therapy
Physical therapy is often used as a hypermobility and Ehlers-Danlos syndrome treatment. It is a successful treatment for hyper-flexibility because the muscle groups surrounding problem joints can be released, balanced, and then strengthened to better support your joints.
If a patient is using physical therapy to treat hip pain from hypermobility syndrome, a full release of the iliopsoas muscles is crucial. Of your two iliopsoas muscles, your iliacus is much more difficult to reach. It’s hidden in your abdomen and requires a special angle of applied pressure in order to release. And, because of it’s difficult location – and tendency to overcompensate when hip joint or hypermobility issues arise – it is often the cause of hip flexor pain.
The iliacus and psoas muscles can be thought of as being a rubber band holding a stack of cards together. The spine, pelvis, and hip all need to be lined up properly and held into place with some – but not too much – flexibility. When there is hypermobility present, such as with Ehlers-Danlos syndrome, it can hinder your muscles’ ability to maintain this balance in your body.
A skilled therapist will be able to locate the internal point of the iliacus muscle where it connects to the top of your pelvic bone and apply pressure at the correct angle to give you almost immediate release. And, when you are at home, you can recreate the therapist’s technique with the Hip Hook, a tool made specifically to release your iliacus muscle by applying direct prolonged pressure created by your own body weight.
Exercise and strength training
Many patients that have hypermobile joints experience joint pain, so they stop doing physical activity. However, this is counterproductive, as a lack of activity can weaken important joint supporting muscles and can also cause weight gain.
Excess weight gain often leads to unnecessary and avoidable stress on the joints themselves. As such, strength training to lose weight and increase joint stability is essential in Ehlers-Danlos syndrome treatment.
Surgery
While surgery should not be the go-to treatment, it is an increasingly common necessity in Ehlers-Danlos syndrome treatment due to damaged joints. Many patients that experience chronic pain with hypermobility syndrome end up needing surgery to reconstruct joint tissues like cartilage and tendons.
Hypermobility syndrome pain relief
Managing hypermobility syndrome will be different for everyone, and may change with age. However, finding pain relief is the most important.
If you are looking for effective hypermobility pain relief or Ehlers-Danlos syndrome treatment from home, the Hip Hook is the most targeted hip flexor release tool available. The unique and specific design provides deep pressure relief within the hip’s iliopsoas muscles. It has been developed and tested by a certified physical therapist and effectively resolves hip pain caused by a tight hip and twisted core – without needing to visit a practitioner each time for relief.
FAQs about hypermobility
Why can hypermobility be a problem?
Hypermobile joints are susceptible to frequent dislocation, which can cause injury or to the labrum cartilage, resulting in pain. The muscles surrounding hypermobile joints can become tight from overworking to stabilize the loose joint.
Should I stretch if I’m hypermobile?
If you are hypermobile, the muscles and joints in your body are already very flexible. Continuously stretching can lead to over-stretching, which makes your joints less stable. The surrounding muscles may respond by holding tension in an effort to protect the body and create stability. While some stretching can still remain a part of your routine, you may experience more benefits in how your muscles and joints feel by adding in more strengthening and muscle release.

Best Ways to Sit and Sleep with SI Joint Pain
Sacroiliac joint pain (or simply SI joint pain) can make some of our simplest daily activities much harder and far less comfortable than we want them to be. Because we sit for nearly half the day and sleep for another third (that’s about 20 hours of your day!), we’re going to help by sharing some of our favorite tips for the best ways to sit and sleep when you are experiencing SI joint pain.
What does SI joint pain when sitting or sleeping feel like?
SI joint pain when sitting or sleeping can present itself in several ways. Perhaps the most common symptom is a constant dull, aching pain felt in the lower back and upper buttocks region on the back side of the pelvis. This discomfort is typically felt more on one side of your back, between where your sacrum and ilium bones meet and together form the sacroiliac joint.
Some may also experience more of a sharp, stabbing pain within the SI joint that can be brought about by sudden movements while sitting or moving around in your bed. Motions such as getting up or turning over too quickly, or side bending or twisting towards the affected side may irritate and compress the joint space to cause this increase in pain.
Additionally, it is possible to feel sacroiliac joint pain refer sensations to other areas of the body. Pain may radiate down into the hips, groin, and back side of the upper thigh. Other ways to describe the pain caused by an unhappy SI joint include tightness, stiffness, burning, tingling, numbness, or weakness felt on the affected side.
Tips for SI joint pain relief when sitting
Here are 6 tips to help you get some relief for SI joint pain while sitting. Feel free to apply these suggestions in different sitting situations (e.g. driving, working at your desk, watching TV from the couch, etc.) to find out what works best for you.
1. Relax your hip flexors before sitting for SI joint pain relief
Tight hip flexors pull on the SI joint, pelvis, and lower back where it can cause irritation. Sitting engages the hip flexor muscles to help support you in an upright posture; however, asking an already tight muscle to perform more work may make it unhappy and become more painful.
Applying pressure to those tight muscles using a hip flexor release tool and performing a gentle hip flexor stretch can be the perfect combination to release some tension and reduce the tug on the sacroiliac joints when sitting.
The piriformis is another muscle that may pull on the SI joint and cause discomfort. Using a massage therapy ball to apply pressure followed by the Figure 4 stretch is a great pair of exercises to target this muscle and provide relief.
2. Maintain an upright and balanced sitting posture for SI joint pain relief
Being in good posture supports your body in its natural alignment. Here are a few cues to help:
- Think about reaching the crown of your head up towards the ceiling and feel the muscles in your core, hips, and lower back region gently engage to help position your pelvis in a neutral position. Do your best to avoid excessively arching or rounding your spine.
- Allow your breath to gently lift the center of your chest, as though there is an invisible string attached to the center of your breastbone, connected to the sky.
- Stay balanced side to side, distributing your body weight evenly across your sit bones. Try to avoid leaning to one side, sitting with your wallet or phone in one of your back pants pockets, or crossing one leg over the other (unless you are doing a quick piriformis stretch). Each of these may place uneven pressure on the SI joints and cause discomfort.
3. Support your pelvis for SI joint pain relief
Using a lumbar pillow or a seat with built-in lumbar support can help align your pelvis and SI joints, helping to reduce pressure and relieve pain. Other options include wearing a SI brace or using kinesiotape to help stabilize the sacroiliac joints and help them heal. Each of these can be useful tools to help you manage your symptoms and get through a painful period, but are not ultimately addressing the root cause of pain.
4. Open the angle of your hips for SI joint pain relief
Sitting places the hips into more of a “closed” and shortened position, where the hip flexor muscles are more likely to become tight. Having your knees lower than your hips “opens” the angle of your hips, creating more length in the hip flexors. This lets them relax further and reduces the strain felt on the SI joints.
You can achieve this by raising the seat of your adjustable office chair, sitting on a cushion, or even tucking your feet underneath your chair (which can also serve as a nice quad stretch). You may also consider trying widening the position of your knees to open your hips into more external rotation to see if that helps.
5. Try sitting cross-legged for SI joint pain relief
Sitting in the tailor position may help open up your hips and provide some relief from SI joint pain while sitting. Starting on the floor, your bed, or even while seated on your couch, cross your legs together near the ankles. Have your heels as close to your body as is comfortable, while also making sure that the weight of your body is on your sit bones. Focus on relaxing and taking deep breaths.
Once you’ve settled into this position, try grabbing the front of your knees (or your shins) with your hands and gently pull your torso forward and upward to create a stretch in the lower back and hips. Think about spreading the knees apart from each other and bringing them closer to the ground to increase the stretch in the hips.
If this position is either too challenging to maintain or uncomfortable to get into, you may modify your positioning by sitting on top of a small cushion. This will allow your knees to be lower than your hips, opening up your hip angle and making the stretch easier to perform.
6. Take frequent breaks when sitting for SI joint pain relief
Sitting for longer periods of time without moving requires the hip flexors to work harder. When these muscles don’t get the chance to relax or recover as you repeat this pattern day after day, they become fatigued and tighten up where they may pull on the SI joints, causing pain.
Consider getting up from your desk about every 30 minutes to move around. Go for a quick lap around the office or do a few stretches to help get some blood flowing into the muscles and give the hip flexors a break from being in a shortened position for so long.
If you have access to a standing desk, switching between standing and sitting throughout the day could be helpful too. If a standing desk isn’t an option for you, alternating between sitting and a half-kneeling position could be great (plus you can stretch your hip flexors in this position while you work!).
Tips for SI joint pain relief when sleeping
Here are 4 tips to help you get some relief for SI joint pain while sleeping. Try these out so you can finally catch some Zzzzz’s and wake up the next morning feeling refreshed and ready to go.
1. Relax your hip flexors before sleeping for SI joint pain relief
Tight hip flexors can contribute to sacroiliac joint pain and other kinds of hip pain when sleeping. Establishing a pre-bed nighttime routine to help these muscles relax can make a huge difference between getting a good night’s sleep or tossing and turning with discomfort.
This routine may include a combination of muscle release techniques, stretches, and corrective exercises that are focused on relaxing tight and unhappy muscles while also improving the alignment of your pelvis and SI joints. Here is our favorite 3-step routine for SI joint pain relief that you can perform before getting to sleep tonight. It should only take you 10 minutes or less!
2. SI joint pain relief for stomach sleepers
Sleeping on your stomach tends to place most people into an over-extended position (or having too much arch) in their lower back and pelvis, which places added compression to the spine and the sacroiliac joints. You can adjust for this by placing a small pillow near the bottom of your abdominals and top of your pelvis. Doing so helps situate your spine and pelvis in more of a neutral position, thereby reducing the compression and strain felt in the SI joints.
3. SI joint pain relief for side sleepers
Sleeping on your side typically places more pressure on the bottom hip, so you may find relief by sleeping with the painful side facing up. As a painful SI joint may also refer pain into the groin area (even with the painful side facing up), you can try using a pillow and place it between your knees and ankles. Here is a video showing how this can help to open up the angle of your hip joints and set your pelvis into a better position, relieving some of your sacroiliac joint pain while sleeping.
4. SI joint pain relief for back sleepers
If your hip flexors are tight (which is common among people with SI joint pain), this may put your lower back and pelvis into an anteriorly tilted position. Again, this puts extra pressure on the joints in the lumbar spine and also the sacroiliac joints that can increase your pain. Placing a pillow underneath your hamstrings (where the top of the pillow is beneath your sit bones) can help to posteriorly tilt your pelvis back towards a neutral position and relieve some pressure on the SI joints.
Improving your SI joint pain long-term
Adjusting your sitting position and sleeping position can provide immediate short-term relief. Regularly releasing the hip flexor muscles Achieving longer-lasting improvement will require you to address the actual root cause of your SI joint pain.
Chances are that your sacroiliac joint pain has something to do with misalignment and instability of your pelvis. This can create either too much or too little motion in the SI joint (both of which may result in pain), and is commonly referred to as having a hypermobile or hypomobile SI joint.
When the supporting muscles and ligaments around the pelvis are strong, supple, and balanced they are able to hold the pelvis in its natural position (called a neutral pelvis). This allows for the sacroiliac joints to move and function as they are supposed to, pain-free.
Is the iliacus muscle a potential source of your SI joint pain when sitting?
While there are over 40 muscles that surround the SI joints alone, an often overlooked muscle as it relates to the alignment of the pelvis and SI joints is the iliacus. The iliacus, one of your hip flexor muscles, originates at the ala of the sacrum (upper corner of the sacrum), connects to the anterior sacroiliac ligament, and lines the iliac fossa (the inside surface of the ilium) as it passes over the hip joint and inserts into the lesser trochanter of the femur in the groin region.

By understanding the anatomy of the iliacus, you may begin to see how tightness in this muscle would rotate the ilium forward and pull the pelvis into an anteriorly tilted position. This changes the alignment between the ilium and the sacrum, affects the ability of the sacroiliac joint to move and absorb force, and ultimately leads to pain and inflammation over time.
Using the Hip Hook for SI joint pain
Our favorite iliacus release tool that we’d recommend trying out is called the Hip Hook. Designed by a physical therapist, the Hip Hook has the ability to apply precise, angular pressure to this hard-to-reach muscle on the inside surface of your pelvis in a similar way that only a skilled practitioner could perform on your body. In just a few minutes per day, you can begin releasing tension in this muscle and help realign your pelvis, thereby reducing the strain on your sacroiliac joints.

Frequently asked questions on SI joint pain
How do you sit with SI joint pain?
Your hips and lower back should be relaxed and supported in a neutral position, such as with a lumbar support. Sitting with the hips higher than the knees can also be helpful to relax your hip flexor muscles, which may be pulling on your SI joint and creating pain in your lower back if you sit for extended periods.
Is sitting bad for SI joint pain?
Sitting for extended periods of time may cause your SI joint pain to flare up because it places your hip flexors in a shortened position and pulls on the SI joint. To help reduce your pain, it might be helpful to take frequent breaks to walk around and stretch to help the tighter muscles in the area to calm down and loosen up.
What is the best sleeping position for SI joint pain?
Using pillows to support your hips and pelvis in a better alignment can reduce your SI joint pain when lying down. For stomach sleepers, place a pillow underneath the lower abdomen. For side sleepers, have a pillow lengthwise between your knees and ankles. For back sleepers, have a pillow under your upper hamstrings. For longterm relief, release your hip flexors (psoas and iliacus) to alleviate tension on this joint.
What aggravates SI joint pain?
There are many muscles around the SI joint that can become tight and pull it out of alignment, such as the hip flexors, piriformis, and quadratus lumborum muscles. When these muscles are holding tension, it is more challenging to sit or stand for long periods of time. SI joint pain may also be aggravated by going from sitting to standing too quickly or twisting, bending, or laying on the affected side.
How do you prevent SI joint pain when sitting?
To prevent SI joint pain when sitting, it is important to teach your tight muscles to relax. Before sitting, consider doing some gentle stretching for your hip flexors (psoas AND iliacus), glutes, and lower back muscles. There may also be some muscle knots in these areas that need to be released with direct pressure with the help of specialized muscle release tools or a skillful practitioner.
Tight lower back? It could be a psoas trigger point
If you’ve experienced lower back pain or tightness, you know how limiting it can be physically (and mentally) in your daily life. You’re not alone — it’s estimated that lower back issues may affect up to 80% of people during their lifetime, and this can happen across all ages.
For some, their lower back pain can resolve pretty quickly with some self-myofascial release, stretching, or massage. For others who aren’t as fortunate, where their lower back has become chronically tight and painful, those methods may only provide temporary relief.
If the pain and tightness you’re feeling in your lower back continues to return, it’s an indication that you have not yet addressed the true root cause of the issue. You have simply been managing symptoms caused by a larger issue hidden from your view.
If you’ve been massaging and stretching your back, but the pain remains, then it’s time for a new angle. It’s time to address your pain head-on with a solution that actually solves your pain puzzle.
It’s all about a core muscle with a silent p — the psoas (pronounced SO-as).
Anatomy and function of the psoas muscle
The psoas major (or simply “psoas” for short) connects to the T12 – L5 vertebrae in your spine and travels through the pelvis, where it then crosses the front of the hip joint and inserts at the lesser trochanter of the femur near the inside of the groin. At this insertion point, the psoas is one of two muscles, along with the iliacus, that come together and create what is known as the iliopsoas tendon.
The iliopsoas muscles are your main hip flexors and help to provide support and stability for your lumbo-pelvic hip complex (which consists of the lumbar spine, pelvis, and hips). They connect the upper and lower halves of your body together at your “core” and are used in nearly everything that you do on a daily basis, including:
- Helping create the motion of hip flexion, which is used when walking or running (and using higher steps, as in marching)
- Providing postural support for the lower back and pelvis when sitting or standing
- Stabilizing the lumbo-pelvic hip complex to prevent injury and perform at your best while working out, playing sports, picking up your kids, or being active
These are some pretty important jobs that your psoai (plural of psoas) perform!
As you can imagine, these tasks require your hip flexors to be working constantly and they rarely get the chance to relax. Because of this, it’s easy to overexert your psoas muscles. When life’s demands consistently exceed their ability to fully recover, they become tired, tighter, and weaker — this is the perfect recipe for trigger points to develop in your psoas and cause pain.

What are psoas trigger points?
A psoas trigger point is a contracted area within the muscle or fascial tissue of your psoas that likes to stay tight and doesn’t seem to ever let go. Sometimes referred to as “muscle knots,” these trigger points can be the cause of your pain, tightness, and range of motion restrictions felt in your body.
Common symptoms of psoas trigger points
Trigger points can develop anywhere along the entire length of the psoas muscle. Common symptoms of psoas trigger points include both localized and referred pain patterns.
- Localized pain — felt in the immediate area surrounding the muscle knot.
- Referred pain — felt elsewhere in the body.
This concept of referred pain is exactly what may be contributing to your lower back pain!
Localized pain from psoas trigger points
Localized pain from psoas trigger points is typically felt deeper in the core (anywhere between the belly button and the anterior superior iliac spine, or ASIS, of the pelvis), at the front of the hip, and the inside of the groin.
Referred pain from psoas trigger points
Referred pain from psoas trigger points is commonly felt in the lower back muscles, like the spinal erectors and quadratus lumborum (QL).
Since the psoas connects to the transverse processes of the T12 – L5 vertebrae, these pain referral patterns can be confused for issues with the discs or joints of the lumbar spine.
Additionally, you may find that pressing on the part of the iliopsoas higher up towards your waist (the iliacus) refers pain down into the upper thigh and quadriceps muscles. This could be an indication that you also have trigger points in your iliacus muscle that need to be addressed.
Other possible indicators of psoas trigger points
Aside from the localized and referred pain patterns we just discussed, there are other common signs and symptoms that you should be mindful of that may indicate you are holding tension or have trigger points in your psoas muscles.
A tight psoas inhibits your ability to fully engage the glute and hamstring muscles to extend your hip. This may result in pain or discomfort when performing this motion, such as pushing off with each step when walking or running, when going from seated to standing, and even when standing for longer periods of time.
Causes of psoas trigger points
Common causes of psoas trigger points include:
Sitting too long can create psoas trigger points
Spending a lot of time with the hips flexed, such as when sitting at your desk, lounging on your couch, driving your car, sleeping in the fetal position, etc. places your psoas muscles into a shortened position. Over time, these muscles begin to develop a “muscle memory” for this shortened position, become tighter, and have difficulty lengthening. This is the perfect environment for trigger points to form.
Workouts without hip flexor recovery
Excessive use of the hip flexors without adequate recovery — lots of running, biking, hiking, kicking, climbing up stairs, and even sitting — require the psoas muscle to be engaging constantly for extended periods of time. This can fatigue your muscles, make them weaker, and cause them to hold tension.
Weak hip flexors
Weakness in the hip flexors may lead to the development of trigger points in the iliopsoas. Different activities, such as lifting with good technique, running a marathon, or even simply sitting in good posture, require a certain amount of strength and endurance to perform optimally.
Relative to the task at hand, when the required demand for a muscle to be used exceeds the capability of your muscles to perform, compensations may occur and cause the psoas to hold tension in an effort to protect the body.
Hypermobile joints
People who have hypermobile joints are more prone to the development of trigger points in their iliopsoas than you might think. While they may be able to stretch their bodies into an extended position, this can actually be too much range of motion coming from the hips and/or lower back where it makes the body feel unstable. The psoas muscles may then kick into overdrive and hold tension in an attempt to create stability and prevent injury from being overly flexible.
For example, someone may be getting super deep into their yoga poses, moving their joints beyond the “normal” range of motion that it was designed to do. Another example is women during pregnancy, where the joints and ligaments in the pelvis become more lax to create space for the baby moving through the birth canal. In both these cases, the degree of flexibility creates instability, causing the iliopsoas muscles to tighten in response.
What is the best way to release iliopsoas trigger points?
When it comes to releasing trigger points, there are typically 3 main ways that people try to help relieve their pain: by stretching, massaging, or applying pressure on their muscles.
Stretches for psoas trigger points
While hip flexor stretching plays an important role in the recovery process, alone it is likely not enough to get rid of your iliopsoas trigger points. Stretching, or generally overusing a muscle that has a trigger point, also carries the potential to increase referral pain through activation.
Stretching a muscle makes it longer by moving the body in a certain way that causes it to lengthen. For example, the lunge stretch can support the reduction of tightness in the stretched psoas and iliacus muscles by bringing some blood flow into the area to warm it up and help increase its flexibility.
When trigger points are present, stretching typically provides only temporary relief. This is because the muscle is still holding some tension, even though you are lengthening it with a stretch. You’ll stretch, then move around, but the tightness returns because the knot is still present.
It should also be noted that over-stretching a muscle that has trigger points could actually make the pain and tightness worse. Don’t force your body to stretch into a position that it isn’t capable of getting into.
Instead, be more gentle and ease yourself into your stretches and focus on taking slow and controlled breaths. This can help calm the nervous system and make the brain feel safe letting the muscles lengthen and move deeper into the stretch.
Self massage for psoas trigger points
Massaging a muscle involves rubbing and moving it in different ways. However, trigger points don’t respond well to these techniques. In fact, rubbing or rolling a foam roller over trigger points can just make them angry and irritated. Trigger points require direct and prolonged pressure to the muscle knot for it to fully release.
Massaging a muscle does come with the possibility of increasing your pain. This happens when a latent trigger point exists in the muscle, where rubbing on it activates the trigger point and makes your symptoms worse. If this happens, don’t panic. Just shift your technique to steady, direct pressure.
Prolonged pressure release for psoas trigger points
Applying prolonged pressure to a muscle is different than getting a massage, rolling on a foam roller, or performing a stretch. Trigger point release techniques involve finding the sensitive and contracted area of muscle tissue and pressing directly on it, or very close to it, for an extended period of time (at least 90 seconds).
At first, this pressure on the trigger point may be uncomfortable and even result in a slight increase in pain, including referred pain to other areas of the body. This is completely normal and okay…just keep breathing and try to relax.
Continue to apply pressure to the trigger point, taking deep breaths, and making sure it is more of a “hurts so good” kind of feeling. As 30…60…90 seconds pass by, the localized and referred pain that you may have been feeling may begin to dissipate. The brain sends signals to the muscle to release, where it can return to a more softened and relaxed state.
Be smart about using this technique. Like the other methods already discussed above, doing too much, not enough, or forcing more than what your body will tolerate can cause an increase in pain. Ease yourself into it by starting off with gentle pressure and then slowly increasing the intensity over time.
Can I release my own iliopsoas trigger points?
Yes, you can release most of your own iliopsoas trigger points by yourself. Remember that trigger points and muscle knots can exist in the muscle fibers anywhere along this muscle (not just the places with the Xs), so it takes some trial and error to find the best spots on your body. There are common iliopsoas trigger point locations that may develop in people, which are depicted in the image below.

I’m going to focus specifically on the places that you can safely access and release.
Iliacus Trigger Point
This trigger point lies primarily in the iliacus muscle. In the diagram above, it’s the furthest out on the pelvic bone. Because of its location on the inside surface of the pelvic bone (or ilium), it requires a certain angle to access this spot. A trained professional, such as a physical therapist or massage therapist, should be able to access and release this muscle for you while you’re lying on your back and fully relaxed.
To release this by yourself, it is best to use an iliacus release tool that is designed specifically for this area of the body. You can try using a massage therapy ball to see if that provides any benefit for you, but its rounded shape won’t be able to achieve the angle and precision needed for the most effective release.

Psoas Trigger Point
This trigger point lies within the muscle tissue where both the psoas and iliacus come together in the pelvic region, forming the iliopsoas.
The “X” seen in this picture is located near the hip crease. Since this area is much closer to the surface of the body and not within the pelvis, you may be able to access this area yourself using a massage therapy ball.
Be mindful that there are more nerves and blood vessels that run through this area, so if you feel any throbbing or tingling when applying pressure to this area, simply move your tool a little higher along the muscle and above the hip crease area.
Using a massage therapy ball for the iliopsoas
As you experiment with finding your iliopsoas trigger points, and move higher up along the muscles, it begins to run deeper within the pelvis. At this point, that same massage therapy ball (or lacrosse ball) that could access the lowest trigger point in the hip crease area likely won’t do the trick anymore because it can no longer reach this muscle to apply enough pressure. As with the previous trigger point, an iliopsoas release tool can help you reach these higher spots to release it yourself.
Pressing here with a specifically designed iliacus release tool can be close enough to the trigger point to where the brain sends signals for the muscle to release its tension being held in that spot. Plus, there’s the added benefit of hitting the psoas and iliacus muscles at the same time!
A tight psoas and tight iliacus affects the whole body
If you have been troubled by tightness in your hip flexors and want to learn more, I encourage you to read my book “Tight Hip, Twisted Core – The Key to Unresolved Pain.” I’ll share with you my knowledge of the body and clinical examples from my experience as a physical therapist for more than 20 years.
Frequently asked questions about psoas trigger points
How do you release the psoas muscle?
To release the psoas, apply prolonged pressure to the muscle (at least 30 to 90 seconds). Because the psoas muscle is located deeper within the core, it may require the help of a skilled therapist or use of a psoas release tool like a Hip Hook to effectively release it.
What happens when your psoas muscle is tight?
When the psoas muscle is tight, it affects the alignment of the lumbar spine, pelvis, and hips. If the psoas muscles on both sides of the body are tight, they can pull the spine and pelvis into an anterior (or lordotic) position. When one psoas is tighter than the other, it can cause a twisting of the spine and pelvis to where a functional scoliosis and functional leg length discrepancy may be observed.
Where do you feel psoas pain?
Psoas pain may be felt deeper within the core: in the lower back muscles that line the lumbar spine, at the front of the hip, and/or in the groin or upper thigh. This can be caused by tightness or even the presence of psoas trigger points within the psoas muscle.
What causes psoas trigger points to develop?
Psoas trigger points typically develop as the result of the psoas muscle being held constantly in a shortened position, such as when sitting down or sleeping in the fetal position. They can also develop from consistently overusing the psoas muscle (during activities such as running or cycling) and not having an adequate recovery.

How to Sleep Better with Sciatica Pain
If you have sciatica pain, you know it can have a lot of impact on your day-to-day quality of life. It can be chronic throughout the day, and it’s fairly common for it to worsen at night. That’s why it’s important to learn how to sleep with sciatica and pick up some healthy habits that will help you get a good night’s rest.
If you’re reading this, then you’re already looking for answers. And, while I can’t promise your sciatica will completely go away, there are a few recommendations that will at least reduce the pain.
Depending on how severe your discomfort, these tips and tricks may have a profound effect on your sleep quality. But first, we want to make sure that sciatica is truly the culprit for your hip pain while sleeping.
Is sciatica the cause of your hip pain at night?
Sciatica pain is a nerve-related condition that a large percentage of adults experience at some point in their lives. It can cause nerve pain extending through the glutes, legs, shins, and feet.
While there are a few probable causes of sciatica pain, one tight and overlooked muscle group that often contributes to sciatica pain is the iliopsoas muscles (also known as the hip flexors).
The iliopsoas is made up of two muscles, the iliacus and the psoas. When these muscles are tight, the lower back goes into rotation, side-bending, and extension. This misalignment causes the piriformis muscle to tighten in the center of your glute (where the sciatica nerve passes through). As this muscle tightens, it can pinch the sciatic nerve and even cause sacroiliac joint pain.
Many times, when people experience sciatica pain, they try to treat the source or the area of the pain. While this is not a bad tactic, and it can reduce pain for a time, it is alway better to discover the root cause of your sciatica pain.
The root cause of sciatica pain may be tight hip flexor and piriformis muscles, which can be easily addressed! So this article will cover both immediate fixes for getting sleep tonight and ways to reduce sciatica pain long-term.
Sciatica can sometimes be confused with lower back pain, but they are much different conditions. If you’re not sure, some common symptoms for people experiencing sciatica include:
- Muscle weakness in one or both of your feet and legs.
- Numbness in one or both of your legs.
- Sharp or shooting pain that travels from your lower back all the way to your foot.
- A “pins and needles” type sensation in your legs extending down to your feet and toes.
The exact area of the pain will not be the same for all people with sciatica because it will depend on where the nerve is impacted and the direct cause of the pain.
No matter the cause, there is a commonality: sciatica can impact your sleep.
Discovering the root cause of your pain is a good long-term goal, but you still need to know how to sleep with sciatica and how to manage your symptoms.
How to sleep with sciatica pain
Many people that have sciatica find that their pain may increase when they try to go to sleep at night. This is usually because the location of the nerve that is impacted is now under more pressure when you are lying down, especially on your side. The increased pressure can irritate the nerve even more depending on the type of mattress you have – or your favorite sleeping position.
Since pain often extends beyond the specific pain or trigger point and extends down the leg, this becomes increasingly difficult.
Whatever the cause, the suggestions for getting a better night’s sleep will be the same. So, when learning how to sleep with sciatica, those are the two things you should do first.
1. Adjust your sleeping position
When learning how to sleep with sciatica, your sleeping position can impact your level of pain drastically. For instance, sleeping with sciatica becomes more difficult when your back is arched or curves more towards the mattress. This may be because you sleep on your stomach, or your mattress is too soft so your spine curves, adding pressure to the lower back and sciatica nerve.
There are many sleeping positions that can minimize hip pain when sleeping and help you learn how to sleep with sciatica pain.
If you do have sciatica pain or hip pain at night, then one of the best positions to sleep in is on your side with a pillow between your legs. Sleeping on your side with sciatica reduces the pressure put on the nerve.
Most people have sciatica pain that is isolated to one side of their body, so learning how to sleep with sciatica pain may involve sleeping with that side on top to avoid any unnecessary pressure on the nerve.
Just remember, alignment is still key!
Adding a pillow lengthwise between your knees and ankles in this position will help to put your hips in a more neutral position. The pillow will lift your knee up slightly to make it more aligned with your hip, taking some of the pull off of the hip muscles while you sleep.
Another sleep position that tends to help many people with sciatica is sleeping on your back with a pillow under your knees. While sleeping on your back may increase the pressure on your nerve, it can also help distribute some of the weight across your back.
Adding a pillow under your knees helps to relax your hip flexor muscles (which you now know may be part of the problem). You may need to put more than one pillow under your knees to get the relief you need when learning how to sleep with sciatica. Experimenting with the height of the pillow and deciding how much to bend your knees is important.
Sleeping with sciatica pain will look a little different for everyone, so trying out a few sleeping positions for hip pain may be necessary to find the one that works for you.
2. Consider a new mattress
I’ve already mentioned that the type of mattress you have can impact how to sleep with sciatica pain. The cause of your sciatica and the severity of the pain can certainly impact this, but there are some mattress types that can help minimize your pain.
As a general rule, softer surfaces cause more curvature in your spine, which adds more pressure to the nerve. Some people with sciatica pain actually choose to sleep on the floor because it keeps their spine in proper alignment.
When learning how to sleep with sciatica, you might try laying down a camping pad or a yoga mat. This generally works for most people that have severe sciatica pain.
If sleeping on the floor doesn’t seem like the ideal solution, there are other options!
Seek out a medium-firm mattress. This should help improve your spinal alignment and reduce your sciatica pain.
If you don’t want to invest in a new mattress or sleep on the floor, still another possible way to learn how to sleep with sciatica is to firm up the current mattress you have. This is easily done by slipping a piece of plywood under the mattress but on top of the box spring.
The firmness you prefer will likely be different from another person with sciatica pain, and if you sleep in the same bed as your partner, they may not like the mattress to be so firm. So, for many people, effectively reducing and managing their pain could be a combination of a few different strategies.
Solutions for sleeping better with sciatica pain
Finally, having a long-term solution to comfortably sleep with sciatica nerve pain or hip pain at night often has to extend beyond the type of mattress you have or the sleeping position that you prefer.
If iliopsoas muscle tightness is contributing to your sciatica pain, addressing the tension and tightness in those muscles will help you get your pelvis back into alignment. The piriformis muscle will also begin to relax as the iliopsoas releases more, and both of these things open up more space for the nerve.
It may take some time to do this, but over time, the nerve will have enough room to heal and prevent pain in your leg.
Releasing the iliopsoas can be difficult, especially without the help of a physical therapist. That’s why I invented the Hip Hook. This muscle release tool applies prolonged pressure to both the psoas muscle and the hard-to-reach iliacus muscle, providing the direct pressure required to finally release those muscle knots.
This muscle release can be done in as little as 10 minutes each night before bed.
With or without the Hip Hook, you can build a bedtime routine that reduces some of your sciatica or hip pain at night.
Doing things like yoga or stretching before bed can loosen up your muscles and help relax your body in preparation for sleep. Similarly, taking a warm bath may relax your muscles some.
You may also want to try to integrate self massage for sciatica before bed. This can easily be done in correlation with the Hip Hook, and I encourage you to release both the front and back of your hip for best results. Self massage for sciatica can be done using a lacrosse ball, or the Hip Release Ball.
In the end, how to sleep with sciatica nerve pain becomes a somewhat personal experience. Find out what works for you, and invest in long-term solutions for your body.
The important thing to remember is that sciatica pain and hip pain can be managed and even be reversed depending on the cause of your pain. One of the best ways to manage any type of pain that is interfering with your sleep is to create good bedtime habits and routines, and take the time during the day to truly care for your body to prevent pain in the first place!

FAQs about Sleeping with Sciatica
Why is sciatica pain worse at night?
When you lay down, muscle tension is creating a tug-of-war on your hip joints: your hip flexors in front and your piriformis in back. Your sciatic nerve runs alongside and underneath these muscles, and can become impinged by muscle tension and pelvis misalignment.
What is the best position to sleep in with sciatica?
There are ways to get comfortable in a variety of sleeping positions with sciatica, with the right angle and pillows! If you’re a side sleeper with sciatica, adding a pillow lengthwise between your knees and ankles in this position will help to put your hips in a more neutral position. If you’re a back sleeper with sciatica, adding a pillow or two under your knees can help by relaxing the position of your hip flexors.
How does the piriformis affect sciatica?
The sciatic nerve runs through or under the piriformis muscle. When this muscle is tight, it can impinge upon the sciatic nerve. Tension in the piriformis can be caused or worsened by tension in the iliopsoas muscle, your primary hip flexors.

Best golf swing tip? Release your hip flexors
Whether you’re a professional golfer or someone who loves to get out on the course to play with friends, we’re all looking to improve our golf swing mechanics so we can play well and have fun.
Nothing is more frustrating than shanking your drive from the tee box or lipping out an easy birdie putt — well, perhaps with the exception of experiencing pain in your lower back, hips, or knees after each and every swing. That’s no fun either!
As experts on the hip and the hip flexor muscle group, the best golf swing tip that we can share with you for increased performance and less pain is to release your hip flexor muscles (more specifically, the iliopsoas). After all, the hips are one of the most important joints in the body as it relates to a golf swing!
The most efficient biomechanics of a golf swing requires the upper and lower halves of the body to be working together and be without restriction. Interestingly enough, the anatomy of the iliopsoas makes it the only muscle in the entire body that connects to both the upper body and lower body.
.jpg)
The iliopsoas muscles (made up of both the iliacus and the psoas) are situated very deep within the core of your body, where they are responsible for supporting the lumbar spine, pelvis, and hip joints in the proper position and in their ideal alignment in everything that you do…including your golf swing!
Perhaps the biggest role of the iliopsoas during a golf swing is its influence on the rotational movements that must occur in your body throughout the entirety of the motion. Lack of hip flexibility in golf due to tight hip flexors limits your ability to create rotational force, and this poor hip rotation reduces power generated from your golf swing.
Additionally, tight hips cause compensations to occur in your golf swing, which can lead to inconsistency with the timing and accuracy of your ball striking ability. If you are noticing any of the following during your golf swing, it may be a sign that you have tight hips!
- Improper weight shift to the front foot during your backswing (called a reverse pivot)
- Moving the pelvis towards the ball too early (called early extension)
- Excessive foot movement to get into more range of motion
- Having an abbreviated (or shortened) swing path, on the backswing and follow-through
- Feeling like you are swinging too much with the upper body
Tight hip flexors and golf injuries
Golf injuries are much more common than you may think for a non-contact and low-impact sport. As we’ve already discussed, a golf swing requires the use of many different muscles and joints working together.
When there is something that throws off the proper mechanics in the kinetic chain (such as tight hip flexors causing immobile hips), compensations begin to occur within the body that can later develop into pain, tightness, and injury over time.
As it relates to golf injuries caused by tight hip flexors, common areas of the body that are likely to be impacted are the hips, lower back, and knees.
Hip injuries in golf caused by tight hip flexors
The hip is designed to be a very mobile joint in the human body. It is especially important, as we’ve already discussed above, in the rotational capabilities and forces generated throughout an efficient and powerful golf swing.
When the iliopsoas is tight, the alignment of the hip joint relative to the pelvis is affected. This impacts how well the head of the femur fits into the acetabulum, restricting the free movement of the ball-and-socket joint of the hip.
If left unaddressed over time, this can cause gradual wear and tear of the structures and soft tissues in the hip joint and lead to pain and injuries. Common golf hip injuries may include (but are not limited to) hip impingement, hip labrum tears, hip bursitis, hip arthritis, and more.
Lower back injuries in golf caused by tight hip flexors
Unlike the hip joint, the lower back (or lumbar spine) is designed to be stable. That means there should be relatively little motion occurring in these joints during a golf swing. However, when the hips are not mobile enough to move within their full range of motion, the most common area that the body looks to make up for this movement is the lower back.
As more and more motion comes from the lumbar spine, the core muscles will have more difficulty controlling the rotational forces that the golf swing has on the body, which leads to more stress being placed on the joints and discs of the lumbar spine. Common golf back injuries may include (but are not limited to) muscle strains, disc injuries, arthritis, and more.
Knee injuries in golf caused by tight hip flexors
Just like the joints in the lower back, the knee joint is designed to be stable. When a lack of hip mobility causes poor hip turn in a golf swing, the body may compensate by twisting more from the knee joint.
Similarly, this creates more torque within the knee joint than it is designed to handle and causes strain in the area. Common golf knee injuries may include (but are not limited to) tendonitis, arthritis, or other soft tissue injuries to the meniscus or other ligaments (like the ACL, MCL, PCL, or LCL), or more.
Hip mobility for golfers
Hip flexor tightness in golfers (and all people for that matter) is very common and is likely caused in part by the excessive amount of sitting we do, the overuse of these muscles in our various activities, among other reasons.
As a golfer, maybe you’ve already been told that you have tight hips and need to work on improving your hip mobility. If so, there’s a good chance that you’ve done various hip flexor stretches before and may have felt a bit better afterwards, but then the pain and tightness comes back.
Why is that? What are the missing pieces to getting an effective hip flexor stretch?
When a muscle is holding tension (such as with a muscle knot in the hip flexors), that tension will continue to remain in the muscle even after you’ve stretched it. The temporary feeling of relief comes from the increase in blood flow going through the stretched muscle, but does nothing to actually address the muscle knot to effectively release the muscle tension.
Hip flexor muscle release for golfers
To most effectively release the tension being held in a muscle (like the iliopsoas), it takes the application of prolonged pressure (of at least 90 seconds) directly to the sensitive areas along the length of the muscle.
Due to its location deeper within the core of the body, the psoas and iliacus muscles can be a bit challenging to get to on your own. Releasing these muscles may require an in-person visit to a practitioner or using a specialized iliopsoas release tool such as the Hip Hook (designed by a physical therapist).
The Hip Hook’s unique design presses into the psoas muscle when you first lay over the tool. By reaching back and using the handle, the tool begins to rotate and the tip now presses more directly into the iliacus muscle. The Hip Hook can be much more effective at releasing tension in the iliopsoas than other tools or massage therapy balls, which typically only address the psoas muscle (and not the iliacus).

Frequently asked questions on tight hip flexors and your golf swing
Why do I get lower back pain from my golf swing?
Lower back pain for golfers typically develops as a result of poor hip mobility, which causes too much motion in the golf swing to come from the lower back. This places extra strain on the muscles, joints, and discs in the lower back and can lead to pain or injury over time.
Is golf bad for your back?
While back injuries are common in golf, the cause of injury is typically due to a lack of range of motion and mobility in one area of the body (primarily the hips, but maybe also the thoracic spine) that causes compensation to happen at the lower back to complete each and every golf swing.
Therefore, golfing with muscular tension in specific areas may be bad for your back and increase your risk of injury. By addressing tightness and mobility restrictions in these areas, pressure is taken off of the lower back and you may reduce your risk of injury.
How can I improve my hip rotation in golf?
To improve your hip rotation and generate more power with your golf swing, you must first address tension in the muscles around your hips, such as the iliopsoas. This hip flexor muscle, made up of the psoas and iliacus muscles, lies deeper within the core of the body which makes it a tougher muscle to access to release the tightness. Getting these two muscles worked on by a manual therapist or doing it yourself by using a hip flexor muscle release tool like the Hip Hook can be great options to help reduce tension in these muscles to help improve your hip rotation in your golf swing.

A Doctor Recommended Tool for Hip Flexor Tightness
The Hip Hook was featured in Well + Good: Fitness Tips as a tool that doctors recommend to help release the inner-most tightness in your body.
Deeper within your core and pelvis lies a muscle called the iliopsoas. Also known as your hip flexor, the iliopsoas is actually made up of 2 separate muscles — the iliacus and the psoas. These muscles are prone to holding tension, whether it be from living a sedentary lifestyle or from overuse in our workouts and daily activities.
Muscle tension in the iliacus and psoas can limit the range of motion coming from the hips and cause the pelvis to be held out of its proper alignment, twisting the “core” of the body. If left unaddressed, tight hip flexors may contribute to lower back pain, hip pain, and knee pain over time.
The Hip Hook is the first muscle release tool designed to address both the iliacus and the psoas. Using the Hip Hook for just a couple of minutes per day alongside your workout routine may help you feel stronger and more flexible with your body, keeping you free from pain.

Tips from a PT for Reducing Back and Hip Pain During Pregnancy
The Hip Hook was just featured on Family Education’s guide as a tool that helps with Hip and Back pain during pregnancy!
Designed by Christine Koth, a holistic physical therapist, the Hip Hook is a muscle release tool designed to address your hip flexor muscles, specifically your psoas and iliacus. When tight, these muscles can contribute to pain experienced in the lower back, hips, and knees.
Using the tool for just a few minutes per day can make a big difference in how your body feels.
Learn more about the Hip Hook here.

Tools for Mobilizing the Hip Flexors
Slowly, but surely, the importance of the iliacus muscle is making its way out into the world.
When the iliacus becomes tight and holds tension, this lesser-known hip flexor muscle can cause misalignment of your hips and pelvis, ultimately leading to aches and pains developing in your lower back, hips, knees, and more.
Dr. Kelly Starrett from The Ready State agrees, and considers the iliacus to be a part of what he refers to as “The Four Horsemen of the Spine” along with the rectus femoris, the psoas, and the quadratus lumborum. Keeping these muscles happy and healthy can make a big difference in the way that your body moves and feels day after day.
In that article, Dr. Starrett acknowledges that the iliacus muscle is one of the most challenging muscles to reach due to its location deeper within the pelvic bowl, and he recommends using the Hip Hook as an awesome mobility tool for people to try to access and mobilize this area.
The Hip Hook also appeared as part of the TRS Holiday Gift Guide along with some other great products recommended by Dr. Starrett.

How to Prevent Hip Pain When Sleeping
You’re finally ready to hit the hay, but your hip pain won’t let you sleep. You can approach this problem from a couple of new angles: comfortably positioning your body in bed, and understanding the root cause of the problem to address the root cause of the pain.
In this article, I will detail a little known reason you may be experiencing hip pain when sleeping (or rather a little known muscle that may be the culprit), a few ways to alleviate your hip pain at night, and how you can begin to address the root cause of your hip pain.
Although this article is filled with helpful resources and information, it is not meant to diagnose the cause of your specific hip pain. Consulting a physical therapist or medical practitioner is the best way to get a full picture of your situation, understand your treatment options, and establish a supervised treatment plan.
Let’s help you get some ZZZZs!
What causes hip pain when sleeping?
Numerous ailments can affect your hips and cause you pain. Many people who experience hip pain when sleeping may not have much pain during other activities – or even during other parts of their day.
In the evening, when your body has had a chance to rest and relax a little, your pain may be triggered by inflammation due to lack of movement. Or, you may just finally have had the time to notice your pain.
For athletes, sore muscles may cause hip pain while sleeping or even a more chronic pain like tendonitis or bursitis. As you age, hip pain may be caused by arthritis or osteoarthritis. Even certain cancers, injuries, or pregnancy can all contribute to hip pain.
One of the most common (yet often overlooked) reasons why so many of my patients have hip pain when sleeping is tight hip flexor muscles. That is: their hip flexor muscles are so tight that they are pulling their hips out of alignment (which can be the cause of pain for hip bursitis or SI joint pain). And this is only exacerbated by sleeping positions that cause an unnatural curvature in your neck and back for prolonged periods of time.
But what are your hip flexor muscles, and why do they hold so much sway over your hip pain while sleeping? I mean, you’re just laying there!
Tight iliacus muscles and tight psoas muscles can create hip pain while sleeping
Your hip flexor muscles are also known as the iliopsoas muscles. The iliopsoas are made up of two separate muscles: the iliacus and psoas.
These two muscles are essential to everyday movements like sitting, walking up stairs, running, jumping, and rotating your hips.
Because of the extensive overuse of your iliopsoas muscles in the various movements you make during your day, they tighten over time. This is especially true for athletes that tend to engage their iliopsoas muscles more and put additional strain on them during training.
Not surprisingly though, tight hip flexor muscles are equally common in people who tend to sit for most of their day.
These muscles like balance. So, both inactivity/under-stretching and overactivity/over-stretching can cause pain and tightness.
What’s more, the location of the iliopsoas muscles on the inside of your pelvis bone makes them hard to access and easy to overlook. In fact, many of my patients had never even heard of the iliacus before! So, unlike your hamstrings or calf muscles, you can’t easily use a massage roller to relieve your muscle tension after a workout or a long day on your feet.
The iliacus muscle attaches to the inside of your pelvis and comes down the front of the hip, where it connects to the front of your thigh bone. The iliacus muscle, in particular, is very close to the hip joint.
The psoas muscle blends with your diaphragm via connective tissue and attaches to the lower spine. As you move down the psoas muscle, it attaches to the same spot on the front of the hip as your iliacus muscle.
While there is a myriad of reasons while your hips could hurt, tight iliopsoas muscles are often a major culprit in hip pain when sleeping. So, it’s important to not only know about the issue of tight iliopsoas muscles, but how to prevent it.

Best sleeping positions for hip pain
If you have hip pain while sleeping, it is extremely helpful to understand the root cause. Still, once you’ve determined what is causing your pain, it will take some time to treat, even if your issue is simply tight iliopsoas muscles.
That’s why I’ve compiled a list of some of the best sleeping positions for hip pain. These positions will help you lower your pain while you are working to get to the source of that pesky symptom.
Try a few of these out and see how they work. Finding comfortable sleeping positions may help you alleviate hip pain while sleeping and allow you to finally get a good night’s rest.
If you have hip pain when sleeping on your side
Many of us enjoy sleeping on one side, and in fact, you may even favor one side over the other.
If you have outer hip pain, such as hip bursitis, you may feel pain either on the hip you’re laying on, or the hip you’re not laying on.
If you have pain in the hip you’re laying on, pain caused by direct pressure on the joint, then pay attention to your mattress surface. You may find relief by adding a memory foam pad or mattress topper to your mattress to help distribute your weight more evenly and provide extra cushion for that hip joint.
If you have pain on the hip you’re not laying on, try sleeping with a pillow between your knees and ankles. It may take some time to find a position that works with your pillow, and you may even have to try out pillows of different densities. The goal is to have your legs rest parallel to each other, so your knee is not lower than your hip. This can be accomplished by using a fat pillow, resting lengthwise from knees to ankles.
Sleeping with a pillow between your knees and ankles is a good way to relieve SI joint pain while sleeping on your side, as it reduces the strain on muscles attaching to the top of the thigh bone (greater trochanter). This strain on the hip is directly related to a tight iliacus muscle, which causes an anterior rotation on the pelvis, and pulls on the lower back and hip joint.
Whatever the pillow position you choose, the main purpose of sleeping with the pillow is to alleviate the pull on your hip’s soft tissues and keep your pelvis in a natural alignment.
When you allow your leg to rest naturally while lying down, there is a slight dip that enables your legs to connect and rest. When this happens, your leg’s natural pull adds more pressure to the muscles around your hip joint, which can then cause hip pain when sleeping.
If you have hip pain when sleeping on your back
If you have hip pain when sleeping on your back, it can make almost any other sleeping position uncomfortable. This pain is often caused by tension in the hip flexors which then tug on your lower back, hips, and legs.
For alleviating your hip pain when sleeping on your back, try placing a pillow or rolled-up blanket under your knees. Depending on the degree of muscular tension, you may need two pillows positioned under your knees. This places your hip flexors in a relaxed state, easing tension on your lower back and hips.
If you feel a pinch on your groin while laying in this position, allow your legs to spread and rotate outward. You can even use pillows on the outside of your knees to keep them comfortable and supported in this position.
If you have hip pain while sleeping on your stomach
Although sleeping on your back is likely the best sleeping position for someone with hip pain, there are those of us who prefer sleeping on our stomachs. If that is the case for you, and you want to prevent hip pain when sleeping, then grab a pillow and try this sleeping position out tonight.
When sleeping on your stomach, you might bend one leg out to the side. If you do, you should place a pillow under your knee to elevate it slightly. This will relieve some of the pressure on your hip.
If this is too dramatic of a position for you, then try a folded blanket or a thinner pillow that makes you more comfortable.
Iliacus release: Discover the root cause of your hip pain for a better night’s sleep
While getting enough sleep is crucial for your physical, mental, and emotional wellbeing, the ultimate answer is not extra pillows and smooshy mattresses, but addressing the root cause of the problem.
All of these issues tie back into tension in the iliacus muscle, one of your primary hip flexors. This tension in your core is likely putting strain on your lower back and hip joints.
Stretching may help some, but if tight muscles are the true cause of your hip pain when sleeping, then you’ll need to fully release those muscles to alleviate the pain for good.
The iliopsoas muscles (comprised of the psoas and iliacus) are very interconnected to the structure of your hip, and because of their positioning on the inside of your pelvis bone, they are difficult to access. Repeated sessions to a physical therapist or other practitioner who specializes in releasing the hip flexors may not be possible.
This is why I invented the Hip Hook: after decades of clinical practice and seeing this pattern of tight hip flexors creating hip pain, back pain, and even knee pain, I looked around to find any tool that could mimic the angled pressure I apply with my hands in therapy sessions. When I discovered that no psoas and iliacus release tool existed, I got to work inventing one!
If you want to address the root causes of hip pain at night, I highly recommend the Hip Hook. The Hip Hook is still the only muscle release tool designed for targeted pressure on the hard-to-reach iliacus muscle.
With just a few minutes added to your bedtime routine each night, or even once every few nights, the Hip Hook can help you be on your way to a life free from hip pain when sleeping.
3 simple steps to realign your pelvis before bed
Release your hip flexors as a part of your bedtime routine. Taking ten minutes and following these 3 simple steps can realign your body and stop your muscles from pulling on your joints, so you’ll never need an article like this again!
Step 1: Release the front of your hip using the Hip Hook or the Hip Release Ball. You can also add to a bedtime routine a slow, soothing yoga flow, or a few hip flexor stretches for tight hips.
If you have sciatica pain while sleeping, these self-massage techniques for sciatica can be helpful.
Step 2: Use a massage ball to release the muscles in the back of your hip.
Step 3: Realign your rotated pelvis with this simple 2-minute exercise.
Other ways to manage hip pain when sleeping
I’ve already given you a few good options, but there are even more ways that you can ease your hip pain while sleeping, and some of them happen before you go to bed.
Get the right mattress
First, make sure you have a decent mattress. In general, a firmer mattress is ideal for preventing hip pain when sleeping. If the mattress is too soft, your body will not be aligned properly and your hips, in particular, will not be given the support they need.
A mattress can also be too firm and will be equally poor when it comes to giving your body the support it needs.
That is why it can help talk to an orthopedic specialist when choosing a mattress that’s right for your body.
You can also add a foam pad or mattress topper to your mattress to help distribute your weight more evenly and add more support, especially if you’re a side sleeper who experiences pain in the hip you lay on. Try not to get a mattress with inner metal springs, especially if you sleep on your side. A memory foam mattress is better for weight distribution and support.
Follow a bedtime routine
Although this may seem like a strange addition to the list, if you are already losing some sleep to hip pain, you need to try and get as much good sleep as you can.
One of the best ways to optimize your sleep is to put your body into a natural rhythm. To do this, you need good morning and evening routines (ideally including hip flexor release!).
Going to bed and waking up at the same time each day is ideal, especially if you can get 7-9 hours of sleep each night.
It also helps to eliminate distractions and to keep your bedroom clutter-free and reserved for sleep only. Create a peaceful environment so your mind and body can relax each night.
Before deciding to do hip flexor stretches, it is helpful to know the root cause of your hip pain. Although some stretching can be great, overstretching is possible and can cause more harm than good.
It’s important to visit a physical therapist to determine the cause of your hip pain when sleeping once and for all. Then, and only then, will you gain the tools to get rid of your hip pain.
FAQs about hip pain when sleeping
How do I stop my hip from hurting when I sleep?
One way is by using pillows to adjust the positioning of your body, allowing for more natural alignment. However, addressing any underlying muscle tension during the day may address the root cause of hip pain at night and lead to longer lasting results.
What can cause hip pain at night?
Common causes of hip pain at night include:
- Tendonitis
- Bursitis
- Arthritis
- Injury
- Tight hip flexors
- Pregnancy
What causes hip pain when lying on your side?
If your hip touching the mattress is hurting, it could be from the compression on that joint from a variety of causes, from bursitis to arthritis. If your top hip is hurting, it could be muscular tension from the angled weight of your top leg tugging the muscles around your hip joint.