Your cart is currently empty!
Category: Alignment
Understanding and Managing Hip Flexor Pain
Hip flexor pain can sideline even the most dedicated recreational athlete. These muscles, crucial for activities from running to yoga, are often tight and prone to injury. Let’s explore what you need to know to keep your hip flexors healthy and pain-free.
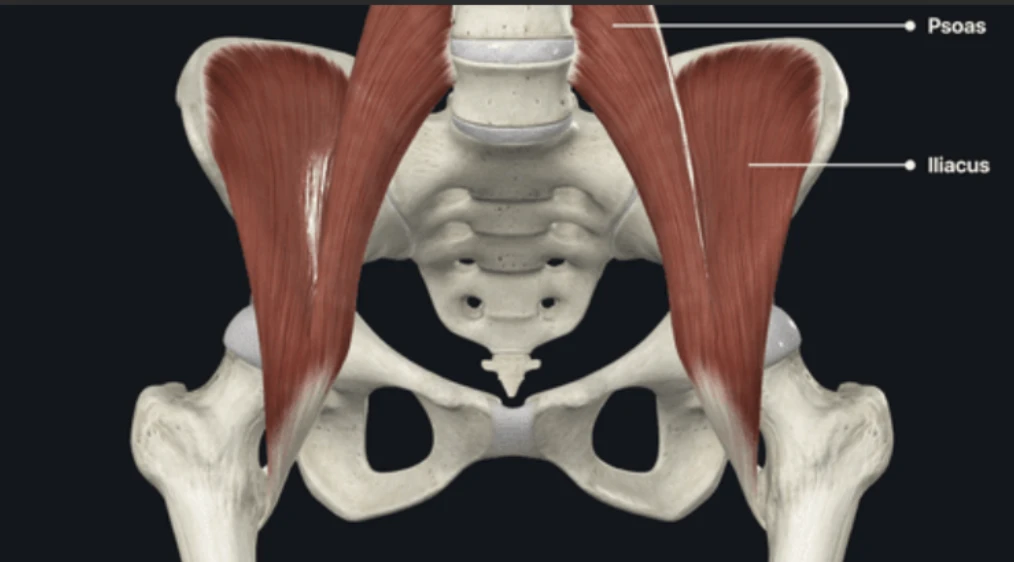
Where is your hip flexor? – Anatomical illustration of the hip flexor muscles
What are the Hip Flexors?
Your hip flexors are a group of muscles that allow you to flex your hip, i.e., lift your knee to your chest and bend at the waist. Key players include:
-
Understanding Your Hip Flexors: The Iliacus
When you think about lifting your knee or bending at your waist, a group of muscles called your hip flexors are hard at work. One of the key contributors to this movement is the iliacus. This powerful muscle is located in your iliac fossa, which is the inner surface of your hip bone (ilium). From there, it travels downwards and joins with the psoas major muscle (which we’ll discuss next) before attaching to your femur, the large bone in your thigh. Essentially, the iliacus plays a crucial role in directly pulling your thigh upwards, enabling that essential hip flexion movement.
-
Understanding Your Hip Flexors: The Psoas Major
Another vital muscle in the hip flexor group is the psoas major. This deep-seated muscle originates from the vertebrae in your lower spine (specifically the lumbar region). It then travels downwards through your core and pelvis, eventually merging with the iliacus muscle to form the iliopsoas tendon, which attaches to your femur. Because of its connection to the spine, the psoas major is not only important for flexing your hip but also plays a role in stabilizing your lower back and influencing your posture. It’s a powerful muscle that bridges your upper and lower body.
-
Other Hip Flexor Helpers
While the iliacus and psoas major are the primary powerhouses for hip flexion, it’s worth noting that other muscles also contribute to this movement. These include the rectus femoris, which is part of your quadriceps muscle group and also helps to straighten your knee, and the sartorius, the longest muscle in your body, which assists with both hip and knee flexion, as well as hip abduction and external rotation.
Where is Hip Flexor Pain Felt?
Pain typically presents in the front of your hip, groin, or even lower back.You can also feel pain in knee, ankle, and foot if these muscles are tight. You might notice it when:
-
Walking or running
-
Lifting your leg
-
Stretching
-
After exercise
Common Causes of Hip Flexor Pain
-
Muscle Imbalances and Weakness: Often, hip flexor pain isn’t solely due to tightness in the hip flexors themselves but rather an imbalance with weaker opposing muscles, particularly the glutes and core. When the gluteal muscles are weak, the hip flexors may compensate during movements like walking, running, or lifting, leading to overuse and strain. Research has highlighted the importance of gluteal strength in maintaining proper hip mechanics and preventing injuries. For instance, a study published in the Journal of Orthopaedic & Sports Physical Therapy emphasized that “gluteal muscle activation deficits are common in individuals with various lower extremity musculoskeletal disorders, including hip pain” (Powers, 2010). Similarly, a weak core can compromise pelvic stability, forcing the hip flexors to work harder to stabilize the trunk and pelvis during movement, contributing to their overload.
-
Prolonged Sitting and Sedentary Lifestyles: In today’s increasingly sedentary world, prolonged sitting is a major culprit in hip flexor issues. When you sit for extended periods, your hip flexors are held in a shortened position. Over time, this can lead to adaptive shortening and stiffness of these muscles. This shortened state reduces their ability to lengthen properly during activities, making them more susceptible to strain and injury when suddenly stretched or engaged. A review in Sports Health: A Multidisciplinary Approach noted that “prolonged static postures, particularly sitting, can contribute to muscle length adaptations and potentially lead to musculoskeletal pain syndromes” (Lynch et al., 2010). This shortening can also tilt the pelvis anteriorly, further exacerbating tension in the hip flexors and potentially contributing to lower back pain.
-
Repetitive Hip Flexion Activities (Overuse): Athletes and individuals engaging in activities that involve repetitive hip flexion are particularly vulnerable to hip flexor pain due to overuse. Sports like running, cycling, dancing, soccer, and martial arts constantly engage the hip flexors to bring the leg forward. This continuous contraction and eccentric loading can lead to micro-traumas in the muscle fibers, resulting in inflammation, pain, and reduced flexibility. The cumulative effect of these repetitive movements can overwhelm the muscles’ capacity for recovery.
-
Acute Injuries and Trauma: While less common as a chronic cause, acute injuries can directly lead to hip flexor pain. These often occur from sudden, forceful movements, such as sprinting, kicking, or rapid changes in direction, which can cause tears or strains within the muscle fibers. Direct impact to the hip area can also result in contusions or muscle damage. The severity of the pain and the recovery time depend on the grade of the muscle strain, ranging from mild discomfort in a Grade 1 strain to significant pain and loss of function in a Grade 3 tear. If you’ve sustained an acute injury to the hip flexor area, see your healthcare provider for assistance.
-
Poor Biomechanics and Movement Patterns: Inefficient or improper movement patterns can place undue stress on the hip flexors. For example, in runners, overstriding or a lack of hip extension can force the hip flexors to work harder to pull the leg through, leading to strain. Similarly, in weightlifting, improper form during exercises like squats or deadlifts can shift the load onto the flexors rather than the intended larger muscle groups. These suboptimal biomechanics create chronic overload on the hip flexors, increasing their susceptibility to pain and injury.
Tools for Deeper Hip Flexor Relief
Beyond traditional stretching, tools like the Aletha Health The Mark and Aletha Health The Orbit can help you achieve deeper relief by targeting specific areas of tension.
-
Aletha The Orbit: Use The Orbit first as a warm up to help improve overall blood flow and reduce generalized muscle stiffness. Gently roll the Orbit along the length of your hip flexor muscles and surrounding areas like your quadriceps and glutes. This can aid in recovery and prepare your muscles for movement.
-
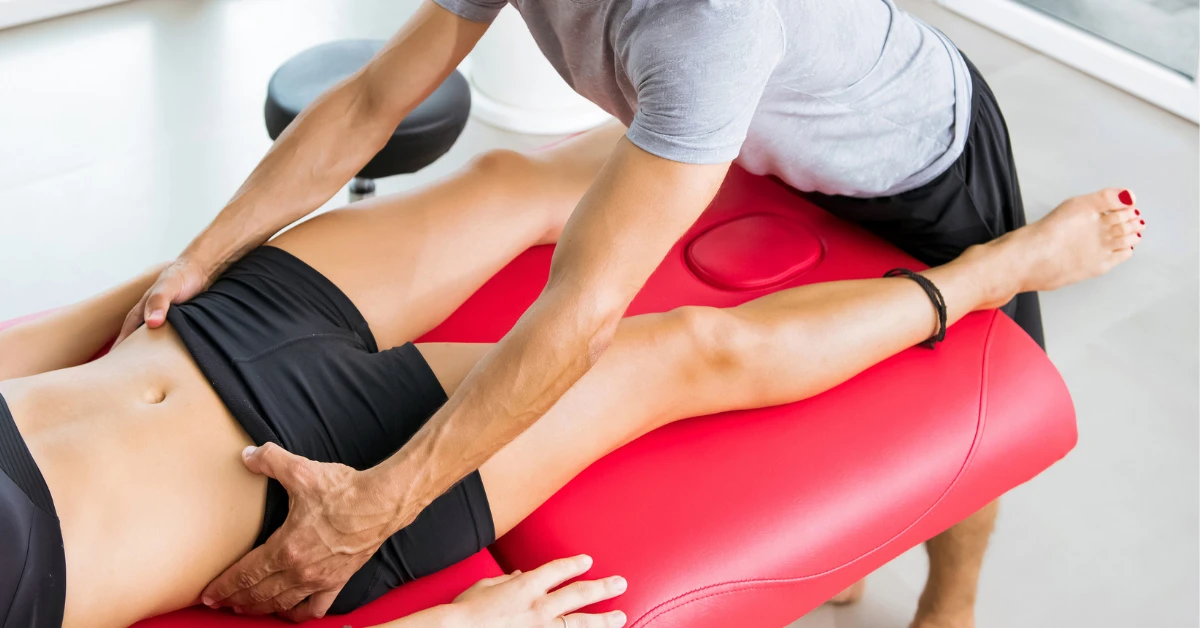
Aletha The Mark (formerly Hip Hook): This tool is designed to reach the deep-seated iliacus and psoas muscles that make up a significant part of your hip flexor group. This is the first tool that can use the iliacus on its own. You can use the Mark by lying on your stomach and positioning the tool directly over the tender spot in your hip flexor. Slowly lower your body onto the tool, allowing its unique design to apply pressure and help release deep-seated tension. Hold for at least 90 seconds, focusing on relaxing into the pressure.
[ Include video on how The Mark works on the hip flexor: https://youtu.be/WhZiloNGYlQ ]
-
Finish up with The Orbit on the piriformis: After using the Mark on your hip flexors, return to The Orbit to further address the piriformis. This can help release any residual tension in the surrounding hip musculature and promote overall hip mobility. To target the piriformis muscle, which is located deep in your buttock and can contribute to hip discomfort, lie on your back with your knees bent and feet flat on the floor. Place The Orbit under your glutes on the side you want to target. Gently roll and find tender spots in the piriformis area, holding pressure as needed.
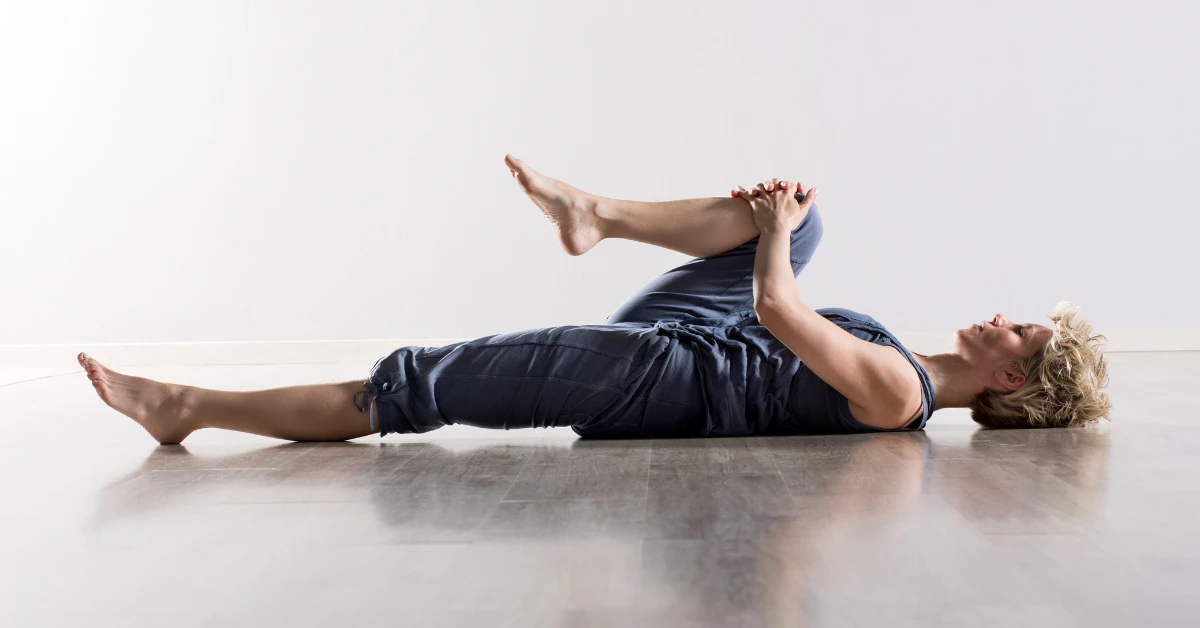
Leverage Exercises and Stretches for further Hip Flexor Relief
These exercises and stretches can help alleviate pain and improve flexibility in addition to using the tools:
-
Hip Flexor Stretch: Kneel on one knee, with the other foot forward. Gently push your hips forward until you feel a stretch in the front of your hip.
-
Half-Kneeling Hip Flexor Stretch: Similar to the hip flexor stretch, but focuses on a deeper stretch.
-
Lunge Stretch: Step forward into a lunge, keeping your back straight and gently pushing your hips forward.
-
Pigeon Pose: A yoga pose that stretches the hip flexors and rotators (If you have a knee injury, you may want to avoid this exercise).
Actionable Advice for Using Your Aletha Tools for Managing Hip Flexor Pain
To get the most out of your Aletha tools, try incorporating these practices into your regular routine:
-
Targeted Muscle Release: Utilize The Mark to address deep hip flexor tension effectively, leading to quicker relief. Pay particular attention to areas where you notice tightness or experience tenderness.
-
Gentle Stretching: Incorporate gentle stretches that target the hip flexor muscles. Following your stretches, you can further enhance relief by using The Mark on any lingering tight or tender spots.
-
Strengthening Exercises: Building strength in your hip flexors and surrounding muscles can provide better support and stability. Consider incorporating these exercises:
-
Marching in Place: Stand tall and lift one knee towards your chest, then slowly lower it and repeat with the other leg. Focus on controlled movement.
-
Standing Hip Flexion: While standing, lift one leg straight forward, keeping a slight bend in your knee. Lower it slowly and repeat on the other side. You can add resistance with a light ankle weight as you progress.
-
Seated Knee Raises: Sit upright in a chair with your feet flat on the floor. Lift one knee towards your chest, then slowly lower it. Repeat with the other leg.
-
Leg Raises (Lying Down): Lie on your back with your legs straight. Keeping your core engaged, lift one leg a few inches off the ground and slowly lower it. Repeat with the other leg. For a more challenging variation, lift both legs simultaneously.
-
Consistent Application: Regular and consistent use of your Aletha tools can be a valuable strategy for preventing discomfort, enhancing flexibility, and supporting your body’s recovery after physical activity. Remember to pay attention to your body’s signals, begin with light pressure, and gradually increase the intensity as you feel more comfortable.
Learn more about Aletha Health’s Story on our website and follow us on Instagram to see the tools in action, making an impact on thousands of people.
References:
-
Lynch, T. L., Whiteside, D., & Kelly, M. (2010). Prolonged static postures and their effects on musculoskeletal health. Sports Health: A Multidisciplinary Approach, 2(4), 310–317.
-
Powers, C. M. (2010). The influence of altered lower-extremity kinematics on the development of musculoskeletal pain and injury: a review of the literature. Journal of Orthopaedic & Sports Physical Therapy, 40(2), 42–56.
-

Aletha Health Products Featured in Telemundo
Aletha Health products were recently featured on Telemundo!
See the articles below!
Technology That Will Make Our Lives Easier in 2022
Home Essentials to Massage Your Body
Fitness Products to Help Your Well-Being in 2022
Valentine’s Day Gifts to Enjoy Together

Fix This Common Posture Problem Almost Everyone Has
Stroll through any office and you’ll see row after row of people hunched over their desks, with their heads shooting forward and shoulders rounded. Even when out and about, you’ll see people on their cell phones holding that same head-shoulders forward position.
This all-too-common position can lead to some extremely common issues, including migraines, jaw pain, and the dreaded tech neck. Most people know they should respond when pain like this occurs, but when it’s “just” a posture problem, few people take action.
What’s the common posture problem almost everyone has? Rounded shoulders. It’s so pervasive that we think it’s ordinary, yet as we’ll see below, ignoring hunched shoulders can lead to a number of bigger, more painful issues.
What causes rounded shoulders?
At its core, rounded shoulders result from poor posture habits, too much focus on certain exercises, and muscle imbalances. For a majority of people, they stem from spending too much time slouching in front of a computer or phone, with the shoulders forward and down.
Other causes of rounded shoulders are:
- Driving or riding in a car
- Sitting for long periods
- Focusing exercises that bring the arms forward and tighten the chest
- Carrying heavy objects
The core cause of rounded shoulders
At its core, one primary muscle that causes rounded shoulders is the pectoralis minor — an often forgotten muscle that attaches the shoulder and the ribs. This muscle contracts when we move the shoulders forward.
When we keep a forward position for hours, every day, for weeks on end, we slowly train the pectoralis minor to stay contracted. It quickly gets the message that it should stay in this position, making it harder for it to relax and move back. Over time, this creates the unsightly rounded shoulders we’re all familiar with.
Our bodies aren’t isolated systems. When one muscle pulls forward, another goes slack. A chronically tight muscle, then, can get into a tug-of-war with muscles responsible for opposing movements. In the case of the pec minor, this can include muscles throughout the shoulders and upper back, spreading tightness throughout our body.
A few posture-related problems that often stem from pec minor tightness:
- Tech neck
- Tight upper traps
- Backaches
- Shoulder pain
- Pain between the shoulder blades
- Migraines

How do you tell you have rounded shoulders?
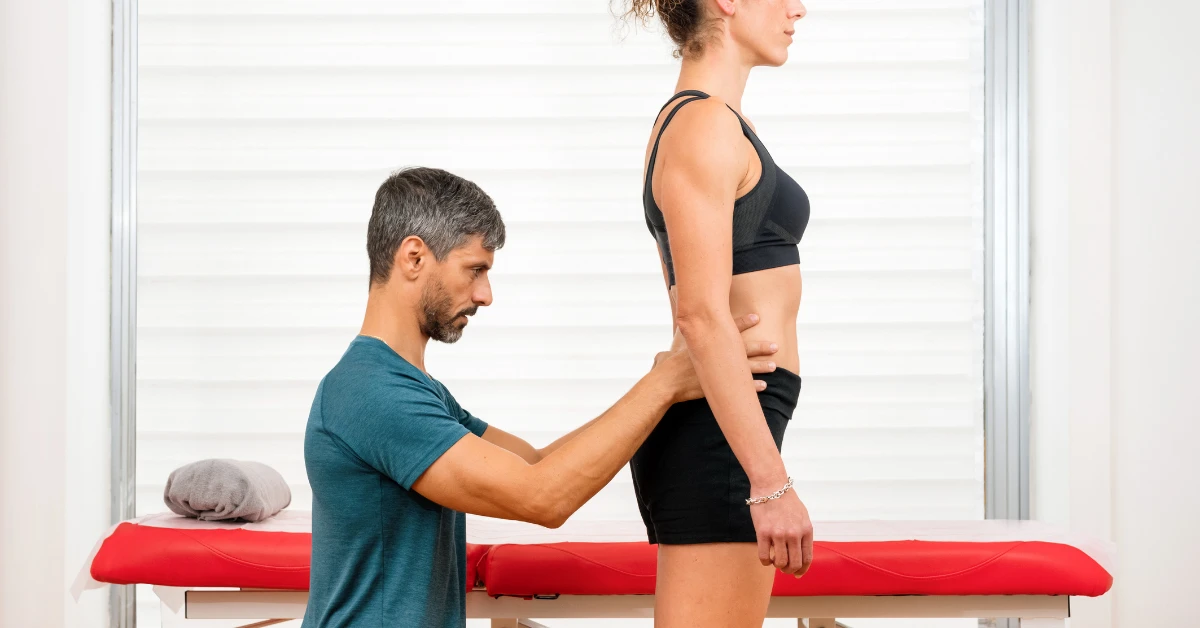
The first thing to check is how your shoulders sit in a resting position when you’re standing upright.
Step 1: Stand in front of a mirror, letting your hands hang naturally by your sides.
Step 2: Look at your shoulders. Do they seem a little slumped? Straighten them out then relax once again, see if they fall into the same position.
Step 3: Look at your thumbs; do they point forward? Slouching shoulders tend to turn our hands inward, making the thumbs point towards each other.
If this quick test reveals your shoulders are rounded, don’t panic! We’ve got a great solution that can start repairing your muscle tightness and posture problems in a jiffy.
Temporarily relieve rounded shoulders
Just as you trained your muscles and joints to hunch forward, you can also retrain them to relax back to their normal, correct resting position. This can be done through a combination of modalities, including stretching, exercise, and muscle release.
Stretching to relax shoulder muscles
Stretches release muscle tightness and tension by boosting blood flow to the impacted muscles. You can use any number of shoulder, upper back, and chest stretches to temporarily relieve a tight pectoralis minor muscle. Stretches on their own won’t remove the tension for long, however. As soon as you go back to your usual routine, you may find the rounded shoulders (and pain!) return.
Rubbing to increase muscle relaxation
When you rub a tight shoulder muscle, it may relax a little because you’ll increase flexibility and blood circulation. As is the case with stretching, though, a rubbed muscle will regain tension pretty quickly. It may feel good to massage these muscles, but it won’t train them to relax and return to their normal resting position.
Exercising to correct muscle imbalance
Some exercises can help strengthen your core, upper back, and chest muscles to correct rounded shoulders. These include planks, pull-ups, push-ups, band pull-aparts, shoulder external rotation exercises, and other upper body movements. Exercises are best used in conjunction with the other modalities above and below, of course. Muscles don’t always respond well when we exercise them while they’re tight.
Fix rounded shoulders with muscle release tools
The best way to relax specific muscles is to apply direct and prolonged pressure — in other words, applying sustained pressure without movement. This is distinctly different from rubbing or massage, and its benefits last much longer than stretching.
Prolonged pressure releases muscles like the pectoralis minor in as little as 30-90 seconds. When pressure is applied at just the right angle and in just the precise manner, it informs the brain that the muscle under pressure needs to relax. The brain responds, the muscle releases, and your pain and rounded shoulders melt away.
You’ll need the right tools to release your pec minor, however, as the pressure required to do this is precise. Tennis balls and similar implements won’t always work, as their surface is too broad or too round to pinpoint small muscles like the pec minor. That’s why we created the Nuckle.
The Nuckle was designed by a physical therapist specifically to release, relax, and realign the neck and shoulders. With three widths and six angles, it can adjust to every body type and apply clinically effective, specific pressure to relax tight muscles and reduce pain.
By releasing your pec minor on a daily basis you can permanently fix rounded shoulders, eliminate tech neck, and stand tall once again.

Twisted Pelvis Self Correction: How to Fix Pelvic Tilt
Do you have a twisted pelvis? If you are experiencing back, hip, or knee pain from pelvic misalignment, the good news is that you can correct it. In fact, twisted pelvis self-correction could be a great option for your pelvic tilt issues.
A large percentage of people that live with a pelvic tilt do not suffer from dramatic symptoms (if any). But for some individuals, leaving their pelvic tilt untreated can cause more issues down the road, like poor posture or chronic back pain.
I’ve got good news for both groups of people: When accompanied by the guidance of a medical professional, and when done correctly, twisted pelvis self-correction is possible. Depending on the type of pelvic tilt you have, and the severity of the pelvic angle, the medical intervention will vary. However, for the average anterior pelvic tilt, there are a few simple things you can do to reduce and maybe even eliminate your symptoms.
But before we dive into ways to perform a twisted pelvis self-correction, let’s make sure you understand what a twisted pelvis is, and why you are experiencing it in the first place.
What is a twisted pelvis?
A twisted pelvis is an abnormal angle in the positioning of the pelvic bones. It is not one specific type of pelvic tilt or misalignment, but instead can refer to all three types of pelvic tilt.
These three types of pelvic tilt are:
1. Anterior pelvic tilt
An anterior pelvic tilt is when the front of your pelvis angles forward, pulling the front of your pelvis down. It’s commonly caused by the shortening and tightening of hip flexor muscles during everyday movements, like commuting or sitting at your desk.
The forward angle caused by anterior pelvic tilt can lead to an accentuated curvature of the lumbar spine, also known as hyperlordosis. This can cause pain in the low back and pelvic region, which is one of the reasons why twisted pelvis self-correction is important.
2. Posterior pelvic tilt
A posterior pelvic tilt is the opposite of an anterior pelvic tilt. This means your muscles are lifting the front of the pelvis and pulling down the back of the pelvis.
Since the bottom of the pelvic bone is scooping under your body to the front, it is pushing your hip bones back as well. This change in pelvic angle stretches your lower back muscles creating a flat lower spine.
Chronic muscle tightness in the hamstrings is a common cause of this type of pelvic tilt.
3. Lateral pelvic tilt
A lateral pelvic tilt is when one side of your pelvis is angled higher than the other. So, instead of tilting front to back, one side of your hip sits higher up, creating unilateral muscle imbalances. When you have this type of pelvic tilt, the erector spinae muscle group (muscles and tendons running along either side of the spine) is most impacted.
The most common type of pelvic tilt is anterior pelvic tilt. But these symptoms can be hard to spot if the angle of the pelvis is not dramatic. In fact, even a “neutral” pelvis should have a small angle of tilt forward. Once the angle of your pelvis tilts beyond 10 degrees, however, it is considered to be a twisted pelvis. Making the diagnostic process even harder is the fact that many of the symptoms for a twisted pelvis also overlap with other anatomical issues you may be experiencing.
So if you have any of these prominent anterior pelvic tilt symptoms, it’s best to consult with a professional to understand if your back has a healthy curvature.
- Accentuated curve in lumbar spine
- Incorrect posture
- Lower back pain
- Hip and knee pain
- Forced hip and knee rotation
- Muscle imbalances in hip region
Anterior pelvic tilt symptoms often mirror the severity of the tilt. So it may be more difficult to recognize if you only have only a slight twist or misalignment in your pelvis..
Anterior pelvic tilt causes
As I mentioned above, one of the main anterior pelvic tilt causes is tight hip flexor muscles. How these muscles tighten and begin to pull the pelvis forward varies from person to person. It usually happens gradually over time as well.
Things like excessive sitting or lack of stretching after strenuous exercise/activity can cause the hip flexor muscles to shorten, tighten, and create muscle knots. As these muscles are allowed to stay in a shortened position or are “frozen” in place, they pull on neighboring muscles and connection points.
You may think of the area where you feel this the most as your hip flexors, but your hip flexors are actually made up of the two large iliacus and psoas muscles. Together, these are referred to as the iliopsoas muscles. You have two iliopsoas muscles – one to control either side of your hip – that originate from the top points of your pelvic bone and lower back.
And while both the iliacus and psoas have different starting places, they each connect to the top of the thigh bone (femur).
.png)
The psoas muscle travels from your low back, across the front of your pelvis, and then attaches to your thigh bone. The iliacus travels from your pelvis bone, crossing over the hip joint, and then attaches to your femur.
These muscles are in close proximity to some of your most vital joints. So it is easy to see how when these muscles shorten, they can begin to pull your hips out of alignment, impacting your posture.
There are other causes of a twisted pelvis, but muscle tightness and muscle imbalances are often primary causes. Having a pelvic tilt can be uncomfortable, but if muscle issues are the cause, then twisted pelvis self-correction becomes much easier.
Other causes of a twisted pelvis, like anatomical genetic issues or some kind of body trauma, may require more than just twisted pelvis self-corrections. While relatively uncommon, invasive treatments like surgery may be necessary.
Your twisted pelvis self correction options
Once you know you have a twisted pelvis, you can try some treatment options outside of physical therapy (with the permission of your therapist). These may include targeted pelvic exercises, hip flexor strengthening exercises, and hip flexor stretches.
Since the cause of your pelvic tilt is likely either muscle tightness or muscle imbalance, the primary goal of a twisted pelvis self-correction practice (even under the guidance of a medical professional) is to correct alignment by balancing the muscles.
Depending on the severity of the misalignment, working with a chiropractor may also help jumpstart your treatment. However, a chiropractor cannot solely fix the problem, because the problem does not lie within the bones, it is caused by your muscles.
So, let’s talk about how you can make those muscles happy!
Muscle pressure release
Creating a daily twisted pelvis self-correction routine will be your first step. This routine will more than likely include a combination of exercises, stretches, and a pressure release of the iliopsoas muscles.
Let’s talk about that last point, first: Releasing the tight hip flexor muscle.
This starts with stopping the muscle contraction.
If you have to sit a lot for work, then be conscious of the position you sit in. You may not be able to avoid being at a desk all day, but you can physically get up from your chair once an hour and stretch a little each day to counteract the effects.
Once your muscles are already tight, you’ll need to get them to release. And that requires relaxing your hip flexors and then lengthening them – which is why stretching alone won’t do the trick.
To release your iliopsoas, you want to apply prolonged pressure to the point where the muscle connects to your pelvic bone. Muscle and fascia are very sensitive to changes in pressure. Prolonged pressure gives your body’s mechanoreceptors within the muscle and fascia time to send signals to your brain so the muscles can stop holding tension.
But the problem with your iliopsoas muscles is that this important release point is in a very hard-to-reach area. Your hands or standard muscle pressure release tools won’t cut it. Fortunately, the Hip Hook is a tool specially designed for safe iliopsoas muscle release.
The Hip Hook makes it easy to release the hard-to-reach iliacus at home, and when used in combination with the Hip Release Ball, you will be ready to add pressure release, stretching, and realignment exercises into your routine for the most effective twisted pelvis self-correction treatment program.

Twisted pelvis realignment exercise
Even if you perform a muscle tension release with the Hip Hook and the Hip Release Ball daily, your pelvis will likely still need to be realigned.
Releasing the tension in the iliopsoas muscles is a critical first step. And a chiropractor and/or at-home realignment exercises are the final piece of a proper twisted pelvis self-correction. Practicing the following pelvic realignment exercises in conjunction with the use of the Hip Hook has proven to be very effective for the clients I’ve worked with.
Here is how to perform a twisted pelvis realignment exercise:
- Identify the side of your hip that is rotated forward. This will be the side you perform the realignment exercise on (you do not perform it on both sides of your hip)
- Lay down on the floor on your back.
- Bring both knees up so your feet are off the floor and your legs are bent.
- Put your hands behind the knee of the leg that has the anterior tilt. The other leg will continue to sit up off the floor, bent.
- As you hold onto the back of your knee, push against your hands as if you are trying to put your foot down onto the ground. Be mindful to move your foot down towards the floor, not out towards the wall.
- Hold this position for two seconds with a moderate amount of force (not as hard as you can). It should be enough pressure so that you can get a contraction of your hamstring and glute muscles. Repeat 10 times.
- Slowly lower your legs back to the floor, and feel free to perform other exercises like a glute bridge.
The contraction and relaxation of the hip muscles while performing this exercise is important, which is why you hold and release the tension repetitively to ensure a successful twisted pelvis self-correction.
Frequently asked questions about how to correct a twisted pelvis
Is there a good way to sleep with a misaligned pelvis?
When you have a pelvic tilt, you may experience hip, knee, and lower back pain. Depending on the type of pelvic tilt you have, using a pillow to elevate your knees (either on your side or your back) can help to reduce the pull on your muscles, which in turn alleviates pain.
While this can help you to sleep through the night, getting to the root of the problem and correcting a twisted pelvis is the best way to address any sleep issues that arise due to hip misalignment. Lucky for you, you now have all the tools you need for twisted pelvis self correction!
What happens without a twisted pelvis self correction?
If you leave your pelvic tilt to worsen without treatment, your symptoms will likely get worse as well. Usually, this will visibly impact your posture, and also cause some uncomfortable wear and tear on certain joints like your hips and knees.
When your body is out of alignment, it makes it difficult and painful to do activities that you love and can even impact your quality of life. That’s why twisted pelvis self correction (or correction with the help of a physical therapist) is so important.
Can a twisted pelvis cause sciatica pain?
In some cases, yes, a twisted pelvis can cause sciatica pain.
The severity of the pelvic angle and the type of pelvic tilt will influence where you experience pain – but because of the muscle and soft tissue connections within your pelvis, tension is highly possible on the sciatic nerve.
8 Symptoms of a Twisted Pelvis
Back pain, hip pain, and knee pain can creep into your daily life and interrupt even the most simple of activities. But what is the culprit of your achy ailments?
Believe it or not, you may have a twisted pelvis. And it could be caused by nothing more than going through your day-to-day life (no obvious injuries needed).
Often referred to as a tilted pelvis, pelvic misalignment can create a dramatic chain reaction through your body – causing pain and tightness to arise in surprising places. It is easy to attribute pain in your lower back or even hip pain to things like arthritis, but there is a far more common reason that can be easy to overlook: muscle tightness that leads to pelvic tilt.
When you think about all the movements your hip region is responsible for, it’s not surprising that they may be feeling overworked.
Your hip flexor muscles are even engaged while you are sitting as they stabilize your core! And when these muscles are allowed to remain tight, they add strain to neighboring joints, muscles, tendons, and ligaments.
Over time, this muscle tightness has the potential to cause your pelvis to be pulled out of alignment. This leaves you with a twisted pelvis and a tight core.
The anatomy of your pelvic region
Before we jump into defining what a twisted pelvis is, and how to identify some possible twisted pelvis symptoms, it’s important to know how all the parts of your pelvic region interact together.
The bones and joints that are the main players in your pelvis include your femur (thigh bone), pelvic bone, and spine (vertebrae). Your thigh bone is what connects to the pelvic bone, making up your hip joint.

Your pelvis then is made up of three separate bones that connect: the ilium bones that join in front to make your pubic joint, and then one in back called the sacrum that connects to the ilium. This connection in the back is your sacroiliac joint. You’ve probably heard the sacrum referred to as the “tailbone.”
Now, to set the anatomical stage for your pelvis, let’s think of your bones as puppets.
Without your muscles, your bones would not be able to move around. The muscles grab hold of the bones at their connection points and pull on them like strings in a puppet show. Essentially, without your muscles (and ligaments or tendons), your bones are inanimate.
There are 19 different muscles that cross through your hip region. All of the muscles in your pelvis region play important roles and cross joints at different angles. Some of your muscles are very long, extending all the way from your pelvis to your knee joint, while others are only a few inches in length.
Two of the primary muscles are the iliacus and the psoas muscles. All of your muscles have their own specific job when it comes to movement, but they all work in conjunction with your iliopsoas.
They’re either working with your hip flexors or in opposition to them.
The iliopsoas muscles have two primary roles: they help your hip flex or move forward, and they hold the spine in place relative to your pelvis.
Essentially they are what keep you upright, whether in motion or sitting/standing still.
Your iliacus crosses over your hip joint and attaches to your pelvis which is why it affects your sacroiliac joint as well. Then, your psoas muscle crosses over your hip joint and the pelvis all the way to your lower spine.

These two muscles are also commonly known as your hip flexors or the iliopsoas muscles. And when not properly taken care of, they can be the culprit of your hip pain, back pain, and a whole other slew of issues. These muscles are NOT quiet about expressing their unhappiness!
There are other major muscle actors that help with hip flexion, including the pectineus, rectus femoris, tensor fasciae latae (connects to your IT band), and part of your gluteus medius on the outside of your hip. All of these muscles help the iliopsoas perform hip flexion, but there are also many muscles that pull in the opposite direction.
These opposing muscles are in a sort of tug-of-war, working to keep the bones in the proper alignment.
Most of the muscles that help with hip flexion and forward leg movement are on the front of your body, and the opposing muscles are on the back of your body. Your glute muscles are the primary muscles that help pull your leg backward (called hip extension), but these opposing muscles also include your quadratus lumborum, hamstring muscles, and the piriformis muscle.
Your body is at its optimal alignment when your spine, pelvis, and hip are all lined up and held together properly. But when your iliacus and psoas are too tight, they begin to pull too much in one direction or on one side, causing other aspects of your hip region to topple out of place.
For instance, when your iliacus is constantly pulling and tightening, it can pull your pelvis forward – adding tension to your piriformis muscle and SI joint. This can cause hip pain and even change your posture as the iliacus pulls on the hip and spine bones.
Once your bones are out of alignment, it can start to cause knee pain as your posture is compromised more and more. That effect will start to trickle down your whole leg and can manifest as knee or leg pain. It can even change your walking stride.
It’s clear to see that, without healthy hip flexors, you don’t have a strong foundation. And you are likely set up for a domino effect of issues – including a twisted pelvis.
What is a twisted pelvis?
It is good to know how your muscles and bones are working together, and that tight muscles can cause a twisted pelvis, but what exactly does that mean?
The short definition of a twisted pelvis or pelvic tilt is an abnormal positioning of your pelvic bone.
When your pelvis is in a neutral position, your ilium (the large, flared portion of your pelvic bone) forms a joint with your lower spine (the tailbone or sacrum). As I mentioned above, this junction is known as the sacroiliac (SI) joint.
There is also a socket that forms at the base of your pelvic bone which is where your hip joint ball and socket junction with your thigh bone.
A neutral pelvis position is when the hip points and your pubic bone are aligned and in the same plane. This means that they are vertical when standing – and horizontal when you are lying down – and that both sides of your hip points are also aligned in the same plane.
A twisted pelvis occurs when there’s a misalignment of the pelvic bone itself, which is why a twisted pelvis is often referred to as pelvic misalignment.
There are several causes of a pelvic misalignment, but they are usually either structural or functional problems within your legs, hips, or spine. The most common causes of pelvic tilt include:
- Muscle imbalances
- Uneven leg lengths
- Spinal scoliosis
- Tight iliopsoas muscles
The primary cause of your pelvic tilt is also a determining factor in the exact type of pelvic misalignment you have. There are three main types:
- Anterior pelvic tilt: Anterior pelvic tilt is when your hip bones are pushed or pulled forward. This occurs when the bottom of your pelvic bone tips back and up. This type of pelvic tilt is the most common one associated with tight hip flexor muscles. It is also a common issue during pregnancy.
- Lateral tilted pelvis: A lateral pelvic tilt (or pelvic upslip) is when the pelvis is misaligned side to side. This means that one side of your hip is sitting slightly higher than the other, causing a tilt. This type of pelvic tilt is most often caused by uneven leg lengths or spinal scoliosis.
- Posterior tilted pelvis: Posterior pelvic tilt is the opposite of an anterior pelvic tilt. It happens when your pelvic bone scoops under the body towards the front. This type of misalignment pushes your hip bones backward and stretches your lower back muscles, flattening the natural curvature of your lower spine. A common cause of posterior pelvic tilt is tight hamstring muscles.
Since there are varying causes for each type of pelvic tilt, the culprit of your own issue can sometimes be difficult to identify. But, more often than not, you will start off with an innocent sensation, like tight hip flexor muscles. As the pelvic tilt worsens over time due to poor posture, excessive sitting, or general muscle weakness and imbalances your symptoms may become more noticeable.
8 clues or twisted pelvis symptoms
The first step toward a twisted pelvis correction is identifying if you have a pelvic misalignment to begin with. This can get tricky because not everyone that has a pelvic tilt can visually see it. In fact, they may not have any obvious symptoms!
The symptoms of pelvic misalignment often begin to occur in patients with severe pelvic tilts, whereas minor tilts may not have any pain or discomfort associated with the issue.
If your twisted pelvis does cause symptoms, they will often occur in a variety of places in your body, not just the pelvic region. For example, if…
- You are experiencing hip pain, lower back pain, or leg pain
- Your gait is uneven or you are having trouble walking normally
- You are experiencing SI joint irritation and inflammation
- You have pain in your buttocks
- You feel numbness, tingling, or weakness of your legs
- The height of your hip bones is uneven
- You are experiencing pelvic floor muscle weakness
- You have an extreme lower back arch or lack of an arch
…then you may be experiencing twisted pelvis symptoms.
Identifying a pelvic tilt can be difficult when basing it solely on symptoms because it can mirror several other issues, including sciatica pain. Consulting a medical professional or doing an at-home pelvic tilt test can help you narrow down the possible causes of these symptoms.
To properly and officially diagnose a twisted pelvis, your doctor will likely perform a physical exam and measure the angle of your pelvis to determine the type and severity of the tilt. The physical examination will usually be accompanied by various questions to help determine the best course of treatment.
Remember, there is no replacement for an official diagnosis. It’s always important to work with a licensed professional before beginning any treatment program.
Twisted pelvis treatment options
A twisted pelvis can cause several issues, including pain that interrupts your daily life. But I have good news for you: It can be corrected relatively easily – and without surgery in almost all cases.
Once the cause of your pelvic tilt has been determined, then you and your doctor can decide the best type of treatment for your specific needs.
For instance, if you have a twisted pelvis that is caused by muscle problems like tight hip flexors, then treatment will involve extended pressure release of the psoas and iliacus muscles, hip flexor stretches, and the appropriate strengthening of the hips, glutes, and core.
Keep in mind that although this is likely to treat anterior pelvic tilt, tight hip flexors can also pull on and tighten muscles on the back of your hip like your piriformis. So, stretching, strengthening, and pressure release should occur on both sides.
When working on how to fix a rotated pelvis, it can be beneficial to work with a physical therapist to target specific needs. We can teach you how to do exercises and stretch properly to avoid creating more issues and avoid pain.
A physical therapist can also perform pressure release of your muscles for you. This is often the easiest and only way to target your iliacus and psoas muscles responsible for an anterior pelvic tilt.
That’s because it’s nearly impossible to find the right angle and apply the right amount of pressure needed to release these muscles on your own.
But I have more good news for you.
With the help of the Hip Hook, you can perform this much-needed muscle release at home. This is a great supplement between your appointments, making treatment more accessible and effective.
If you experience severe pain due to a twisted pelvis, some doctors may recommend certain injections to alleviate pain as you begin treatment. Although surgery is uncommon, if the pelvic tilt is due to a structural problem of some kind, it may be necessary.
Frequently asked questions about having a twisted pelvis
Is a tilted pelvis painful?
One tilted pelvis symptom can be pain or tightness in the muscles and areas around your hips. The level of discomfort you feel often depends on the severity of the tilt or misalignment.
If you are experiencing pain in your hips, lower back, and knees you may want to discuss the possibility of having a tight iliopsoas and/or pelvic tilt with your doctor or physical therapist.
Can a tilted pelvis cause bladder issues?
Yes, a severely tilted pelvis can cause some incontinence, if left untreated. When your pelvis is misaligned, it can impact the strength of your pelvic floor muscles which can make it more difficult for you to control your bladder. This is a normal symptom that can be managed or may even go away with an effective treatment plan.
Should I see a chiropractor for my twisted pelvis?
A chiropractor can be a helpful resource during your treatment of a pelvic tilt but they should not be the sole treatment provider. A combination of chiropractic work, physical therapy, and consistent at-home exercise can help move your pelvis back into alignment over time.
But remember, to keep your pelvis and hip muscles happy, you’ll need to make some changes to your daily habits, posture, and stretching routine.

How to Fix Anterior Pelvic Tilt: 6 Exercises and Stretches
If you are reading this article, then you likely are aware that you have – or at the very least suspect that you have – an anterior pelvic tilt. And if you have that suspicion, then it’s quite likely and completely reasonable that you want to know what you can do to fix it.
You are in luck, my friend! Because we are going to dive into what an anterior pelvic tilt is, common causes, and some symptoms I frequently see. And last but not least, I’m including some targeted anterior pelvic tilt stretches and strengthening exercises to help promote proper pelvic alignment and happy hip flexor muscles.
What is anterior pelvic tilt and what causes it?
When you have a neutral pelvis, it should fall within the range of 7-10 degrees of tilt. The neutral pelvic angle is what creates your lordotic curve, or the small curve of your lumbar spine. That curvature is healthy and we like to see it!
But if you have anything beyond 10 degrees of tilt, it becomes a diagnosable anterior pelvic tilt or rotated pelvis.
So an anterior pelvic tilt is a misalignment of your pelvis that specifically causes the front of your pelvis to rotate forward and the back of your pelvis to rise. When the angle becomes more dramatic or tilted, then your posture can begin to change – causing issues with stability, mobility, and even some loss of balance.
There are three types of pelvic tilt, but an anterior tilt may be the most common – at least among my clients. The reason that anterior pelvic tilt tends to be more common than posterior or lateral pelvic tilt is because of the very common cause: tight hip flexor muscles.
If you are familiar with the many issues tight hip flexors can cause, then you may not be surprised to learn that tight muscles may also be the culprit(s) behind your twisted pelvis. That’s because these muscles are responsible for hip flexion or the forward movement of your leg. Things like sitting for extended periods, muscle imbalances, and strenuous exercise can all contribute to tight hip flexors.
But there’s more to fixing this issue than simply doing some hip openers or gentle stretches. You need to understand how these muscles connect to and work with your pelvic bone.
Your hip flexors are made up of two muscles: the iliacus and psoas. The connection points of these muscles are on your lower back and the top of your femur. They overlap each other and work together, which is why they are often grouped together and called your iliopsoas muscles.
Because of the location of the iliopsoas muscles, when they are tight, they cause a chain reaction throughout the pelvic region. If they are allowed to remain tight, they will begin to pull the pelvis forward, shortening the distance between your pelvic bone and femur.
This can cause tightness, pain, a shortened stride, a limited range of motion, and a visible anterior pelvic tilt. As your pelvis shifts more, additional strain is put on the muscles all throughout your pelvic region, which can cause muscle tightness to become even more pronounced.

How do I know if I have an anterior pelvic tilt?
Identifying if you have a pelvic tilt can be difficult because not everyone will present obvious or visible symptoms. That being said, these are some of the most common twisted pelvis symptoms to be aware of:
- Hip pain
- Lower back pain
- Knee pain
- Irregular walking gait
- Pelvic floor tightness
- Incorrect posture
The only way to know for sure that you have a pelvic tilt is to see a licensed professional. They will do a physical exam, listen to your symptoms, and measure your pelvic angle before making a diagnosis. They will also show you how to fix anterior pelvic tilt with a customized treatment plan that may include a mix of physical therapy and chiropractic appointments.
In addition to that, you can also do some simple at-home exercises to alleviate pain and other symptoms and speed up your recovery time.
How to fix anterior pelvic tilt with 6 simple exercises
Although a twisted pelvis can cause a wide range of symptoms and issues, it is relatively easy to find a treatment that works for you. Correcting anterior pelvic tilt often involves a combination of physical therapy and at-home stretches, workouts, and muscle pressure release.
Many of the exercises and stretches used to fix anterior pelvic tilt are related to how to fix a rotated pelvis of any kind, they are then just switched to target different muscles. Working with a physical therapist will ensure you are incorporating the right movements, help you practice correct form, and give you a supportive environment to retrain some of your muscles.
An anterior pelvic tilt is often caused by muscle tightness or imbalance. So when you’re trying to fix an anterior pelvic tilt, most exercises will focus on releasing the muscles and building balanced strength.
Though some of these exercises may look familiar or seem easy, it’s important to remember your muscles are not operating at peak performance. So I suggest slowing down, decreasing the weight (or only using your body weight), reducing the number of repetitions you do, and being mindful about your breathing during your exercises.
Feeling ready?
Without further ado, here are my top six exercises for learning how to fix anterior pelvic tilt from the comfort of your own home.
1. Hip thrusts/bridges
Although there are many strength training exercises you can try when treating anterior pelvic tilt, hip thrusts (also known as hip bridges) are one of my favorites.
Hip bridges should be done just using your own body weight. It’s possible to do them either elevated with your back on a bench or lying down with your back flat against the floor. If you choose the latter, make sure you’re fully connecting your back to the floor with a neutral curve in it. This will allow you to get the full range of motion needed to reap the benefits of this movement.
Hip bridges engage your glutes to help strengthen the muscles on the back of your hips. This will encourage some posterior tilt to counteract the anterior tilt you are experiencing. Adding a hip resistance band is an option you have to help target the outer hips/glutes and make this exercise more challenging.
2. RKC planks
RKC planks are essentially forearm planks with your hands interlocked and your feet a little wider than hip-distance apart.
Pull your stomach in tight, make sure your shoulders are engaged, and squeeze your core, glutes, and quads in order to lift and hold your body up. Practice doing this for a few seconds at first and continue to work your time up.
These planks are more beneficial than other ab exercises because they are not meant to actively engage the hip flexors. Instead, they primarily engage the abdominal muscles and your glutes, which makes them a fantastic choice when learning how to fix anterior pelvic tilt.
3. Lying pelvic tilts
A pelvic tilt exercise can either be done laying down or standing. I particularly love this one because it trains your pelvis to be able to move into a posterior pelvic tilt position.
To perform a lying pelvic tilt you should:
- Lay down on your back with your knees bent up toward the ceiling and your feet planted on the floor. (If you have an anterior pelvic tilt, you’ll notice a large space between the floor and your low back because of the accentuated curve of your lumbar spine.)
- Flatten your lower back towards the ground. While you are pushing your back down, engage your glutes.
- Relax and return to the starting position.
- Repeat 10 times.
4. Standing pelvic tilts
You can achieve a similar exercise described above with standing pelvic tilts, but it will be more difficult because you no longer have the help of gravity to stabilize yourself!
While the movements will be the same as a lying pelvic tilt, it can help if you do this in front of a mirror so you can see if you are moving fully into a posterior tilt position.
- Stand sideways in front of a mirror.
- Relax and spread your feet shoulder-width apart.
- Squeeze your glutes and lower abdominals as you move your pelvis into a posterior position.
If these movements are too difficult or you can only tilt your pelvis a little bit, not a problem. Make this your goal to work toward and note your progress over time.
5. Hip flexor stretches
Strength training exercises aren’t the only thing you can try when learning how to fix anterior pelvic tilt. Integrating hip flexor stretches into your treatment can also have some benefits.
Be mindful that it is possible to overstretch your hip flexors and if you do this it can cause them to tighten more severely, making your problems worse instead of better!
Some stretches to try when learning how to fix anterior pelvic tilt include:
- Standing quad stretch
- Low lunge stretch
- Standing hip flexor stretch
If you’re unfamiliar with hip flexor stretches or how to safely complete them, then it can be helpful to have a physical therapist guide you through the stretches, the form, and how long to hold each stretch.
And if you already are someone that regularly does yoga or stretches after exercise, then be especially mindful of how intense your hip flexor stretches are getting. Don’t hesitate to ask for guidance from your physical therapist.
6. Muscle pressure release
Although exercise and stretching are integral parts of how to fix anterior pelvic tilt, one of the most effective ways to treat tight hip flexors is a prolonged pressure release of the muscle.
You may experience a pressure release of your iliacus or psoas when you are at the physical therapist, and you’ll notice that it is difficult (in fact, nearly impossible!) to reach and release those muscles without assistance from another person.
Since you likely don’t go to the physical therapist daily, having a way to release your iliacus muscles at home is a necessary part of fixing anterior pelvic tilt.
The Hip Hook is the only tool available that allows you to perform a prolonged muscle release of your psoas AND iliacus muscles. It gives you the ability to gently and safely release your hip flexors from the comfort of your home. Used between physical therapy visits, it has proven extremely useful with many of my clients.
Using the Hip Hook has become one of the most effective ways I’ve learned how to fix anterior pelvic tilt caused by tight hip flexor muscles.

Achieving proper pelvic alignment
How long it takes to fix anterior pelvic tilt will depend on the severity of the pelvic tilt angle and the consistency of your treatment activities. But the good news is, it is almost always treatable with physical therapy exercises.
Some people may experience a great deal of pain due to their twisted pelvis, so it may take longer to heal due to a limited ability to perform certain exercises and stretches.
In severe cases, some pain-relieving medications and even injections may be prescribed to help jumpstart other aspects of the treatment. And, if a structural issue is causing your twisted pelvis, surgery may be required. That’s why it’s so important to consult a health professional to learn how to fix anterior pelvic tilt for your case.
Most of the time, simply applying the six exercises listed above on a consistent basis is enough to put you on the right track to a healthy, pain-free pelvis and proper alignment.
Frequently asked questions about anterior pelvic tilt
How do you tell the difference between anterior and posterior pelvic tilt?
When you are experiencing an anterior pelvic tilt, the front of your pelvis drops forward and the back rises. When you have a posterior pelvic tilt, it is the opposite. So, the front of the pelvis rises and the back of the pelvis drops.
That’s why when looking at someone with a dramatic anterior tilt they will have an accentuated curve in their lumbar spine. Whereas someone with a posterior pelvic tilt will have a flatter lumbar spine.
Can anterior pelvic tilt make your belly stick out?
When you have an anterior pelvic tilt, it can cause poor posture that comes in the form of slouching forward and your belly protruding further out than normal.
This happens because as your pelvis is pulled forward, the curve in your low back is more pronounced, your butt is pushed out more, and your belly may protrude forward – creating the illusion of a larger stomach. Fixing anterior pelvic tilt has the ability to change your appearance, but it will not necessarily cause you to lose weight.
Can anterior pelvic tilt cause digestive issues?
It is possible that anterior pelvic tilt can cause some digestive issues if there is enough pressure put on the abdominal muscles. The most common issue associated with pelvic tilt is constipation, although other gastrointestinal problems are possible.
By releasing the iliopsoas muscles and doing the exercises to fix anterior pelvic tilt, you may notice
What is Anterior Pelvic Tilt? Causes, Symptoms, and Solutions
There are a few types of pelvic tilt and they all have one thing in common: misalignment of the pelvis. How you fix anterior pelvic tilt, posterior pelvic tilt, or lateral pelvic tilt varies from case to case, but most of the time they have very similar causes.
Anterior pelvic tilt (also referred to as APT or hyperlordosis) can be difficult to identify, and it is suggested that anywhere from 75-85% of people that have anterior pelvic tilt don’t show any symptoms.
Treating APT can take some time and consistency, but it is very possible.
But first, to help you identify if APT is the cause of your posture challenges or hip pain, let’s talk about what it is and some of the symptoms that will help you recognize it.
What is anterior pelvic tilt?
Anterior pelvic tilt is when the front of your pelvis rotates forward and the back of your pelvis rises. This shift in your pelvis changes your posture and can disrupt the kinetic chain of your body, leading to other alignment issues in your back, neck, legs, and knees.
Pelvic tilt or a twisted pelvis of any kind can cause a lack of stability and mobility, poor posture, and some loss of motor control depending on the activity. Your hip flexor muscles are also impacted by this change in pelvis positioning.
Sometimes tight hip flexors are a symptom of pelvic tilt, sometimes they are the cause, and sometimes they are both! Your hip flexor muscles, or iliopsoas, connect and attach to your pelvis and lower back. When the pelvis shifts, there is additional strain put on these muscles that can cause them to increase muscle tightness.
Although the iliacus and psoas that make up the iliopsoas often are the most likely to be impacted by a pelvic tilt, the rectus femoris (in your thigh) and quadratus lumborum (in your lower back) may also be influenced.
All of these muscles impact your posture. That is part of the reason why hyperlordosis becomes most obvious with bad posture or posture changes.
When you have a neutral pelvis, there will still be a slight forward tilt and healthy curvature in your lower spine. This natural tilt is why we have a small curve in the lumbar spine (lordotic curve). But once that tilt is more than 10 degrees in any direction, it becomes a diagnosable condition.
While an anterior pelvic tilt is identified by a pronounced curve in your back, a flat lower back or lumbar spine is one way to identify a posterior pelvic tilt. Lateral tilts can be more difficult to see, but may be visible in the form of uneven shoulders or a waistline that appears tilted more to one side or the other.
Anterior pelvic tilt symptoms
The two most obvious anterior pelvic tilt symptoms or signs include a bulging abdomen or an exaggerated lumbar spine curve. You may also notice that the waistline of pants or shorts are diagonal to the floor, angling downward instead of at the ideal horizontal angle.
Some other anterior pelvic tilt symptoms include:
- A muscle imbalance specifically regarding the quadriceps and low back dominance
- Stiff or tight iliopsoas or hip flexor muscles
- Weak abdominal muscles
- Difficulty activating glute muscles
Anterior pelvic tilt can worsen with time and if there is no intervention or treatment. As the pelvic tilt becomes problematic, it can lead to difficulty with some movements like squats and deadlifts when exercising. It can also cause a higher likelihood of knee and low back pain and injuries.
Although these signs may seem somewhat obvious, identifying and treating APT always requires a formal examination.
Why?
Some people are simply born with a tilted pelvis. Sometimes, trauma of some kind may have shifted a person’s pelvis, or tight muscles may have pulled their pelvis out of alignment. There are many reasons a pelvis could be tilted. An examination can help you understand why and call out any other treatment that may be needed.
Anterior pelvic tilt causes
Muscle imbalance is a common theme with anterior pelvic tilt. In fact, it could be a symptom or cause of APT. Other causes of include:
- Genetics
- Excessive sitting
- Lack of physical activity
- Tight hip flexors (iliopsoas muscles)
Shortened, tight iliopsoas muscles are a major signifier of hyperlordosis (but again, can also be the cause of pelvic misalignment). And they are caused by everyday things like a lack of physical activity, long daily commutes, practicing sports, and even overstretching.
These day-to-day activities cause your iliopsoas muscles to become overworked or compressed in the same position for prolonged periods of time. As these weakened muscles stay in that position, they need to work extra hard to stabilize your pelvis and core, causing them to tighten.
And that tightness puts unnatural strain on your pelvic bone – causing more tightness, pain, muscle knots, and a forward pelvic tilt.
As if that weren’t bad enough, while the pelvis is being pulled forward, it lengthens and weakens your hamstrings on the backside. And that creates even more muscle imbalance.

Anterior pelvic tilt test
To determine if you have an anterior pelvic tilt, you should look for some of the common signs I mentioned earlier and get a diagnosis from a doctor.
But if you’re just beginning to suspect you may have some pelvic misalignment, there is an easy test you can do at home. Doing this yourself or having a loved one do it will provide some clues about whether or not there is an unhealthy tilt in the pelvis.
Just remember what I said before: some people that have hyperlordosis may not have very obvious signs or symptoms of it so getting a professional medical opinion is always recommended.
To do an anterior pelvic tilt test at home you should:
- Stand in front of a mirror or have someone take a picture of you from the side.
- Locate the anterior superior iliac spine (ASIS) on the front of your pelvis.
- Locate the posterior superior iliac spine (PSIS) on the back of your pelvis.
- With both the ASIS and the PSIS marked so you can see their location, stand sideways in the mirror or have someone take a picture. This allows you to see the angle or level of the PSIS in relation to the ASIS.
To find the ASIS, find the top of your hip bone or iliac crest. Put your hand on the top of the hip bone and follow that down until you come to a bony ridge on the front of your hip bone. Mark this somehow or have someone hold their hand on it while you do the test.
To find the PSIS, start with your hand in the dimples of your low back right where your spine goes into your sacrum. To find your PSIS, move an inch out to the side until you find a little bony protrusion. Make sure you mark this spot as well.
If the PSIS is a lot higher up (more than 10 degrees), then you have an anterior tilt. It can be hard to tell the exact angle when just looking in a mirror, but if you have an obvious tilt it will be visible.
When you go to a doctor or physical therapist for your examination, they will likely do an exact measurement to determine the angle of the pelvic tilt. It will allow them to determine the severity of the tilt and how to best address things moving forward.
How to treat anterior pelvic tilt
Luckily, anterior pelvic tilt can be treated through a variety of exercises and a training routine to realign the pelvis and balance out the muscles.
With consistency and a targeted training plan, correcting your pelvic tilt is possible. However, to understand how severe the issue is and how long a treatment may take, it is often most effective to do this process with the guidance of a physical therapist.
Some of the most effective exercises to use when correcting an APT are those that target the abdominals and glutes, such as:
- Squats
- Glute bridges
- Band walks
- Dead bugs
- Planks
- Side planks
It is important that when you do these exercises that you focus on your form. You can do them in front of a mirror to watch yourself.
And, when you choose to exercise one side, you must also remember to exercise the other to maintain balance. That also applies to when you work your abdominals – don’t forget to exercise your backside as well.
It’s all about balance!
Since your muscles are such a factor in the cause of an APT, addressing the tightened hip flexors is also necessary. Stretching can be beneficial to a point, but it will not be able to actually release the muscle tension.
To do this, you need to use muscle pressure release.
Unfortunately, due to the location of your iliopsoas or hip flexor muscles, it is hard to perform a pressure release of these muscles on your own. A physical therapist is trained to provide this sort of muscle release, but for best results it also needs to be done more consistently.
So, what’s the solution?
You can achieve a pressure release of the hip flexor muscles at home using the Hip Hook. With just 10 minutes or less a day, you can relieve muscle tightness in the hard-to-reach psoas and iliacus muscles.
The Hip Hook alone is not the sole answer to your anterior pelvic tilt issue, but it can play an integral role in realigning your pelvis by helping to balance out your muscles and preventing the iliopsoas muscle from pulling the pelvis out of alignment further.

Frequently asked questions about anterior pelvic tilt
What problems can a tilted pelvis cause?
Beyond impacting your posture, and general comfort in the pelvic region, an anterior pelvic tilt can lead to pelvic floor dysfunction.
Since a pelvic tilt of any kind is often influenced by the muscular imbalance and tension around the pelvis, your ability to control the muscles of the pelvic floor can be lost. This can lead to other issues due to the connection between the pelvic floor muscles and some organ function.
Because of the connection between APT and tight hip flexor muscles, it is not uncommon for people that have an APT to experience hip flexor pain while sitting, squatting, running, cycling, and while performing other daily activities.
Is anterior pelvic tilt painful?
Anterior pelvic tilt isn’t often associated with specific pain. However, due to the misalignment of the pelvis, it can cause a kinetic chain effect that creates pain in other parts of the body such as the hips, lower back, and knees.
How long does it take to fix anterior pelvic tilt?
The length of time it takes to correct an APT depends on the severity of the problem and varies for each person. That is why a personalized training and treatment program is recommended for anyone that is working to correct their hyperlordosis.
Are there other types of pelvic tilt?
While ATP is a common type of pelvic tilt, it is not the only type. Two other types of pelvic tilt are posterior pelvic tilt and lateral pelvic tilt.
Posterior pelvic tilt is essentially the exact opposite of ATP and is when the front of your pelvis rises and the back of the pelvis drops.
Lateral pelvic tilt is when your pelvis shifts from side to side. So, one side of the pelvis would be higher than the other.
Can a chiropractor correct pelvic tilt?
If your pelvic tilt is severe, then visiting a chiropractor may help improve your treatment process but it should not be the only method of treatment you seek.
A chiropractor may be able to help shift your spine back into alignment and influence some pelvic alignment as well, but cannot fix ATP fully, as it’s not solely a bone issue. Without correcting muscle tightness and muscle imbalances, your problem with hyperlordosis will persist.

Why Chest Stretches Aren’t Enough: Press on This Muscle
There are tons of benefits attached to stretching. One of them is to help you increase your range of motion as well as improve your flexibility. The increased blood flow to your muscles means that you get a natural performance boost when you participate in physical activities.
But have you ever noticed that you can stretch one day but the next day you’re back to square one? Maybe that pain around your neck and shoulders only gets temporary relief. Your initial response would be to stretch, but it doesn’t seem to have much effect.
If your chest stretches have only been helping temporarily, this is because the underlying causes of the pain and tightness you are experiencing requires a different solution.
Causes of chest tension
There are two main causes of tight chest muscles. One is motion tightness, and the other is tension tightness. Motion tightness means a muscle is not extending to its full length: for example, you want to touch your toes, but your hamstrings are too “tight”. Your brain may be holding onto this muscle and keeping it from fully extending.
On the other hand, tension tightness indicates your muscles are having tension throughout, even when you are not engaging them. At rest, a healthy muscle is soft and supple. You may be able to make movements with these muscles, but it will feel like they are tight or knotted.
Your daily habits may be contributing to tight chest muscles. The biggest culprit is your posture. Poor posture places sustained strain on a muscle, or muscle group. Over time, your brain learns to hold the tension to support your hunched posture, for better or for worse. This leads to forward head posture, or tech neck, leaving your neck supported by muscles instead of your spine and creates headaches, neck stiffness, shoulder pain, and even migraines.
Causes may include:
- Excessive driving
- Laptop/keyboard use
- Cell phone use: texting/scrolling
- Stress and trauma
- Carrying heavy loads for extended times (i.e. baby on the hip)
Here’s why you have rounded shoulders
When you look at yourself in the mirror, you may not appreciate the side view. This is because you look as if you’ve hunched forward; like a cartoon witch.
There are many reasons as to why you have such a posture. It could be from all the time you spend on your computer or handheld device, but the main culprit is continuous tension in one key muscle in your chest.
The pectoralis minor is a muscle that attaches to the shoulder and the ribs. The muscle’s main function is to stabilize and to help protract the shoulders. It also plays a part in lifting the ribs whenever you inhale.
Each time you experience tension tightness in this muscle, it pulls your shoulders forward, making you look like you are hunching. This marks the beginning of posture issues and that desire to constantly stretch your chest.
How to find the pectoralis minor muscle
First, place the palm of your hand over your heart and have your fingertips underneath your collarbone close to the shoulder. Then, while keeping your torso still, reach the fingertips of your straight arm to the floor. You’ll feel a muscle in your chest tighten and contract. This is your pec minor muscle.

How pressure helps relieve tight chest muscles
You can get some temporary relief by using any chest and shoulder stretch for the muscle experiencing tension tightness. You can remedy the situation by applying some pressure to the tight muscle.
Note that tension tightness occurs when your brain recalibrates to accommodate the new hunched posture. Once you place pressure on the muscle, you effectively cause it to relax. However, it is your brain that needs rewiring to allow the muscle to relax completely.
As such, placing pressure on the affected muscle regularly will help teach your brain how to let go, and to completely release the tightness in the muscle.
Why do you have neck and shoulder pain?
The problem with rounded shoulders is, it doesn’t only affect your posture and the pectoralis minor, it also has a domino effect on other muscles and nerves around your head and neck.
Rounded shoulders means your neck has to adjust by leaning forward and downward to keep you balanced and looking ahead. In turn, this ends up compressing the muscles and nerves at the base of your skull. Rounded shoulders also cause issues with your rotator cuff muscles, which results in a slightly depressed range of motion for your shoulder joints.
Also, the kind of work you do tends to be asymmetrical. Looking at a monitor, holding a baby, or using a mouse and other tasks mean you place more work on one side of your body than the other. Subsequently, you create a repetitive twist through the spine, creating strain and tension on either side. The strain, in turn, causes you to hold tension in the muscles supporting your shoulder.
Your brain will want to maintain balance, so it forces your head to compensate for the side where your shoulder is experiencing tension tightness. You end up stressing one side of the aforementioned muscles. When these muscles are strained, they cause referral pain. You may begin to feel headaches and eye pain. In addition, you place pressure on the nerves at the base of your skull.
There’s a lot happening there! And it can be traced back to tension in the pec minor muscle!
Chest stretches and muscle release
The best way to relax tight muscles is through direct, prolonged pressure. What you need is a tool that can help you address the root cause of chest tension. This means applying pressure to key muscles for prolonged periods of 90 seconds. You can do this with a tennis ball or a specialized tool like the Nuckle, designed to isolate and release these specific muscles. With the right tool, you can easily isolate the small but powerful muscle groups, relieve tension and hunching in your shoulders, and hold your head high.

FAQs about tight chest muscles and chest stretches
What are the best chest openers?
The best chest openers aren’t stretches: it’s pressure applied to the pec muscles. Tight muscles need pressure to send the message to the brain that it’s safe to relax.
How do I get rid of rounded shoulders?
Stretching will only provide temporary relief for rounded shoulders; applying pressure to the pec minor muscles will allow the shoulders to release tension and realign.
How do I improve posture and rounded shoulders?
Tension in the pec minor muscles is responsible for rounded shoulders. Releasing these muscles by applying direct pressure is the best way to allow your shoulders to realign.

Hey Guys: Release Your Psoas for Better Sex
Sitting, Sex, and the Psoas (the p is silent). English is weird.
You may think this title is just some clickbait to get you here. Truthfully, it is not. Men’s sexual health and erectile dysfunction affect a large population of men. The worldwide prevalence of erectile dysfunction is expected to increase to 322 million men by 2025, affecting 30 million American men.
The iliopsoas muscle and men’s health
I’m not saying that sitting is the primary cause of less-than-stellar sex life or erectile dysfunction. There are many variables to take into account – diet, exercise, stress – that can all affect men’s reproductive and sexual health.
I am going to be focusing on one overlooked piece of the puzzle: the iliopsoas muscle. This muscle is made up of two separate muscles that merge into one: the psoas and iliacus. Together, they connect your upper body to your lower body. Traveling from the vertebrae of your lower back, through your pelvis, and attaching to the femur, the iliopsoas is a neighbor to a lot of important real estate. From nerves and arteries to lymph nodes and organs, any issue with the iliopsoas affects these neighbors as well.
The iliopsoas is one of your hip flexors, and there’s even preliminary research that the volume (size) of the psoas plays a role in male sexual health. Bicep curls are out, leg lifts are in! Balanced bodies are healthy bodies; focus on functional muscles for men’s health, not just the obvious eye candy.
Fight, flight, freeze
Think of this muscle as the fetal position muscle: It is strong, and it is meant to snap shut like a steel trap gluing your knees to your chest to shield your vital organs from an attack. This means that this muscle naturally holds tension when stressed, and when we add in 40+ weekly hours of sitting, this tension becomes chronic.
Sitting and sexual dysfunction
Humans did not evolve to sit at 90 degrees. Our hips evolved to sit in a deep squat comfortably (think pooping in the woods). Today, most people can’t even get into that position! This lack of mobility can result in some pretty serious issues, ranging from breathing, digestion, and constipation to reproductive and sexual health problems. Without the daily full range of motion of squatting deep to relieve ourselves, the hip flexors stop moving correctly and they begin to tighten until they are chronically contracted. Your body is the master adapter: if you sit with your hips flexed at 90 degrees for 8 hours a day, five days a week, your body is going to make changes to help you continue to do so. Unfortunately, this adaptation causes issues in all other areas of life, from sleeping to sexy time.
How do hip flexors affect sex?
Our hips are meant to be both an endurance runner, an explosive athlete, to walk dozens of miles a day and then cozy on down for some hot and heavy hip thrusts. But as modern men, we lock our hips into a seated position until they become weak and immobile. Over time, this immobility leads to pain, pain leads to dysfunction, and dysfunction is the last thing you want on date night!
Ever watch a hula dancer? Those are some healthy and mobile hips! You know what they say: it’s not about the size of the ship, it’s the motion of the ocean. And many of our oceans are solidifying into concrete.
Too much sitting locks up the hip flexors, the diaphragm, and the pelvic floor: affecting sexual functioning and the ability to hip thrust. Think of your pelvic floor as a hammock supporting your organs from the bottom and your diaphragm as an umbrella on the top. With each passing breath, the pelvic floor and diaphragm gently move up and down. This gentle up and down movement stimulates blood flow, digestion, and everyday processes. When we sit in a chair with poor posture, this movement stops and we begin taking shorter, more shallow breaths. This shallow chest breathing sends a cascade of stress signals that something is wrong, further compounding tension in the body.
Sexual performance for men: it’s all in the hips.
Probably the best line to come out of an Adam Sandler movie. So before you go down the road of little blue pills or chugging beet juice before the third date…
Two steps you can take to promote healthy hips and sexual performance
- Apply pressure to your tight hip flexors and gluteus muscles
- Stretch your hip flexors
No different than when someone massages your traps, and you melt into a puddle of bliss, the muscles surrounding your hips need the same treatment. Angry muscles relax under pressure. (This does not apply to an angry spouse: apologize and leave the room, slowly.)
Psoas release with prolonged pressure
Applying pressure to release the psoas and iliacus is tricky, and only possible with the right tool or a skilled practitioner. I recommend the Hip Release Ball, which has the right diameter and density to gently release the psoas. But if you really want to get in there, and release the psoas AND the iliacus (the entire iliopsoas muscle), you’ll need the Hip Hook.
The Hip Hook is a psoas release tool and iliacus release tool. It first releases the psoas through patented angular pressure. When you press down the handle, the Hip Hook pivots up into the iliacus muscle, providing the necessary prolonged (90 seconds) pressure for relaxation. This one tool effectively releases the long-standing tension held by your hip flexor, allowing for corrective exercises and stretches to have a much more lasting and therapeutic effect.
Once you have released the hip flexors, work the ball around the sides and back of your hips looking for tender spots. Once you have found an ‘ouch’, hold and breath on that spot for 90 seconds while your muscle relaxes around the ball. The usual suspects that get tight from sitting are the gluteus medius, obturator internus, quadratus lumborum, and piriformis muscles.

How to stretch your hip flexors
After applying prolonged pressure to the iliopsoas, now it’s time to stretch! The lunge stretch is highly recommended because it stretches the iliopsoas, bringing circulation and length to that muscle.
Step one foot forward with your spine straight. You can do this stretch with your knee on or off the ground. With this stretch, it’s important to engage your abdominal muscles, a light cough can achieve this, then contract your glutes by tucking your butt under you. This allows for the iliopsoas muscle to stretch fully over the joint while protecting your lower back from the psoas tugging on it while it’s being stretched.
You should feel the stretch in the front of your hip joint or the front of your thigh. If you’re not feeling it there or if you’re feeling it in a different spot, then stop. You can experiment with bending your spine to the opposite side of the leg you’re stretching to increase the psoas stretch.
To get lasting results from your hip flexor stretch, focus on using proper form and take generously deep breaths.
Hip flexor corrective exercises
The glute bridge is going to be THE exercise that keeps you on your A-game. This exercise stretches the hip flexors by activating the glute muscles. Sure, you’re just humping the sky, but we all know practice makes perfect, so get on the floor and start hip thrusting at least once per day. A solid goal to work up to is a 3-minute glute bridge, holding at the top of the movement (hips off the ground) for 3 mins as well as 100 full reps. Build stronger glutes and stretch your hip flexors at the same time.
Evolutionarily speaking, men’s hips are meant to thrust, ALOT. Unfortunately, it’s usually when our partner is in the mood which is not enough to maintain healthy hips. Walk, thrust, walk some more and sit only when you have to. To reiterate the importance, PLEASE DO THIS EXERCISE.
To learn more about how your hip flexors affect your body – and your sex life – check out Christine Koth’s book Tight Hip Twisted Core. For complete psoas release and iliacus release, I recommend the Hip Hook, and the Hip Release Ball for addressing the back of the hips and glutes. Releasing both the psoas and iliacus are important for full range of motion, pelvic strength, and a lifetime of amazing sex.
FAQs about tight hip flexors and sexual health:
Can tight hips cause groin pain?
Yes, tight hip flexors (iliopsoas) can result in misalignment in the pelvis, this misalignment can manifest as pain throughout the pelvic and groin area.
Can sex cause low back pain?
Possibly. A tight hip flexor (iliopsoas) can pull on your low back causing pain and reduced range of motion in the pelvis.
Does flexibility affect sex?
Stretching and tension release activities can promote blood flow and lymphatic drainage to the pelvis thereby improving the health and function of the pelvic floor and sexual organs.

Work Hard Play Hard Podcast – Resolve Mysterious Pain in Your Back, Hips, & Knees with This Little Known Secret
Christine was recently featured on the Work Hard Play Hard Podcast with Rob Murgatroyd discussing a solution for pain in the back, hips, and knees by releasing tension in the iliacus muscle using the Hip Hook.
Show Notes:
This show is all about fulfillment—which means feeling good. But if you have any sort of back or hip pain, then you know that feeling good is not easy. Enter Christine Koth, a physical therapist and best-selling author of “Tight Hip, Twisted Core.” She’s created a product called the Hip Hookthat gets access to the iliacus muscle and relieves a bunch of back and hip problems. She saw a problem and she solved it, and the result is transformative if you have hip or back pain. You’re going to get a ton out of this interview with Christine Koth.
Listen Here.
Full Transcript:
Rob Murgatroyd 0:00
Welcome to another episode of the Work Hard Play Hard podcast. My name is Rob Murgatroyd. And each week on this podcast, I talk to some of the most fascinating people on the planet in all areas of life, from mindset to fitness to spirituality, and, of course, business. Look, I believe you deserve success in all the areas of your life, not only business. But before we get into today’s show, you may want to join us on our next Work Hard Play Hard experience. This year, we’re going to be going to Mykonos and Marrakesh. In these experiences, I have hand selected a group of high performing business people who are seeking more balance connection, and they want to celebrate their wins as a reward for the hard work that they put in. If you want someone to curate once in a lifetime experiences and force you to play more, rush over to workhardplayhardexperience.com. Fill out an application so we can jump on a discovery call to see if this is a good fit for you. And remember, excuses are over. It’s time to live.
Christine Koth 1:15
Happy muscles don’t hurt. So if you go in and you lie on the Hip Hook and you don’t feel much, then that muscle is happy. If it feels really intense when you lie on the Hip Hook, then that muscle is not happy and needs your attention. When I talk about prolonged pressure, we’re talking about resolving muscle tension that is not relaxing when you’re relaxed. So when you lay down on your back and you’re in your bed, there’s absolutely no muscle in your body that should be working. The whole point of laying down, right, is to give everything a break. I don’t have any background in this but all the things that I’ve learned along the way have really satisfied my quench for knowledge and learning new things.
Rob Murgatroyd 1:59
Hey, everybody, welcome to the Work Hard Play Hard show. Today on the show is Christine Koth. Okay. This show is all about fulfillment, right? Which means feeling good. But if you have any sort of back or hip pain or anything like that, then you know what I’m talking about. Feeling good is not easy when you’re in pain. So in this episode, you’re going to hear an interview that I did with Christine Koth. Christine is a physical therapist, and the best selling author of the book Tight Hip Twisted Core. Now the reason I wanted her on the show is twofold. First, she created a product called the Hip Hook — the Hip Hook that gets access to a muscle called the iliacus. Now it doesn’t matter, I could barely spell it — doesn’t matter what the iliacus is. What matters is that the iliacus is inside of your pelvis. And really, really difficult to get to. You’re not going to get to it yourself and the physical therapist who is unaware of how to get to it is going to have trouble. So she created this Hip Hook, and the reason why you want to go after this iliacus is because it’s responsible for a ton of back and hip problems. So because it’s so difficult to get to, she came up with an idea. She said, What if I were to create this hook that you can lie on and it hooks into this iliacus? Now, I gotta tell you, I’ve been using this Hip Hook, it’s just coming out now the time this airs, it should be just out. It is transformative if you have hip or back pain. Now I also wanted her on the show because she’s an entrepreneur. She saw a problem that needed a solution and she went straight after solving it. She created the Hip Hook. So please enjoy this episode with Christine Koth.
Christine, welcome to the show.
Christine Koth 4:11
Thank you, I’m glad to be here.
Rob Murgatroyd 4:15
I am super freaking excited that you’re here. Because this show is called Work Hard, Play Hard and it is all about fulfillments. And to enjoy fulfillments you got to feel good. And you have created an ingenious product that can help people who are suffering from back pain, hip pain and some other related symptoms which we’re going to get into. So I’m really excited that you’re going to bet you’re here because seven out of 10 Americans right now are suffering from some sort of back related pain. So with that intro, welcome officially to the show. All right, before we get into what you created, I’d like to turn the clock back and take you back to growing up in the Midwest, great people, I was just in Wisconsin, actually, last week for the first time, a lot of farms…
Christine Koth 5:13
Lots of farms.
Rob Murgatroyd 5:14
A lot of farms. And we all have, you know, moments that shape our life. And one of those moments for you was a letter that you wrote to your dad to quit smoking. In what ways did his reaction to that letter shape what you’re doing professionally today?
Christine Koth 5:37
Well, it was really interesting, because when you’re young, you’re naive. I’ve always been an extremely optimistic person, you know, rainbows and unicorns and all of that. When I was a young child, I just thought that the world was a beautiful place, and that people were all great people, including my parents. So I thought if people are armed with the correct information, they’ll make the right choice. And in this particular situation, I have learned in sixth grade, all about the dangers of smoking and drugs and alcohol. And empowered with that knowledge, I brought it home to my dad, thinking if I gave him this information, he would have the knowledge he needs to be able to make the right choice and choose to stop smoking. So, enthusiastically I brought this information back to him and he kindly said, “Well, thank you for sharing this with me, but no, thank you, I’m not gonna quit smoking.” And it was like, you know, complete cognitive dissonance. I was like, “What?” You have this information, and you’re not going to use it, and you’re going to choose to do something that’s going to harm you. And ultimately, it killed him. He ultimately died from that. And so, it really set me on this path of really seeking to try to understand: number one, how the body works, and how I can choose to do something, it’d be different than the way that my dad was choosing to live his life, but also really trying to study how I can motivate people to take care of themselves, you know, because I wasn’t able to motivate my father. So it’s like, well, what does it take to give people the right tools and the right inspiration to want to make those life changes? So, being super curious about the body and about learning the psychology of human beings was really initiated from that moment.
Rob Murgatroyd 7:46
Yeah, for sure. It was a defining moment. You know, my dad also smoked three packs of lucky strikes a day from, my God, when he was 16 years old. And he said the same thing your dad did, “I’m gonna die of something.” But I don’t think he — he obviously, eventually wound up dying of a smoking related situation. But, like yours, there was no, there was no talking to him. And it was a different time. And it was a different place. And people today are taking much more responsibility for their health. And so when I see things like what we’re about to get into with what you created, I hesitate — I hesitate to call it a hack, because it’s — it’s way beyond a hack. But it is such an efficient way of solving an issue. So let’s dig into that and if we fast forward a bit, you decided to become a physical therapist, and you notice that there was a direct link to tightness in the hip flexor. A lot of people familiar with what a hip flexor is. And that tightness in the hip flexor actually winds up or potentially can wind up causing pain in lots of places all over the body. And you got really good at releasing tension in a muscle that’s called the iliacus. And I’m sure we’re gonna get into that as well, which is inside of the hip, and not easy to reach. Alright, so with that, can you take me back to the first moment that somebody said, “Wow, you worked on my iliacus” — they probably didn’t say that, but — “You worked on my iliacus and I feel amazing.” Take me back to when you made that first link.
Christine Koth 9:31
Surprisingly, this very first link happened right out of college. I’ve been practicing physical therapy for over 20 years. And you know, as this motivated, Type A, excited, just graduated PT school, got my first job, really trying to do the best job I could with each of my clients. I ended up having this wonderful woman come in to my office. She was a school teacher and she also loved to run as a hobby. She was doing marathons and loved long distance running. And she came in to see me with kneecap pain, patellofemoral pain, right in the front of her knee. And I was being a good girl and like looking at her entire body and looking at her posture, and I noticed that there was a rotation in the way that she was standing. So I got her on the table and was poking around, trying to figure out why she was rotated in her hip. And maybe that was related to why she was having knee pain. And one of the techniques that I had learned from one of my mentors that I was lucky enough to have right out of school was to look for the psoas — to really examine whether the psoas was tight. Now the psoas is one of the hip flexor muscles, and that is deeper in your abdomen. So if you were to draw a line from the front of your hip bone, to your belly button, the psoas would be halfway in between there and about maybe an inch or two in maybe, probably two inches deep into your body. So with my novice hands, I’m digging around looking for this psoas muscle. And I was a little nervous digging into somebody’s abdomen, right. But then, I started moving a little bit closer to the bone towards the outside of the body. And I noticed that right inside the pelvic bone, there was this other tight muscle. And I was like, “Ooh, what is that?” I looked it up in my anatomy book. “Oh, that’s the iliacus!” Okay, well, I feel more comfortable touching that muscle. It’s not so deep. So I went and put my prolonged pressure using my fingers. And then the client, my patient, was just like, “Wow, that’s so tight! I never knew that muscle was even there.” She was just thrilled that I had found something that no one else had found. And lo and behold, once I put pressure on that muscle, and it released, she could lie flat on the table, which she was unable to do before. She got up, her pelvis was no longer rotated, she was able to do a squat without knee pain, and then subsequently went on a run without any pain. So I was like, “Ooh, I am pretty good!” You know, being a little novice PT, I was pretty impressed with myself. So that really started the trajectory of me looking at that muscle and how it was impacting nearly everyone that came into my office from that point forward. And that’s how I started to develop and really understand this pattern of how this muscle and tension in this muscle impacts the rest of the body.
Rob Murgatroyd 12:39
You know, I was listening to Howard Stern interview with Alec Baldwin, I guess, maybe last month, and he was late for the show. And Howard said, “Why are you late? What’s more important” — he was joking with him, you know — “What’s more important than me?” And he said, “I had to get my iliacus worked on.” And Howard Stern says, “What the hell is an iliacus?” And he explained it to him. He said, “I have to go three times a week. It’s the only thing that solves my back issues. I’ve got somebody that works on that.” And then I saw your product, which we’re going to talk about in a bit that was targeted specifically towards that muscle. And I said, “This is interesting.” So this is the, you know, whenever I hear something, two times, I always pay attention, because I feel like it’s a whisper from the universe. So I looked into it more. And then that’s how we wound up connecting. But I want to ask you, about the pressure that you put on the iliacus, so for people that don’t understand you make some beautiful distinctions. And, I will talk about when I record the intro, for this episode, I’ll talk about your book “Tight Hip, Twisted Core” which is excellent. And I’ve been reading it in prep for this — this interview. And you talk about the difference between everybody just calling everything tight, you know, my muscles are tight. That’s really not the case. There’s a lot of other words that are associated with that. But the question I have for you is the iliacus — I would assume becomes shortened as you’re doing different activities, sitting, running, etc. and that shortening creates pain. Well, you probably can stretch out your hip flexors, you could probably stretch out your psoas you could probably go to somebody maybe to even kind of dig into the iliacus. But the goal is really to lengthen that iliacus, I would suspect, and my question is when you talk about putting pressure in the example that you just gave on somebody’s iliacus, can you explain exactly why holding a painful point for a few minutes or so will help it release and maybe even describe what a release is like what’s happening there?
Christine Koth 14:58
Yeah, absolutely. This is one of my favorite topics to talk about, because like you said, there’s so many ways that we use these words tight. And, you know, there’s not really a lot of clarity around that. So, when you think about a muscle, a muscle is designed to contract and then relax. And what can happen is for various reasons — that I talk about in my book — that a muscle can choose to contract and stay contracted. And it can be the entire muscle that chooses to stay contracted, it can be a portion of the muscle that stays contracted. And this is what we call a muscle knot. And we’ve all experienced this where someone comes up behind you and grabs your shoulders, and you’re like, “Ah!” there’s a tight knot and your shoulders and your upper trapezius muscle up in your top of your shoulder, that’s a very common place that people develop knots. And that’s what that means is there’s a section of the muscle that is holding a contraction and not relaxing, even when you’re not using it. So this is different than being tight in a way where you don’t have the full range of motion, when we do a stretch. Say we’re stretching our hamstring muscles by touching our hands to the ground, touching our toes and standing. You may not be able to touch your toes because your hamstring is not lengthening enough. But then if you stand back up, or you go to lie down, your hamstring may completely relax. And that means that that has no muscle knots or isn’t holding tension. So there’s two different kind of “tight” definitions there. When I talk about prolonged pressure, we’re talking about resolving muscle tension that is not relaxing when you’re relaxed. So when you lay down in your back and you’re in your bed, there’s absolutely no muscle in your body that should be working. That’s the whole point of laying down, right, is to give everything a break. And if you lie down and there’s still muscle tension, that means that that muscle tension exists when you’re walking, when you’re sitting when you’re driving to work when you’re going for a jog. Anything that you’re doing that muscle is holding tension. And this type of tension is what responds well to prolonged pressure. Prolonged pressure means putting pressure on the muscle and holding that for 30 to 90 seconds. If you do it for less, it’s not effective. If you’re just rubbing it and it’s not effective, you really need to put that prolonged pressure on the muscle and it works on a neurological level, meaning that pressure sends a signal to your brain over the period of that 30 to 90 seconds, that says okay, you can relax, you can change this pattern that you’ve developed, which is holding tension when you don’t need to. And it’s that neurological connection, and that reset that is what produces the results that we’re looking for.
Rob Murgatroyd 17:57
Okay, so I know it does do that. But do you know why it does that? So why would prolong pressure trigger the brain to say release?
Christine Koth 18:08
You know, there’s a bunch of different kind of, well, we can them neurological hacks using the hack word that that trick the brain into changing its pattern or thinking something is okay. So one of those, for example, is if you are trying to lengthen your hamstring muscle and get it to stretch — if you contract the opposite muscle which would be your quad that basically tells the hamstring muscle to relax. So if you contract the antagonist muscle, that is a way to trick the brain. And prolong pressure also just works that way. It’s just a way of the brain saying, “Okay, I’m going to let this relax.” There’s also some things that happen locally as well. So when you have muscle tension or muscle knots in the body, there’s a buildup of minerals. When minerals like calcium are responsible for causing contraction in the muscle and, when you put pressure on it, it increases the circulation there and helps clean out some of those excess minerals and toxins that have built up in that area, which also helps that muscle locally to release this tension.
Rob Murgatroyd 19:25
Okay, got it. You created this device called the Hip Hook, which is this magnificent torture device that I don’t know what else — I’m going to give you my experience with it here live, which I think will be good feedback for you anyway. I lied on top of it. And the moment I lied on top of it. I was like, “Oh my god, what is this? This hurts but it hurts so good. I don’t want to let…” It was this weird mix of get off of me, but don’t get off of me. I don’t know how else to explain it. Then following your instructions in your video, you basically say hang out, let it sit there for a minute, your body will start to adapt. And it was very, very quick, like 20 seconds quick. And I went, “Oh,” I went from torture to feeling nothing. Then, you have a little handle on this baby. And the handle is designed — that’s the hook part. The handle is designed for you to sort of like reach around in multiple ways, if you don’t have a lot of shoulder range of motion, and press it. And when you press it, it hooks into the inside of the ilium or the pelvis or the hip and it hits that iliacus muscle. And then I start to feel that torture thing again. This is grueling. And I can literally feel my body going into like, like starting to sweat. Like when you get pain, and it’s like somebody’s pushing on it. But it doesn’t last long, it’s pretty quick, and you can feel it start to release. Your desire is to do exactly what we talked about earlier, which is to not stay on it, and to get off it. But you’re not going to affect the change if you do that. So I put a little timer on my iPhone, and I just went for, you know, I’m an overachiever. So I went through the 90 seconds and got up and I was like, “Whoa, I feel different.” I started walking and I was walking different. It felt like more range of motion in my gait, which is the only way I know how to describe it. So for people that — because you’re going to have people that are going to be ordering this for sure. And then want this to serve as a resource for the people, you know, to introduce it, but also for the people when they get it to have some tactical things that they can do with it. So one of the things that I’m aware of that one of the questions that I have is when you are going into the iliacus, you’re also hitting the psoas, which I believe is probably inevitable because they’re so closely tied that there’s even an area called the iliopsoas where they where they meet together. Or is the goal of this for you to specifically go after the iliacus? Or is it for you to also hit the psoas and the iliacus?
Christine Koth 22:41
Well, you described it perfectly what someone would experience. The first thing when you first were lying upon it and you were experiencing that excruciating pain — that was addressing your psoas. When you first lay directly on it, the tip is going straight up into your body and is pressing directly on your psoas. You know, this tip is designed to be like a human being’s thumb, so if you are going into your massage therapist or your physical therapist, and they were releasing your psoas or your iliacus. This is designed to replicate that. So when you go in initially, like I said, you’re addressing the psoas. So I instruct people to give that some time because we want that muscle to have his chance to reduce its tension. These two muscles, the iliacus and the psoas are actually two separate muscles. They do join together and attach at the same place. But neurologically, they’re completely different. The nerves that go to psoas are different than the nerves that go to the iliacus. So we need to stop grouping them together — I think this is one of the problems of why the iliacus isn’t really addressed in the first place. Secondly, when you push on the handle like you described, then you’re really pinning that iliacus muscle between the tip of this amazing tool and your pelvic bone. And that’s where you’re getting at the iliacus. So you really are addressing both and both are extremely important to address. As you may have noticed, there’s a lot of people talking about the psoas and the psoas is absolutely important, you know, and this tool addresses the psoas. But if you address just that without addressing the iliacus you’re missing this hidden piece, and that’s what this tool really provides — is the ability to address both. The psoas won’t relax if the iliacus is still tight.
Rob Murgatroyd 24:43
Right and I have a ton of — not a ton — I have a few psoas things I did. One of the things I do for the listeners of the show is we do worldwide events where we get a lot of entrepreneurs listen to the show, and we go to different experiences for three, four days around the world. And one of them we did domestically was we went to Tom Brady’s trainer in Boston, and we shut down TB12 and we had his trainers train us. And one of the things they did was they introduced us to the psoas. And you know, we dug deep and all of us were just crying. But after that, I was like, wow, I never realized how important the psoas muscle here is. So I’ve, I’ve purchased a few contraptions to help me with it. But here’s the thing, when I use them, it definitely helps. And it lasts for maybe a day or two. But after that, I’m pretty hooked on it. It’s not something that I feel, you know, like, just do this once a week, and then you can go to once a month, and then just as needed. Like it’s an almost an everyday thing. That’s not the case with the Hip Hook. What I’ve noticed with the Hip Hook and using it, is that number one, now when I lie on it, I 70% of the time lying on it have no pain before I before I hook it, unless I know I did something crazy, like training really hard at the gym, or whatever. And number two, I’m noticing that it’s lasting, the correction is lasting longer. And that was one if maybe you could speak to that a bit?
Christine Koth 26:26
Yeah. This is the beauty of the Hip Hook. I mean, I am so glad that all the other tools — people have been experimenting with all these other tools, because it’s really set the stage for people understanding that they’re achieving temporary relief. It’s close, but it’s not quite there because it’s not addressing iliacus. Like I mentioned, those two are connected in that if one is tight and the other is not, then other one’s gonna get tight. You know, so so this is the beauty of the Hip Hook. And my experience too when I was creating these prototypes and testing them out — I actually would have to wait for a good couple weeks, before I could even test out the new prototype, because my iliacus and my psoas we’re so relaxed after using a previous prototype.
And at this point in time, I’ve been the lucky one that’s had a Hip Hook over these last couple years of me developing this product. I maybe use it once a month, you know, and I use it for like, a couple minutes and then I’m good because the muscle — when you are addressing both the psoas and the iliacus, and you’re addressing it with a tool that’s effective, the results stay.
Rob Murgatroyd 27:50
Okay. Now, the iliacus muscle clearly is not as big as the psoas is, but it’s not small, either. It’s running on the inside of the pelvis. Do you recommend starting at the very crest of the ilium on the inside, and slowly working your way down? In other words, you know, go through the exact steps — lie on it, hook it for two minutes, and then go down a little further. And then a little further? Do you recommend that as a strategy and then going to the next one?
Christine Koth 28:26
Yes, absolutely. I mean, there’s actually quite a bit of real estate in the iliacus. The iliacus is maybe three inches by four to five inches, depending on your body size. So if you think about that, and it’s a flat muscle, so it has quite a bit of real estate that you could potentially have a muscle knot in. And this is one of the things that’s interesting about using the Hip Hook is, you know, each time you go on it, each time you use it, you experience something slightly different. And that’s because there is a lot of real estate to work with. I do exactly what, and I recommend, exactly what you described, where you start at a spot — you find a good spot, like “Oh, this is good,” and you stay there and let it release. And then you move it maybe a couple millimeters up or a couple millimeters down or an inch here and there and work your way around that area. You can also choose to angle it, so angle the handle a little bit more down towards your leg or a little bit more up towards your ribcage to kind of get at different aspects of those muscles. And the psoas, same thing. The psoas has quite a bit of real estate as well. It’s about maybe 12 inches in length and about an inch or two in diameter.
Rob Murgatroyd 29:43
So you’re intentionally — just to make sure I’m getting this — you’re intentionally targeting the psoas on we’ll call it step one when you’re lying on it. And then step two is now you’re going into the iliacus. So it is really something that is doing both.
Christine Koth 30:00
Exactly.
Rob Murgatroyd 30:02
Okay, I was not aware of that. Okay, great. All right. So is it a bad idea to make it a part of your regular regime of just throwing it in your gym bag and, you know, as you are stretching when you’re at the gym, or whatever kind of exercise you do, is it a bad idea to regularly check it and release it or is too much of a good thing, not a good thing?
Christine Koth 30:29
It’s absolutely a brilliant idea to have that as part of your regular wellness routine. The thing about this muscle is that it’s oftentimes tight way before it talks to you — way before you’re experiencing any symptoms or feeling any kind of tightness. And, in fact, this is a really important point, because people may not realize that their iliacus and psoas is tight, but maybe they’re experiencing, you know, sciatica, or maybe they’re experiencing low back pain, or maybe they’re experiencing knee pain or foot pain. And they’re not attributing that particular symptom to what’s going on in their hip, of course, because who would think that. But very, oftentimes, there’s this hidden tension in there that’s changing the whole alignment of the pelvis, and the way that the ball fits into the socket and the hip joint, which is really changing the way that the rest of the body is aligned and working. So it’s kind of like this hidden gem, you know, this thing that is contributing to something that you may not even realize is there. So from a wellness perspective, and especially if you’re doing things that really challenge yourself in this area, it’s absolutely a brilliant idea to check in with that muscle on a regular basis, and make sure that it’s relaxed and happy. Happy muscles don’t hurt, so if you go in and you lie on the Hip Hook, and you don’t feel much, then that muscle is happy. If you feel if it feels really intense, when you lie on the Hip Hook, then that muscle is not happy and needs your attention.
Rob Murgatroyd 32:10
That’s a great way to look at it. One of the things that was interesting to me about this is getting out of it. You don’t realize how hooked in you are, when you have this thing, you know, full throttle in. And getting out of it, I sort of like did a push up to get out of it. And I was like, “Okay, well, that’s not a great idea” because it was just hooked in really, really deep. So what I’ve learned is to roll myself on the side that it’s hooking into, and I can get out of it without pain. Is that the right way to do it?
Christine Koth 32:46
Yeah, that’s brilliant. Yeah, that’s a great idea. Because it is intense as it’s sinking in there. If you just push out of it like jumping up out of bed, your body might be a little startled. But yeah, rolling out of it is a great idea — kind of easing out of it, because you’ve really put pressure and addressed an area of the body that likely has probably never seen the light of day, you know, never been touched before. Very few practitioners work on this area, so you want to give it some TLC.
Rob Murgatroyd 33:22
Yeah, you are hooked into this thing. Okay, cool. All right. So I want to switch gears a little bit. And I want to talk about you coming up with this idea. You took it upon yourself to create a product that could directly help people with this. And to create that product — this isn’t easy. I mean, I’ve interviewed many, many people who’ve created products. There is a lot of entrepreneurial work and fortitude and, and just everything to be able to bring a product like this to market. Did you have any idea what you were getting into?
Christine Koth 34:06
I will say it’s much easier to write a book than it is to develop a product.
Rob Murgatroyd 34:10
And that’s not so easy.
Christine Koth 34:11
It is a lot of work. I’ve actually run service based businesses my whole life being physical therapist, I started a private school, I’ve had a lot of service based businesses. I had never developed any products, including the book. So it was my first time writing a book, my first time creating a product. Luckily, one of the things that I did get from my dad was an entrepreneurial spirit, and he was a very hard worker. And so I’ve incurred those qualities, which is very useful for something like this because it really — like literally every day there is a wrench thrown into the… — or something that I didn’t really anticipate or something new that I have to learn. You know, I’ve been learning about different, material science and design and manufacturing and just the whole process of how to create packaging, how do you communicate to your audience in a way that they can actually take this thing and actually use it. So, there’s just been so many pieces that I didn’t realize. I thought, okay, I just designed the product, and then I find a manufacturer, and then they just make it and it takes a couple months. But it’s not like that. It’s a whole different industry, and there’s just many things that come up along the way. However, I will say, it’s been so fun. I have learned so much just doing something. I was never really trained to be a product developer. This isn’t like, you know, I don’t have any background in this. But all the things that I’ve learned along the way, I’ve really satisfied my quench for knowledge and learning new things.
Rob Murgatroyd 36:03
I love how you’ve packaged this whole thing together. It’s really a beautiful story, right? You know, the physical therapist who finds the secret, but doesn’t really have a way to do it, writes a book about it, creates the product, sharing it on social media. Everybody’s excited about this thing coming down the pipe. This is a really beautiful story and you have a lot to be proud of here. I mean that sincerely. Because I know what’s involved in this you really — you’re doing it right. Your book is well written. Your product is a damn good product. Your social media is honest and ethical and funny. Your videos associated with them are kitschy. I mean, you got a lot right here. This is going to be an amazing launch for you. I really, really do believe that.
Christine Koth 36:53
Thank you means a lot for you to hear that from you.
Rob Murgatroyd 36:56
You are so welcome. Okay, we’re gonna move into the fulfillment part of the show. So some of these questions are going to be a little weird and coming out of left field, so just roll with it. The first one may not be so weird for you. Rumor has it that you played bass guitar in a band. How’d you get into that?
Christine Koth 37:17
My ex husband was a lead guitarist in a band. And, you know, I was the manager, right? Of course I was. I wanted to be on stage and bass is absolutely my favorite part of any musical number. So one of my girlfriends was hosting this event called “Ladies Rock Camp” and we formed bands and we all learned an instrument and they get to perform on stage. Oh, my gosh, actually, I can just feel how good it felt right now thinking about that.
Rob Murgatroyd 37:48
Amazing. Well, if you haven’t already, watch David Foster’s documentary on Netflix. It is compelling. You will love it if you’re into music.
Christine Koth 37:59
I would love that.
Rob Murgatroyd 38:00
What is one rule that you have for yourself that you’re never gonna break?
Christine Koth 38:07
Hmm, I would say I fought really hard to discover who I truly am. And I’m super committed to being that which is probably what you were alluding to when you were talking about the book and the social media presence. You know, I just feel like it’s so important for all of us to just be our truest nature, be ourselves, and I just am not going to pretend to be anything else anymore. So that’s that.
Rob Murgatroyd 38:40
I love that and that comes right through. What is an unusual or absurd thing that you love?
Christine Koth 38:48
Hmm, I absolutely love it and get completely geeked out when I finish a tube of toothpaste.
Rob Murgatroyd 39:02
I just finished one this morning and it’s really funny because I had no reaction to it other than “Shit, I gotta buy more.”
Christine Koth 39:09
Anytime you finish something to its completion, it could be like a pair of underwear that, you know, has holes and you have to throw it out or like a tube of toothpaste is a great example. Or like you get that last little bit of mail at the bottom…it’s so satisfying.
Rob Murgatroyd 39:25
Oh, so you feel like you nailed it. You crushed it. Okay, that strategy allows you to bring this Hip Hook all the way home. I guess, you know, you’re gonna celebrate when that toothpaste…I love it. Okay, cool. What techniques or approaches do you have that may be counterintuitive to growing your business outside of just grinding away? A lot of people who listen to the show are entrepreneurs and they just want to grind, grind, grind, grind, hustle, hustle, hustle right until their eyes bleed and they accomplish their goals. But sometimes that’s not really the way it is. And they are counterintuitive things you can do. You can visualize, you can meditate. What is something counterintuitive that you do that you can almost say, “My business has grown since doing this” and I know it doesn’t make any sense?
Christine Koth 40:14
I meditate twice a day and that is absolutely the most important thing every human being should be doing. I have amazing ideas that come out of meditation. I know that when I come out of meditation, I usually work right after I come out of meditation, and that provides just so much more clarity. So I would say that, you know, that may seem like somewhat of a canned response, but it’s absolutely true. And then the other thing I’ll add is that, and this is something I’ve had to learn how to do, is just to do nothing. Because I am, that’s not my nature. My nature is to constantly be doing something. And so I’ve learned to just like literally just lie down in my bed, like not read anything, not have any notebook, but just lay there. And that kind of rest of the mind just really does a lot for ideas to arise or thoughts to arise, or even just being able to come from that place into working again, from just such a more clear and refreshed point of view.
Rob Murgatroyd 41:24
Yeah, to refresh. Sometimes our brain just keeps going, and when we shut it off we can get more connected to source. I love that. What’s one goal that you thought “When I achieved this goal, everything in my life is gonna be amazing” and then you got it, and you were like, I did not do what I thought I was going to do?
Christine Koth 41:43
Hmm, I feel like I’ve had lots of them. You know, I am such an optimist that a lot of my life I look at with such joy. But I would say, let’s see, I would say probably like accolades and awards. There’s something about when you’re younger, you have this idea that some sort of status or some sort of, “if you achieve this award, or you get this recognition” that somehow you’re going to feel good or feel like you have it. And I did that and experienced that. And ultimately, it’s really asking others for approval, when it really is about self approval and self love. And ultimately, I think out of anything, what really allows people to experience or be in a place of center, and to be in a place of really enjoying life is all about your relationship to yourself and your relationship to other people. So, investing in improving your ability to have good relationships. And those two ways is probably more important than anything that you could do externally out in the world.
Rob Murgatroyd 43:02
Yeah, for sure. If you could spend one month, anywhere in the world, where would it be? And why?
Christine Koth 43:11
India. I’ve wanted to go to India my whole life and I have not made it there and probably won’t for a while given the state of our world. I’ve always been really curious about that culture. I’ve studied a lot of philosophy, and I’d just like to experience what it’s like to actually be there, visit some of the temples and experience that.
Rob Murgatroyd 43:34
Yeah, for sure. This, this COVID situation has created a lot of Cabin Fever for us Type A personalities. I just booked a Cabo this morning, to go to a resort because, you know, it’s one of these all inclusive, big resort, high end kind of place. They’re not going crazy with masks and I just had a friend who was there — I got to get out and do something. So yeah, that’s great. Okay, so I’m gonna ask you a couple of questions as we wrap here. This is sort of a first thing that comes to mind question. What would your friends say is one of your superpowers?
Christine Koth 44:13
Well, it could be my laugh. My smile and my laugh. I’ve actually had people come — strangers come up to me — they’re like, “Oh, we heard you laughing and you just have the best laugh.” It just made me happy. Also, I would say, like master manifester. Like, I just for some reason was born with this skill of “okay, this is gonna happen” and then it just does. So I was gonna put that on my my business cards. A master manifester.
Rob Murgatroyd 44:42
Oh, I like that is good. Okay. Do you collect anything or have you collected anything?
Christine Koth 44:50
I like to get rid of things.
Rob Murgatroyd 44:53
Clearing out the clutter. What do people never ask you but you wish they did?
Christine Koth 44:59
Yeah, I would say asking me about my meditation practice, you know, something that is something super personal. People know that I meditate but it doesn’t come up in conversation enough.
Rob Murgatroyd 45:13
Mm hmm. Is TM that you do?
Christine Koth 45:15
It’s a neelakantha meditation, which is very similar to TM.
Rob Murgatroyd 45:18
Yeah. Okay, cool. What book have you re-read the most?
Christine Koth 45:25
I love the book, The Wild Trees, which is all about the redwoods and people who climb up into the redwoods. Scientists explore that and I think the redwoods are ultimately the most fascinating creature on this planet. And that book is about these super daring people that climb into the redwoods in order to understand the ecosystem there. And it’s just fascinating.
Rob Murgatroyd 45:51
Love. That’s interesting. What’s your guilty pleasure?
Christine Koth 45:56
Mochas. For sure, mochas.
Rob Murgatroyd 45:57
Mochas, like mochaccino, mochas, like that kind of mocha?
Christine Koth 46:02
Yeah. There’s this brand called Clever which they have this mocha powder that’s made with oat milk, and it has all these amazing mushrooms in it that’s, you know, adaptogenic and probiotics. And that’s my pleasure. I put that in some water. And it’s like my go to little thing that makes me keep going during the day.
Rob Murgatroyd 46:26
Awesome. Is there a brand that you recommend that we can link up in the show notes?
Christine Koth 46:29
Yeah, it’s called Clever.
Rob Murgatroyd 46:34
I love it. All right. Last question. We’re going to change it up a little bit. What one question would you like to ask me?
Christine Koth 46:41
Ah, out of all the things that you’ve experienced and all the people that you’ve spoken to what has inspired the most personal change for you?
Rob Murgatroyd 46:52
That one just came right out of you didn’t it? That was good. What has…which person or which concept?
Christine Koth 46:59
Which concept?
Rob Murgatroyd 47:00
The concept came from — it was sort of tangentially from the guy who created the television show Everybody loves Raymond. His name is Phil Rosenthal. And I can’t remember the exact quote, but I remember how I felt after he was talking about it. And it was essentially — it was like a vibrational thing where “tune into the radio station that plays the music that you want to hear and shut everything else off.” So if you’re trying to manifest something, and there’s a frequency associated with that manifestation, tune into that “radio station, and the rest of it just doesn’t matter and play the music that you want to hear.” And for whatever the reason is, that one went right through me,
Christine Koth 48:01
That’s beautiful. Master manifester, you know, definitely approves of that one.
Rob Murgatroyd 48:06
There we go. We’re gonna take this show on the road, we’re gonna make a new podcast — a master manifester. Choose your radio station. Well, Christine, this has been awesome. Do you have any final words, suggestions or an ask for the people that are listening?
Christine Koth 48:21
You know, I would just say really, when you’re on your quest for health and wellness, really be on the lookout for the simple truth. Because ultimately, health should not be complicated. When you find the source of the problem, and you’re not chasing the symptoms, health evolves with ease. So, on your journey, focus on that. And if you’re interested in more information, of course, about the Hip Hook, TheHipHook.com, you know, all the links will be included here, my book Tight Hip Twisted Core. And I’m one of those — being a sweet little girl from the Midwest — I’m absolutely available to anyone who has questions. I always try to get to my emails and respond to things on social media personally. So, if you have issues or questions, feel free to reach out to me.
Rob Murgatroyd 49:14
Awesome, Christine, thank you so much.
Christine Koth 49:16
It’s my pleasure.
Rob Murgatroyd 49:19
All right. Thanks for listening. If you love this episode, and you know someone that needs some help in either stepping up their work hard game, or their play hard game, it would mean the world to me if you share this podcast with them to help me get this movement out there. So if you like what you heard, head on over to iTunes, take 30 seconds and leave me a five star review and I will be forever grateful. So Until the next episode. Excuses are over, it’s time to live.

