Your cart is currently empty!
Blog

How to Avoid Hip Pain While Driving
If you’ve ever gone on a long road trip, you probably know the simple pleasure that is stopping to stretch your legs. You feel restless, your body is a bit stiff – and maybe you’ve even developed a muscle cramp or pain from falling asleep in a weird position. Some fresh air and a nice walk around a parking lot feels great.
But an exit sign for a truck stop is not just a welcome break for you. Your psoas and iliacus muscles are about to be a whole lot happier, too.
These are the two muscles that have been quietly holding you up in your seat during that long drive. Or, if you’re the driver, the two muscles that have been allowing you to step on the gas pedal or brake at a red light. Together, they are called your iliopsoas and help make up the network of hip muscles – or “hip flexors” – that connect your thigh bones to your pelvis.
If you’re like most people, you probably aren’t thinking about your psoas and iliacus muscles throughout the day. That is, until you start to experience hip tightness, hip pain, sciatica, low back pain, or any other aches that don’t feel quite right.
So, what does that have to do with your road trip?
Well, prolonged sitting – like you do in your car – is one of the common culprits and causes of hip, back, and tailbone pain.
But, it’s not just relevant for those times when you know you have a long trip ahead of you. Most of us are clocking way more time in our cars than we realize. And we have developed tight hips as a result.

The relationship between driving and hip pain
Did you know that 95% of American households own at least one car?
This stat comes from the US Department of State. Though the introduction of ridesharing and a green push toward walking or riding bikes has decreased the number in recent years, it’s still accurate to say that most of us find ourselves sitting behind the wheel on a regular basis.
In fact, for a large majority of us, long commutes and rush hour traffic are just normal parts of a busy morning. According to another report from the National Household Travel Survey, we’re spending an average of one hour a day on the road.
Depending on where you live, that number may even feel low.
But if you add that up, it equals more than 10 full days each year that we are sitting in our cars.
And, though sitting in your car may feel like a passive activity, you are actually overworking your muscles. Ask anyone who needs to drive for a living, and they’ll probably be able to speak to the toll that it can take on your feet, hips, lower back, and neck.
Your hip flexors are at the core of that.
You see, when you sit down, your psoas and iliacus muscles contract to stabilize your pelvis and spine. Just like the hip pain you might experience from sitting, those same muscles can “freeze up” and form painful knots when you’re in the car. Unlike sitting in a normal chair, though, you’re engaging your psoas and iliacus muscles even more when you’re driving, especially so with your driving leg and even more so with a manual transmission.
When we’re sitting behind the wheel, we are using our hip flexors to hold us upright. We’re also engaging our psoas and iliacus muscles to move our foot on and off the pedals or release pressure of the pedal. In fact, that pedal foot has a constantly contracted hip flexor because that leg needs to be ready to move on a dime. Add in stressful driving conditions which is a common cause of tension in the pelvic region, and you have a triple whammy.
Left unchecked, this can become a disaster for your hips.
How to reduce hip pain while driving during daily commutes
Unlike sitting in your chair at work, or even on long road trips when you can take regular breaks to gently stretch your hip flexors, daily driving makes it much harder to give our muscles some relief from their contracted position.
So, what can you do to prevent hip pain while driving?
For starters, try to find a healthy sitting position. No more slouching with the windows down and one hand on the wheel – your hips will thank you for it!
Spend some time sitting in the driver’s seat of your car moving the seat around. Most have automatic controls that let you move the seat up or down, from front to back, change the angle of the seatback, and even control the tilt of your seat.
Ideally, you want to find a position where your knees are at just over a 90-degree angle, your feet can rest comfortably on the floor, you can reach the pedals without completely straightening your leg and the steering wheel is in front of your chest. A slight tilt forward, bringing your hips above your knees, will help take some of the stress off your hip flexors, too.
After you feel comfortable in the driver’s seat, you can prepare your iliopsoas muscles for a morning commute with a gentle stretch.
This doesn’t need to be a big production.
Doing hip circles or a quick hip flexor stretch for 30 seconds before you hop in the car may help your psoas and iliacus muscles relax a little.
And, after any drive, it’s always a good idea to take a short walk or stretch out your iliopsoas muscles again. Even if it’s simply parking at the back of the lot to add a bit of a walk to the store or taking one flight of stairs at your office.
Any of these will encourage tight hip flexors to release their hold after driving.
Keeping your hips pain-free when you aren’t driving
The reality is that it’s probably not possible for most people to give up their car – or stop every 30 minutes for a hip flexor stretch.
So, when it comes to hip pain from driving, you can probably do more to take care of these muscles that are oh so tight from driving.
That’s when a tool like the Hip Hook could make a huge impact on your day-to-day comfort. Especially if you’ve already started experiencing pain from driving. This simple tool helps you target the source of your hip pain and apply gentle, continuous pressure to your psoas and iliacus muscles. Incorporating a simple stretching exercise into your morning and nighttime routines is a great habit to start.
If you’re just beginning your journey toward understanding your hip pain, keep in mind that there probably is no one cause. While driving alone can overstress your psoas and iliacus muscles, there are probably other activities that you do each day to compound the problem. Sitting, overstretching, working out, driving – these are all very normal (and even healthy) activities that can add up to some chronic hip tightness and pain over time.
So, the next time you get ready to hop in your car, remember your hip flexors!
Take just a few seconds to let them stretch out before you get in the driver’s seat and check your seat position once you do. It just may help you prevent more serious hip, tailbone, and back pain while driving.

Frequently asked questions about hip pain while driving
Can driving cause hip pain?
Driving, along with excessive sitting elsewhere, can be a contributing factor to hip pain. Being in a seated position for many hours each day may lead the hip flexors and other muscles around the hips to tighten up, which can create compression, decrease range of motion, and cause pain in/around the hips.
Is driving bad for the hip flexors?
When driving, the hip flexors are placed into a shortened position (just like sitting at your desk or on the couch) where they can tighten up and become weaker. This can later lead to experiencing hip pain if the hip flexors are never able to truly relax and fully lengthen. You may consider adding in some exercises to stretch and release tension in the hip flexors to reduce the likelihood of developing hip pain while driving.
How do I stop my hips from hurting when I drive?
When sitting down and driving for longer periods of time, the muscles surrounding your hips are not being used and may have the tendency to tighten up and cause pain. If you experience hip pain while driving, it can be a good idea to stop and take a break every so often to stretch and move around. You may also find it helpful to release the tight muscles in your hip flexors and your glutes, as well as performing supporting strength and mobility exercises.
The Most Common Yoga Injuries
Yoga is frequently used as a way to stay in shape, increase flexibility, and prevent injuries. If you’re not taking the right precautionary steps, however, it can cause just as many problems as it fixes. It’s been shown that yoga causes muscle pain in up to 10 percent of people – which, many times, is pain that could have been avoided.
The majority of yoga injuries typically happen in six common places: the hip, shoulders, knees, wrists, hamstrings, and back. Read on to learn how to stay as safe as possible while practicing yoga.
Hip pain after yoga
Hip pain and injuries are a huge topic (huge enough that I’ve written an entire book about it! (Tight Hip, Twisted Core: The Key To Unresolved Pain – get a free copy of the first chapter here). Feeling hip pain after yoga (or even hip pain during yoga) is extremely common. However, as you may have guessed, experiencing hip pain or sore hips after yoga should not be the “norm” and can eventually lead to injury. There are a wide variety of reasons why people injure their hips doing yoga – here are some of the most common ones.
What causes hip injuries during yoga?
Hundreds of yoga exercises involve unnatural hip movements. Exercises that have you open your hips or do significant hip rotation can end up causing too much mobility in the hip, which can set the stage for hip arthritis and labrum tears..

One of yoga’s most common poses – the triangle pose – is a perfect example of an exercise that puts strain on the hip. In triangle pose your front leg is in a very unnatural position that causes a shift of the ball in the socket in the hip joint. These types of hip-opening poses also cause the iliacus and the psoas (two key hip muscles) to tighten because the hip, which is supposed to be strong and stable, is outside of its safety zone. This pose, as well as plenty of others, can cause strain in the hip muscles when performed incorrectly to pushed too far. Initially, it may result in feeling some hip soreness after yoga, but has the longer-term potential for creating instability in the hip which may lead to more significant hip injuries such as labral tears over time.
How to avoid hip injury
Fortunately, there are plenty of ways to avoid hip injury by making sure you don’t go overboard with risky exercises! If you’re starting to feel some hip pain, try decreasing your stance while pushing down and in with your feet, focusing more on stability and breathing versus a deep pose. This will take a lot of the strain off of your hip, allowing you to complete the exercise without damaging your body.
And, if you are having hip pain with a particular pose, try finding alternative poses and exercises for a while to ease the tension and stress on your hip. There can always be too much of a good thing – know your body and decide when it’s right to ease up. Just like anything, yoga can be an obsession. All activities should be done in moderation. Variety, variety, variety.
Shoulder injury during yoga
Shoulder pain is a force to be reckoned with, and it’s very common even for those who don’t do yoga! About 67% of people will develop shoulder pain at some point during their lives – daily wear and tear due to poor posture is usually the most common cause. Yoga can cause or exacerbate your shoulder pain, but it doesn’t have to. Knowing how to manage shoulder pain during yoga is key to a healthy routine.
What causes shoulder injuries during yoga?
Many yoga poses involve extending your arms above (or behind) your head or back. Everything from basic overhead stretching like in chair pose to something like the child’s pose can push your shoulders to the limit, pinching your rotator cuff and bicep tendon to cause pain.
The more extreme your arm positions are, the more likely it is that you’re at risk for causing shoulder pain. If you’re experiencing issues, though, there are plenty of ways to mitigate shoulder pain in your yoga routine.
How to avoid yoga shoulder injury
The simplest way to avoid shoulder pain and injury during yoga is to reduce your range of motion with your arms. You don’t have to completely stop doing the poses you love, but simply limiting the angle you extend your arms can help alleviate a lot of pain. Try experimenting until you find a reduced angle that your arms feel comfortable at, and do the yoga pose in that fashion until your shoulders are feeling better.
Don’t forget to make sure your pecs are as open as possible, as this helps take some of the strain off of the bones and tendons in your shoulders, and gives you a wider range of motion. Opening up your chest posture can be an excellent way to help reduce yoga-induced shoulder pain.
Knee pain & yoga
Yoga is often used as a way to prevent knee injuries and knee pain – however, certain poses can actually end up making your knee situation worse. Before you do yoga poses that have the potential to put a lot of strain on your knee, making sure you know how to take the right steps to avoid injury.
What causes knee injuries during yoga?
When we’re talking about knee injuries and pain due to yoga, the main culprit is usually the meniscus. Deep knee bends, malasana squats, and cross-legged poses can rotate the tibia on the femur, twisting the meniscus and leading to irritation or tears. This doesn’t mean these are inherently bad or dangerous poses, though – they’re just some of the most common catalysts for knee injury in yoga.
Yoga poses to avoid knee injury
If you have known problems with your knee and meniscus, try to avoid poses that put extra stress on your knee. Many people have meniscus tears without even knowing it (for some, it can just be a light to moderate pain in the knee), and certain yoga poses could unintentionally make that problem worse.
To alleviate strain on your knee during some of the exercises mentioned above, putting a roll between your knee and calf can help to spread out some of the tension. If you’re doing a deep malasana squat, you can sit on a block instead of going all the way down to the ground. Limiting the amount of rotation of the knee, not going to the end of your range of motion, will keep your meniscus happy. These tactics allow you to continue doing the yoga poses you love, while also helping to ensure the safety of your knees.
Prevent wrist injuries from yoga
Wrist injuries are a lot more common than you might think – they’re some of the most common injuries in yoga, and are easy to develop even if you don’t have any prior issues. The bottom line? Most of us don’t have flexible wrists, and many yoga poses involve bending our wrists past a natural angle.
What causes wrist injuries during yoga?
Extended wrist angles – and bearing a lot of weight on your wrists – is extremely common in yoga, and can cause a lot of pain and injury. The extent to which this affects you largely depends on how naturally flexible and durable your wrists are, but almost everyone is at risk. Any pose which involves your wrists being bent or bearing weight (a chaturanga, for example) can cause wrist pain.
Yoga tips for avoiding wrist injury
To alleviate wrist pain in your yoga poses, try putting a towel roll under your hands and wrists as you do your normal poses. This will help to ease some of the tension and extreme angles your wrists would have to endure otherwise. There are also special wedge tools that allow you to do yoga without putting a lot of weight or pressure on your wrists.
Hamstring yoga injury prevention
More often than not, your hamstrings are playing a key part in your yoga poses. Every time you go to touch your toes you are stretching them, every time you stand up from touching your toes, you use them. One of the advantages of yoga is that it allows you to stretch and work your hamstrings on a consistent basis – however, if practiced in excess, this can lead to painful hamstring injuries.
What causes hamstring injuries during yoga?
A large portion of yoga poses are using your hamstring in one way or another. That’s not necessarily a bad thing, but you should be able to feel whether a certain pose is putting a lot of strain on your hamstring. Overall becoming more and more flexible puts the hips in a compromised position, making the hip flexors (iliacus and psoas), want to contract to stabilize the now too flexible hip joint. These hip flexors play tug of war with the hamstring and make it more susceptible to strain.
How to avoid yoga hamstring injury
Hamstring strains are hard to treat, and they can last for a long time. The best way to treat one is to prevent it happening in the first place; make sure you don’t overdo it on poses that are putting a lot of tension or pressure on your hamstring, and know your limits! Making sure your hip flexors are relaxed, not just stretched but actually relaxed, will, in turn, give your hamstrings more room to be mobile and can prevent hamstring tears and strains.
Yoga for back pain or injuries
Yoga is a common recommendation for individuals suffering from chronic low back pain with published research to back its positive effects. It is important to note that most back pain is caused by a problem elsewhere, with tight hip flexors and hamstrings usually being the culprits. This then causes the muscles of the lower back to compensate, for example, the quadratus lumborum is quite often involved in chronic back pain. Yoga can be useful to ease tight back muscles but it is important to understand that stretching them may make matters worse if the root of the back pain problem is not addressed.
What causes back pain in yoga?
Nearly 80% of adults will experience low back pain at one point in their lives, there are any one of a number of causes, ranging from sitting too much, improper posture, muscle imbalances to injuries from sports, falls and car accidents. In yoga, one tends to continue to become more and more flexible which leads to too much mobility. The body’s way to balance that hypermobility is to create muscle tightness and contraction. Many patterns of muscle tightness evolve from being too flexible. This is another major topic in my book. Similarly, with many poses that hold a posture at the end range of motion, like a backward bend, for example, there is compression of the joints and discs in the spine. At first, yoga can help get you mobile, but going too far tends to pinch these areas, sometimes even pinching nerves. Compensating for too much flexibility or repetitive pinching of the spine at the end range of its motion can ultimately lead people to seek treatments like prescription pain medications, cortisone shots, and even surgery in advanced cases.
How to avoid back pain in yoga
Prevention is obviously the best answer. The best way to prevent a back injury in yoga is through more focus on strength and less on going deeper into poses. This doesn’t mean starting a deadlifting program, this can be as simple as maintaining good posture throughout your day, on a run, or in your yoga pose. Making sure your head is pulled back, ears in line with shoulders and your hips are in a neutral position can ensure that your core, which includes the muscles of your back, are doing their job. Basically, if you’re reading this slumped over your desk or your phone, you’re weak and prone to a back injury! Balance, or equanimity, is a key teaching in yoga and it applies here too. Keeping your body just as stable as it is mobile and avoiding extreme ranges of motion are key to keeping you on your mat and not injured.
Yoga injuries can be serious, and the subject is a complex one – I’ve actually written an entire book about the subject of the hip area in particular because hip openers are creating an ocean full of people that are too mobile in their hips and end up with tight hip flexors. I know, it seems weird, but it’s true. Tight hip flexors become the cause that ends up wreaking havoc on the rest of the body.
If you’re interested in learning more check out the book and the Hip Hook; it’s a product I invented specifically to help ease lingering pain because of a tight iliacus and psoas. A best friend for every yogi.
Frequently asked questions about yoga injuries
What are the most common yoga injuries?
The most common yoga injuries typically happen in six different areas of the body: the hip, shoulders, knees, wrists, hamstrings, and lower back.
Why do my hips and back hurt after yoga?
If you are experiencing more pain or tightness after doing some yoga poses, it may be because you are working into too large of a range of motion in your poses. While it may feel like you are getting a nice stretch by going as deep into a yoga pose as possible, your hip flexors and other hip or lower back muscles could actually be holding tension to create stability around your hips, pelvis, and lower back.
Can yoga injure you?
Generally speaking, any form of exercise or daily activity that you do can cause an injury to occur – not just yoga. However, by keeping your body strong and paying closer attention to proper form and technique as you move into and out of different yoga poses, you may reduce the likelihood of pain and injury.
How can I prevent injuries during yoga?
To prevent injuries during yoga, it is important to work within a range of motion that you can actively control. For many yogis (especially beginners), that means shortening your stance during yoga poses and making sure that your muscles are engaged to support you in that position. If you try to go too far into a yoga pose, this can cause over-stretching your muscles, tendons, ligaments, and joints past what they are currently capable of, thereby increasing the risk of pain, tightness, or injury.
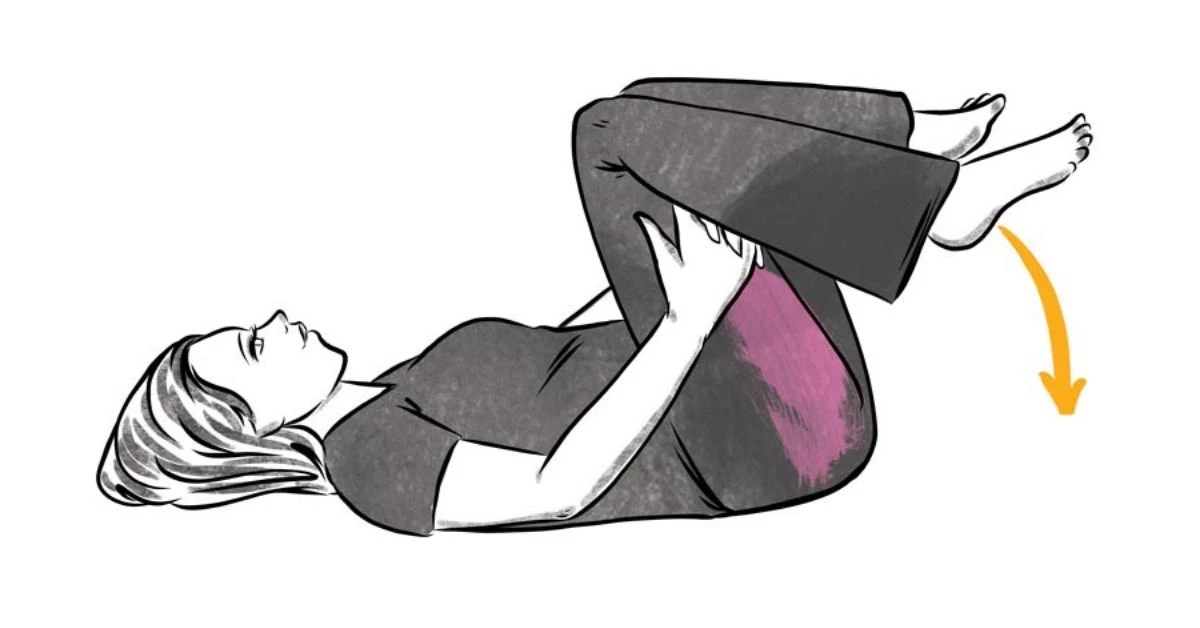
Twisted Pelvis Realignment Exercise
After you’ve released the front of the hip using the Hip Hook or Hip Release Ball, as well as using the ball to release the back of the hip, the last step is this realignment exercise. This step is extremely important to realign your pelvis, but is also the most forgotten.
The goal of the exercise is to use your own muscles to put your pelvis into alignment. Now that the hip flexor has been relaxed, it shouldn’t be locking your hips in a twisted position and by activating the correct muscles you should feel alignment and ultimately relief.
As mentioned in the video lie on your back. You want to do this only on the side that you have released, whichever hip is tight. You’re going to put your hands behind the knee of the tight leg. Now pushing into your hand with a moderate amount of force thinking about putting your foot back down to the ground, but don’t let it move. You should be feeling the hamstring and glute muscles working. This will tilt the pelvis back into position. Be sure you’re not pushing really hard, just the amount of force needed to fire the muscles. Push for two seconds isometrically, then relax for 2 seconds, then go again doing about 10 reps or so of this. Think of it like getting a drawer unstuck, you kind of have to push and pull and wiggle it to get it moving and sliding the right way. The contracting and relaxing is the pushing and pulling of the drawer.
The iliacus and the psoas make up what is commonly called your “hip flexor.” These 2 muscles have an important job, to connect the upper part of your body to the lower half! Although these muscles are also responsible for flexing your hip (bringing it forward), their main job is to help hold your spine, pelvis, and hip together. The iliacus and psoas are called the iliopsoas together. They often time contract and stay knotted up when the body is either too mobile or if those muscles are overused. Because we need them to stabilize us, activities like sitting, running, biking, kicking, and weight lifting are common causes of tightness along with too much stretching like yoga and dance.
As you can see, there are lots of reasons these muscles tighten and this tightness can cause pain in all kinds of places in the body.
I uncover these patterns in my bestselling book, Tight Hip Twisted Core – The Key to Unresolved Pain!
This is also why I designed the world’s first tool designed specifically to release the iliacus muscle – The Hip Hook
How to Use the Hip Hook
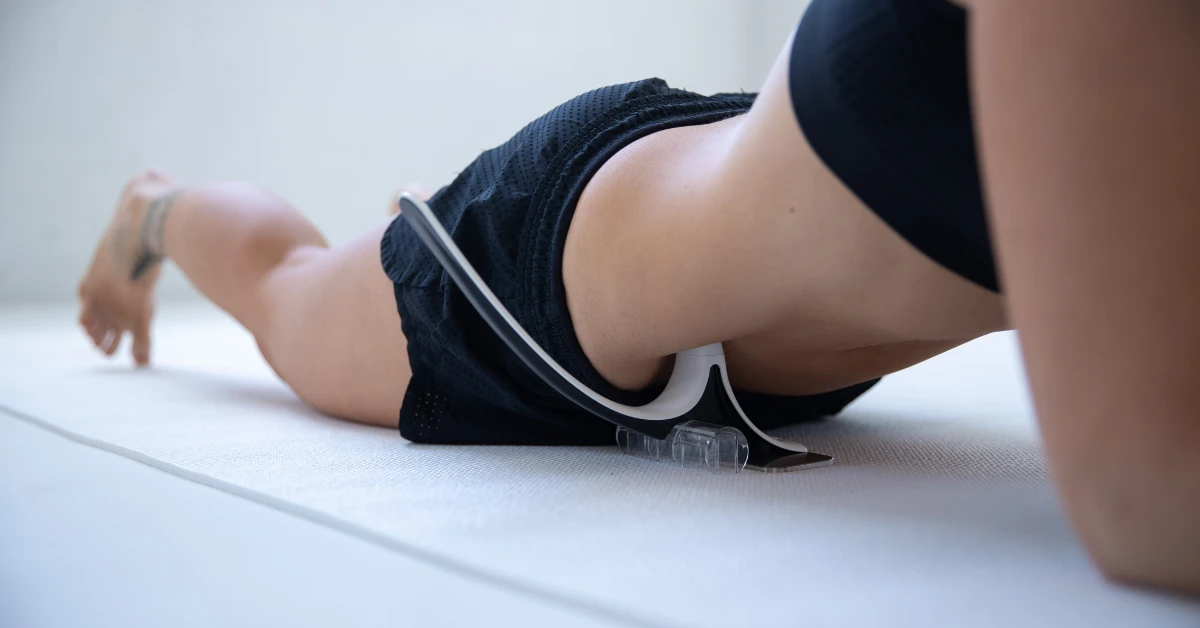
The Hip Hook is designed to put pressure on the psoas and iliacus muscle. These muscles are located right inside the pelvic bones. Using the diagram as a guide, find these spots on yourself. Feeling the soft spot adjacent to the front of your pelvic bones will help you locate the iliacus. The iliacus runs the whole length of the inside surface of the pelvic bone. The psoas can be safely accessed in this area as well as it crosses over the iliacus here. The Hip Hook should be placed as close to the inside surface of your pelvis as possible. That way you will be able to safely access both the psoas and the iliacus. The psoas will be pressed upon when you first lie upon the Hip Hook. The iliacus will be pressed upon when the handle is used to pivot the Hip Hook. Treating both muscles is essential. Accessing only one without the other is often ineffective, giving temporary results.
.jpg)
Starting position – Lie on your side on a firm and non-slip surface like a yoga mat or carpet. Surfaces like beds and treatment tables are too soft and bare floors are too slippery.
Find the access point for the iliacus – Referencing the images of your iliacus and psoas, place your hands on the front of your pelvic bone and slide your fingers right inside that bone. That’s the sweet spot.

NIP – Hold the Hip Hook by the handle and place the tip in the general area of your nipple. 
HIP – Slide the tip to that sweet spot right next to your pelvic bone. The closer to the inside surface of your bone, the better. 
Although it may feel sore closer to the fold where your hip meets your leg, that is not the correct location for this tool. If you place it on this fold, you will be pressing on blood vessels and nerves.
TIP – Tip your body onto the Hip Hook. Make sure the flat part of the Hip Hook is flat on the floor as you position your body on it. Feel free to adjust the position of the tip as needed. In this first position, you are pressing on the psoas and releasing its longstanding tension.

Melt into the psoas – Let your body melt into the tool. At first, the pressure might be intense, especially if you have never done this before, but over time it will decrease. Happy muscles don’t hurt. You can place a sheet or towel over the tip of the tool the first few times to lessen the pressure if you’d like.
Pivot for the iliacus, the moment you’ve been waiting for – After the initial pressure has lessened and the psoas has had a chance to relax, use your hand to place gentle downward pressure on the handle. This will allow for that expertly designed tip to precisely press towards the pelvic bone to where the iliacus attaches, gently squeezing the muscle between the tip and your bone. You are helping the iliacus relax by holding prolonged, steady pressure in this position for thirty to ninety seconds.


Be symmetrical, slow, and consistent – Check both sides. You only need to do this once a day or even once every other day. The first time, it will be sore, but you should not feel any numbness or tingling down your leg. If you do, reposition. This muscle has likely never been touched before and it’s been tight for ages. It will get better over time. Take it slow. It’s common to have bruise-like soreness after use. If you get sore, take a break for a day or two. If it feels painful and doesn’t get better, stop and consult your healthcare practitioner.
Enhance your release – After you have become comfortable with the Hip Hook, try pressing up onto your elbows or hands, squeezing your glutes together, bending your knee and swinging the foot side to side, bringing your opposite leg out to the side, bending and straightening your knee, and lifting your leg off the floor.
Video tutorials of these advanced techniques (and more!) can be found on the Aletha YouTube channel.
Complete the program – Now that you have the Hip Hook, learn the importance of this muscle, the value in prolonged pressure, and other activities and exercises to support your healing by reading Tight Hip, Twisted Core – The Key to Unresolved Pain. Key additions to releasing the iliacus and psoas including releasing the back of the hip and realigning the pelvis can significantly enhance the effectiveness of the Hip Hook. Learning how to fix what has gotten your iliacus and psoas tight in the first place is key.
Get a free first chapter of the book and exclusive discounts here.

Deep Dive into the Anatomy of the Hip Flexor Muscles
For those of you that love to get deep into the details, you will love this section. As an anatomy geek myself, I can’t help but get excited about this topic, especially when digging into arguably the most important muscle group in the body. You may want to also explore these topics:
- What Causes Tight Hip Flexors?
- What are the Common Symptoms of Tight Hip Flexors?
- What’s the Best Way to Strengthen the Iliacus and Psoas?
- How Do You Stretch the Hip Flexors?
- How Do You Release Tension in the Psoas and Iliacus?
What is the origin, insertion, and nerve supply of the iliopsoas?
The origin of a muscle is the location where the muscle attaches closest to the center of the body. The insertion is the attachment point furthest away from the center of the body. The origin of the iliacus is the inside surface of the pelvic bone (the iliac crest and iliac fossa on the ilium) and the top edge of the tailbone (the ala of the sacrum). The insertion of the iliacus muscle, along with the psoas, is located at the inside of the femur near the groin (the lesser trochanter on the femur). The origin of the psoas is the front (anterior) surface of the lower vertebrae (T12-L5) and the bottom of the transverse processes of those same lower vertebrae. The insertion of the psoas is the same as the iliacus, on the lesser trochanter.

Origin and insertion of the psoas 
The origin and insertion of the iliacus The iliacus and psoas blend together to form the iliopsoas tendon where they both attach at the lesser trochanter. The iliopsoas tendon translates the force produced by the muscle belly of the iliacus and psoas themselves, moving the femur bone relative to the pelvis and low back. As you can see, the iliacus crosses 2 joints (the sacroiliac joint and the hip joint) and the psoas crosses 3 joints (lumbar vertebrae, sacroiliac joint, and hip joint). Often times the iliopsoas is only considered a 2 joint muscle because the sacroiliac joint is not counted, no respect for the SI.
Nerves coming off the spinal cord create a complex network that shares information with the muscles, skin, and other tissues in the area. Special nerves head straight for the iliacus by exiting the spine at L2-L4, joining to form the femoral nerve, and innervating the iliacus. Nerves exiting the spine at L1-L3 join to form the Ventral Primary Rami and innervate the psoas. Interestingly, the signals from the brain to these two muscles are distinctly different, showing they are acting independently of each other and should not be considered one muscle. Because they are often called the “hip flexor” or iliopsoas, the iliacus and psoas are often considered one in the same when they are each distinctly different in their action, purpose, and location.
Summary FAQs:
Q: What is the origin and insertion of the iliacus?
Origin – iliac crest and iliac fossa on the ilium bone
Insertion – lesser trochanter on femur
Q: What is the innervation (nerve supply) of the iliacus?
Femoral Nerve (L2-L4)
Q: What is the origin and insertion of the psoas?
Origin – anterior surface and transverse processes of T12-L5 vertebrae
Insertion – lesser trochanter on femur
Q: What is the innervation (nerve supply) of the psoas?
Ventral Primary Rami (L1-L3)
Q: Where does the iliopsoas tendon attach?
It wraps around the inner thigh and attaches at the lesser trochanter of the femur
Q: Is the iliopsoas a 2 joint muscle?
Technically the iliacus is a 2 joint muscle and the psoas is a 3 joint muscle, but often the SI (sacroiliac) joint is not counted, making the combined “iliopsoas” a commonly called 2 joint muscle.
What else is connected to the psoas and iliacus?
Because everything in the body is tied together by connective tissue like fascia, ligaments, tendons, and joint capsules, the iliacus and psoas are connected to the tissues around them. This includes the digestive system, nerves, urinary system, lymph system, and reproductive system.

The iliacus and its intimate connection to the pelvic floor
Fascia is a specialized connective tissue that is continuous from head to toe. The purpose of fascia is to hold everything in place. If we didn’t have fascia our organs would end up in the wrong place and our muscles would be sagging off of our bones! Not very attractive. The fascia that is connected to the iliacus and psoas is also directly connected to the pelvic floor and diaphragm. This gives a “C” shape of connective tissue that wraps along the pelvic floor, follows the iliacus and psoas up the back of the abdomen, and then curls under the ribs along the diaphragm. Because of this connection, tightness in the psoas or iliacus will pull on the diaphragm and pelvic floor muscles, nerves, and organs.

Fascia creates a “C” shaped connection between the pelvic floor, iliopsoas and diaphragm The iliacus is of particular interest to the pelvic floor itself. Issues with urination, sexual function, and pelvic pain are commonly associated with tightness in the iliacus. You can see how intimately connected these structures are in location and with their fascial connection. Similarly, when the iliacus is tight, it rotates the pelvic bones which directly affects the strain of the nerves and muscles in the pelvic floor and hip regions, often manifesting in chronic tension and nerve pain.

The iliacus and its intimate connection to the pelvic floor Summary FAQs:
Q: Does the psoas attach to the diaphragm?
The psoas and iliacus are connected to the diaphragm and the pelvic floor by the fascia connection.
Q: Does the iliacus and psoas attach to the organs?
The fascia in the body is continuous from head to toe and creates a connection between the iliopsoas and the digestive system, nerves, urinary system, lymph system, and reproductive system.
What do the iliacus and psoas muscles do?
The function of the iliopsoas varies depending on the position and activity of the body. Although these muscles are often referred to together as the hip flexor or iliopsoas, their action and function are different. This is an underappreciated and very important point. They both contribute to hip flexion motion but their primary job is to hold together the hip, pelvis, and lower back area.
What does the iliacus muscle do?
Primarily, the iliacus stabilizes the hip joint and the SI (sacroiliac) joint. Because it is relatively short and strong and crosses the two joints of the hip and the sacroiliac joint, it acts as more of a stabilizer, keeping those two joints aligned and strong regardless if the body is stationary or moving. Long muscles have good lever arms for moving bones well. A good example of this is the quadricep that goes from the hip to below the knee. Short muscles are built to hold parts in place. This is what the iliacus was born to do, stabilize the hip and SI joint. Any situation that challenges these 2 joints will lead to a challenge to the iliacus muscle and possibly the development of chronic tightness.
Why does my leg rotate out when I lay down? Why do I need a pillow under my knees when sleeping?
A tight hip twists the leg. The action of the iliacus when it moves the femur bone is flexion and external rotation of the hip. Because of this, when you have a tight iliacus and your pelvis is stationary like when you are lying down, your leg will rotate outward. Tightness here may also put your hip into a little bit of flexion when you lay down, making it hard to lie on your back without a pillow under your knees. These are two signs that you have chronic holding patterns in this muscle. If a muscle is tight laying down, it’s tight all the time, during everything you do. It doesn’t take much imagination to see how that can cause issues with performance and pain.
Why is my pelvis rotated? Why does my hip go out?
A tight hip twists the core. When the leg is fixed instead of the pelvis, like in standing for example, the pull of the iliacus can cause a rotation of the pelvic bone forward, changing the alignment of the pelvis, hip joint, femur, and the rest of the leg. This is called an anterior rotation and this pulling motion works its way up to the spine as well. This is a very common sign of a tight iliacus and can get stuck that way and affect your alignment of the entire body, leading to pain and poor muscle strength

Does the iliacus move the spine? Is the iliacus attached to the spine?
When the leg is stationary, the iliacus will help bend the spine to the same side (ipsilateral side bending) and rotates the pelvis forward when you go from laying down to long sitting, contributing to spinal flexion in this situation. Although the iliacus does not directly attach to the spine, its connection to the pelvis and how it moves that bone affects the motion of the spine.
What does the psoas muscle do?
Similar to the iliacus, the psoas stabilizes the hip joint and SI joint but, due to its connection to the lumbar spine, is involved much more than the iliacus in stabilizing the lower back. Its close connection to the lumbar vertebrae and its attachment to the front and back of each vertebra give it the perfect advantage to help hold that lumbar spine in place. When there is any issue in the low back, the psoas grabs on for dear life to hold it all together, easily developing into chronic tightness. Its complex attachments at the lumbar spine also contribute to motion of the spine such as rotation, side bending, flexion and extension, but primarily, its job at the lumbar spine is to stabilize.
Why does my lower back arch so much?
Some people experience what is called excessive lumbar lordosis where their lower back arches too much. Because of the long length of the psoas, attaching at the top of the lumbar spine and running all the way to the inside of the femur, it does a good job of extending the low back and creating an anterior pelvic tilt. This motion is best seen when sitting when you create extension in your spine to sit with a lumbar curve. Slouching in your chair relaxes the psoas, sitting in good posture activates the psoas (and iliacus). People who have psoas tension tend to have an excessive arch in their spine when they stand or lay down as well.

Does the psoas move the hip joint?
Like the iliacus, the psoas creates flexion and hip external rotation at the hip joint. This can also contribute to one leg rotating outward when standing or laying down, a tight psoas or iliacus could be the culprit along with the bony structure of your hip and pelvis.
Summary FAQs:
Q: What is the function of the iliopsoas?
Primarily the iliacus and psoas are hip flexors but they also have different jobs due their location, nerve supply, and shape.
Q: What is the function of the iliacus?
The iliacus primarily stabilizes the hip and sacroiliac (SI) joint but when it does help with movement, it flexes and externally rotates the hip. It often causes an anterior rotation of the pelvis when the leg is stationary and can contribute to movements of the spine indirectly.
Q: What is the function of the psoas?
The psoas does most of its work stabilizing the spine (and to a lesser degree helps to stabilize the sacrum and hip). It also helps with hip flexion and hip external rotation as well as lumbar extension and other low back motions.
Q: Why does my leg rotate out when lying down?
The psoas and iliacus are hip external rotators and, when they are tight, they will make the leg rotate out to the side. When you release that tension and align the pelvis, the leg will not rotate out as much. The bony structure of the hip and pelvis can affect this too, but usually does so on both sides equally.
Q: Why does my back arch when I lay down?
A chronically tight psoas will pull the spine into extension (arch) at rest. A tight iliacus will rotate the pelvis forward, indirectly contributing to an arch in the back as well.
Q: Why does my hip go out? Why is my pelvis rotated?
One of the most common causes of a pelvic rotation is a tight iliacus. Sometimes a tight psoas contributes as well.
Hip Pain From Sitting? This Could Be Why
Do you get hip pain when sitting at a desk or computer for a long time? When you get up do you feel a pull along the front side of your body, like your mobility has been robbed from you while you were working? Does hip tightness and/or back pain seem to creep up every time you sit down – even if it’s only a slight ache?
You aren’t alone.
The average American adult sits for more 6.5 hours a day, according to a new study from the US Centers for Disease Control and Prevention. Many people also report digestive issues and pain in their low back, neck, leg, and knees after prolonged sitting. These may even show up before you notice pain or tightness in your hip – but the location of the pain may not be the primary cause of your discomfort. Oftentimes, the real cause of pain that develops as a result of sitting is hidden in the hip.
How your hip flexors work while sitting
It’s time to dig below the surface and cast a light on the seemingly innocuous duo in this tale: the psoas and the iliacus muscles.
Don’t know what I’m talking about? You probably know them by a more common name – hip flexors.

“Hip flexors” is a general term to describe the group of your hip muscles that connect to the bones in your thigh, pelvis, and spine that help to bring your leg forward. They’re the reason we are able to walk, run, step up a ladder and – yes – sit in your chair every day. When most people talk about hip flexor pain or tightness, they are specifically referring to (even if unknowingly) a more precise part of their hip flexors – the iliopsoas muscle, which is your psoas and iliacus muscles combined.
When working in perfect harmony, your iliopsoas muscle supports your whole body, stretching out and shortening to move your legs and help you run after energetic kids or do your favorite post-work yoga class.
But, like the supportive friend that we get used to having around, we tend to take our iliopsoas muscle for granted. After years of being there for you while you work long hours at your desk, commute in your car, and navigate the daily stresses of modern life, it can start to scream out for attention. Literally.
You see, when you sit down, you’re shortening – or contracting – the iliopsoas muscle and essentially asking it to stay “on” the entire time you’re in your chair. Its job is to hold you in place while sitting. So, basically, the psoas and the iliacus are keeping you from falling out of your seat.
The problem is, they aren’t meant to be in this position for a long time. Eventually, your iliopsoas muscle gets cramped and starts to develop painful muscle knots. And these concentrated parts of your muscle stay contracted even after the rest of your muscle has relaxed.
Ouch.
That’s when that insidious hip pain creeps in from sitting or when you begin slouching. Your body slouches as a natural response to gravity and an unconscious way to take a little stress off a fatigued iliopsoas.
Even after you stand up and begin to go about your day, your psoas and iliacus might feel like they’re still “frozen” in the contracted position they were in while you were sitting down. Doing this day after day is what causes constantly tight hip flexors and chronic hip pain while sitting.
Why stretching isn’t always the answer to tight hips
A common misconception is that, after a long day of sitting, tight hip flexors simply need a nice stretch, gentle massage or short walk around the block to release their grip on your core and back. But if your muscles have been contracting long enough to form knots and hip pain when sitting, stretching isn’t going to cut it.
Think of your psoas and iliacus muscles as rubber bands. When they are taken care of, they can stretch and contract, moving back and forth with ease. Now, imaging removing all the pressure from the rubber band and putting it in the freezer. The next time you go to stretch it out, it will resist you. If you stretch it too far it may even crack or break.
Your iliopsoas muscle is very strong – so it will take more than a few minutes of sitting down for it to become “frozen” and start causing you hip pain. That being said, it can happen faster than you think. Fortunately, there are a few simple things you can do to reduce the chances of your iliopsoas muscle causing you pain while sitting.
4 simple ways to prevent hip pain from sitting
Preventing tight hips is always better – and a lot less painful – than treating them! When it comes to your iliopsoas muscle and sitting down, the most important things to remember are form and frequent breaks.
1. Create a healthy workspace
For people who work at a computer all day, the easiest way to do that is set your desk and chair up to be as ergonomic as possible.
But if you are already having hip pain while sitting, I’d take this even one step further and look for a sit/stand desk. This will give you the option to change your body position throughout the day to make sure you’re not standing or sitting too much.
2. Check your form
Yes, seriously! You may have been “practicing” the art of sitting since you were a toddler, but if you have hip pain from sitting, you’re probably not doing it right.
Let’s compare how you are right now with the ideal sitting position.
Are your shoulders relaxed and over your hips, your neck neutral, and your feet on the floor with your chair high enough that your hips are slightly higher than your knees? A 90-degree angle is OK, but not optimal. Try sitting on a pillow to put your pelvis at a slight incline. Or, if one side of your iliopsoas muscle hurts more than the other, try tucking that foot underneath the chair – without crossing your legs!
Finally, your sternum should be up and your abs should be engaged so that there’s a very slight curve in your back. Slight is the magic word here. Not too much arch or your iliopsoas will work overtime.
This will take some of the pressure off your psoas and iliacus muscles and encourage a stronger core in the process!
3. Give your psoas and iliacus a break
One of the most important things to keep in mind to prevent hip pain while sitting: frequent breaks.
Every 30 minutes is ideal.
Only a 15-second break is enough to be a game-changer for your health and comfort. Get up, move your hips and spine from side to side, walk over to the window to take in the view, or go refill your coffee. A quick (but gentle) hip flexor stretch in place is perfect! The important thing is that you give your iliopsoas muscle a break from being contracted.
4. Teach your psoas and iliacus to relax
If you are reading this article, you’ve probably already developed a tight iliacus and psoas from sitting too much. Implementing the recommendations above may help the issue from worsening – and could even prevent hip flexor pain in the first place.
But, your already tight hip flexor will also need to learn how to relax. As I mentioned above, stretching is often not enough. The muscle has already decided to stay tight and contracted.
So, what do you do?
Muscle knots and tension respond to prolonged pressure by relaxing. This happens when the brain gets a message to finally release the tension it has been holding. But because of the location of the iliacus and psoas, it’s hard to reach with your hands or common tools.
This is where employing the help of the Hip Hook or a trusted practitioner is the key to getting this tension to release. After using the Hip Hook to successfully target the source of the hip pain you feel from sitting, you can then change your other daily habits with the recommendations above.
You’ll be well on your way to keeping your iliopsoas happy and healthy moving forward. And your reward for implementing these four easy steps will be huge relief from tight hip flexors and pain while sitting.

Your pain – whether you feel it in your hips, knees, feet, or back – could be a result of tight hip flexors and sitting too much. This could be one of the most simple changes to your life that could lead to the most profound transformations in your health and wellness.
Plunking down in your chair in the morning and staying glued to one spot all day is a disaster waiting to happen – but these are four small shifts you can make in your day that could have radical outcomes. And the best part is – they are easy to do!
If this has piqued your interest about your psoas and iliacus muscles, I really recommend that you keep learning more about the stretches and activities you can do to keep your muscles happy and healthy. I talk all about this subject in my bestselling book, Tight Hip, Twisted Core – The Key to Unresolved Pain.
The truth is, if you have a tight hip flexor – especially if it’s a result of years of poor sitting posture – you’re probably going to need some prolonged pressure to release it. The Hip Hook could be your new best friend.
If you want to dive deeper into how your hip flexors affect the rest of your body, check out this post.
Frequently asked questions about hip pain from sitting
Can sitting too long cause hip pain?
Sitting too much can be a contributing factor to hip pain. Being in a seated position for many hours each day may lead the hip flexors and other muscles around the hips to tighten up, which can create compression, decrease range of motion, and cause pain in/around the hips.
What helps hip pain from sitting?
When sitting down for longer periods of time, the muscles surrounding your hips are not being used and may have the tendency to tighten up and cause pain. If you experience hip pain while sitting, it can be a good idea to stop and take a break every so often to stretch and move around. You may also find it helpful to release the tight muscles in your hip flexors and your glutes, as well as performing supporting strength and mobility exercises.
Is sitting bad for the hip flexors?
When sitting, the hip flexors are placed into a shortened position where they can tighten up and become weaker. This may later lead to experiencing hip pain if the hip flexors are never able to truly relax and fully lengthen. To help, consider adding in some exercises to stretch and release tension in the hip flexors to reduce the likelihood of experiencing hip pain while sitting.
Can sitting too long cause buttock pain?
Sitting too much can be a contributing factor to buttock pain. Being in a seated position places the hip flexors into a shortened position, where they can become tight and pull the pelvis forward into an anterior tilt. The muscles on the back side of the body (like the glutes and hamstrings) may tighten up in response to try to maintain balance and prevent the pelvis from rotating forward even more. As these muscles tighten up, you may experience pain and tightness in the buttocks.
Hip Flexor Pain and Tightness – A Growing Epidemic
Hidden in our pelvis lies a dynamic duo of muscles that are arguably the most important muscles in our entire body. These hip flexor muscles, the psoas and iliacus, are experiencing an increasingly challenging existence in our modern lives full of too much sitting, driving, working, and stress. Add in too much stretching or too much exercise and our world full of “too much” is the perfect opportunity for the hip flexors to be tight and painful. This is highlighted in the International Journal of Sports Physical Therapy where they suggest that iliopsoas syndrome may develop as a result of overuse.
A tight hip flexor does not go unnoticed. It silently wreaks havoc on the alignment of the pelvis, hip, and spine, ultimately creating pain in many parts of the body. As the American Osteopathic Association confirms, a tight iliopsoas may manifest in many different ways. For example, your plantar fasciitis, bunions, knee pain, IT (iliotibial) band syndrome, piriformis syndrome, back pain, SI (sacroiliac) joint pain, scoliosis, even your neck pain, could all start from a tight iliacus or psoas.
Many of us don’t even know we have a tight hip flexor, let alone where our iliacus or psoas is located, what it does, and why it would be tight. This series of articles will shed light on all the aspects of this area of the body so that you can be the master of this part of you and understand how this muscle is impacting your entire body.
What is the hip flexor muscle?
You may have heard of the hip flexor, a more commonly known term. Hip flexion is technically describing a type of motion. This motion moves the whole leg forward at the hip, as in walking or marching. Any muscle that helps do this motion is called a “hip flexor.” There are actually many muscles that could be considered hip flexors. However, when a layperson uses the words “hip flexor” they are typically referring to the two largest hip flexors in the body, the iliacus (pronounced “illy ak us”) and the psoas major (pronounced “so as”). When grouped together they can also be called iliopsoas (pronounced “illy o so as”). Although commonly called the hip flexor, we will use iliopsoas throughout this article to more accurately describe these two muscles when referred to together. There is another muscle in this area called the psoas minor that only exists in about 40% of all humans. Although it does not produce the motion of hip flexion, it shares a name with psoas major and does its small job of mainly stabilizing the lower spine.[CK1]
An in-depth examination of the iliacus and psoas including origin and insertion, nerve supply, and the actions and primary function of the iliopsoas can be found in the article, “Deep Dive into the Anatomy of the Hip Flexor”
What other muscles are hip flexors?
There are a few other muscles that also produce the motion of hip flexion, bringing the leg forward at the hip like in walking or marching. Because they have a similar job as the iliopsoas, they not only work together, but they can also become injured together. Although these muscles help create the motion of hip flexion, they are not commonly part of the lay term “hip flexors” used by many to refer to the iliacus and psoas only.
Pectineus (peck-ti-knee-us) is in the inner thigh. Rectus femoris is part of our quadriceps, the big muscle on the front of the thigh. Tensor fasciae latae (ten-sir fash-ha lot-a), one of my all-time favorite names for a muscle, attaches to the IT (iliotibial) band on the outside of your leg. Part of the gluteus medius, located on the outside of the hip, is also involved in hip flexion. Many of the adductor muscle group located in the inner thigh (sartorius, adductor magnus, adductor brevis, adductor longus, and gracilis) are involved in the motion of hip flexion to some degree.
All of these muscles are hip flexors and support the iliacus and psoas in bringing the hip forward, working in different ways. The shorter muscles, like pectineus and iliacus, have less leverage and tend to focus on stabilizing the hip. The longer muscles like the psoas and rectus femoris are better at moving the leg bone forward into hip flexion with actual force.
.jpg)
Other major muscles that create hip flexion along with the iliopsoas (gluteus medius, sartorius, gracilis, and adductor group not shown)
Summary FAQs:
Are the iliacus and psoas the only hip flexors?
Even though the iliopsoas is what is often referred to as the “hip flexor,” there are other muscles that produce this motion as well
What other muscles are hip flexors? Is the gluteus medius a hip flexor?
Muscles that contribute to the motion of hip flexion include:
- Iliacus
- Psoas
- Rectus Femoris
- Tensor Fasciae Latae
- Pectineus
- Sartorius
- Adductor Brevis
- Adductor Longus
- Adductor Magnus
- Gracilis
- Part of the gluteus medius
- Building Blocks of the Body
Each part of our body has a role. The bones support your body and the joints are where the bones connect. Joints allow the body to move but the bones wouldn’t move at all if it weren’t for the muscles. Muscles are attached to the bones by tendons so that they can contract and move those bones around, so you can do your thing. If it weren’t for the ligaments and joint capsules holding the joints together, those movable connections of one bone to another would fall apart as soon as the muscle tried to move them. Then there is the fascia, which runs continuously from head to toe. Fascia holds the muscles, cells, organs, nerves, all parts of the body, in place. If you didn’t have fascia, your muscles would be hanging off the bone.
When one part of the body is too tight or too loose or broken or weak, it affects the way the rest of the body works. Since each bone is connected to the next by this network of ligaments, tendons, and muscles, when part of the system is not working well, it impacts the rest of the body. We see this when a broken toe leads to back pain or when knee surgery creates a hip problem.
The chain reaction
An unhealthy psoas and iliacus have profound effects on the rest of the body. Due to the location and strength of the iliacus and how it connects to both the pelvis and the thigh bone, it is involved in issues with the low back, tailbone, hip, leg, knee, foot, toe, upper body, and neck. Because its tightness twists the core and changes the way the leg is connected to the upper body, all of these areas are affected. When the iliacus is relaxed and happy, these areas have a chance to work as they have been designed to work—with ease, aligned and strong. When the iliacus is tight, all of these areas are susceptible to pain and injury.

Tightness in the iliacus and psoas (iliopsoas) is caused by either overuse (sitting too long or certain athletic endeavors) or by a too flexible body (where the muscles have to hold on for dear life to keep the body from falling apart). Injuries and stress contribute as well. Once this tightness sets in, it can persist for years, pulling on the pelvis and creating a faulty movement pattern in the leg to the toe and the spine to the head. That strain starts to wear away at the body, usually at your weakest link, and eventually leads to the one thing that no one wants and everyone wants to get rid of: pain. The “hip flexor” is commonly the root cause of a chain of events that leads to pain; therefore, if we keep our iliopsoas healthy and happy, we can simply avoid so much suffering.
Become a part of this movement by intimately knowing your iliacus and how to take care of it. Get on the iliacus train to your own wellness and evolve into a better functioning you. Soon you will be an expert on how to care for this muscle, and your newfound knowledge will help to create a world where everyone knows they have a psoas and iliacus that makes up their “hip flexor”, its importance, how to care for it, and how to live pain-free.
In this article series you will discover:
Deep Dive into the Anatomy of the Hip Flexor (also known as iliopsoas or psoas and iliacus). What is the origin and insertion, nerve supply, and the actions and primary function of the iliopsoas? What muscles oppose the iliopsoas?
How do I find the iliacus and psoas on myself? Can I palpate it?
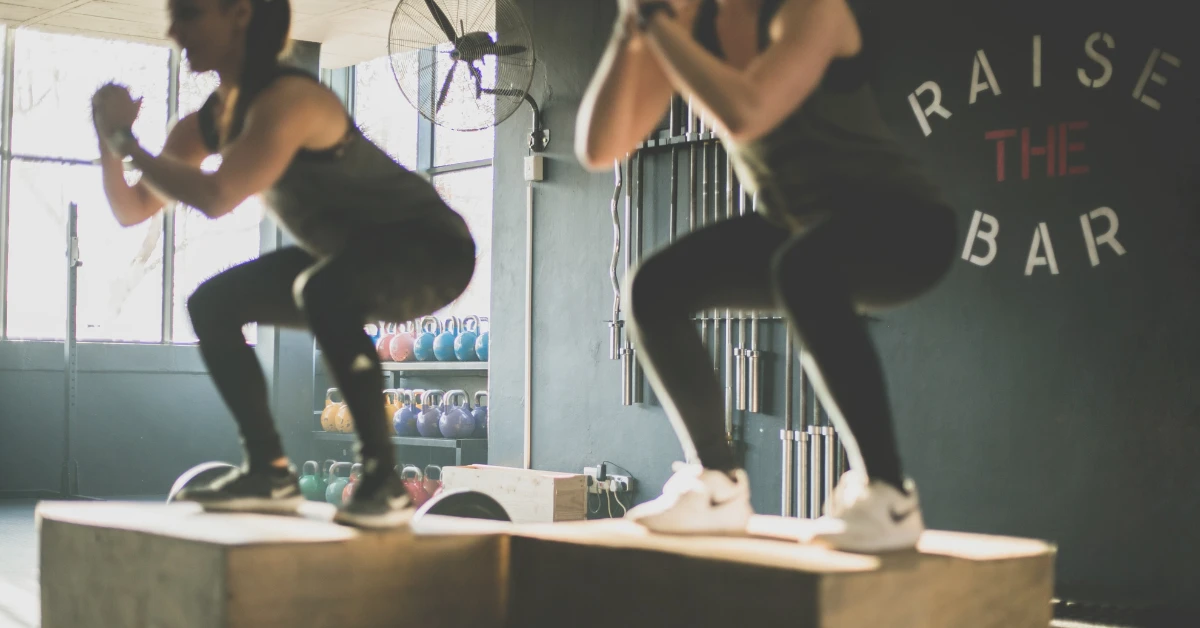
What causes tight hip flexors?
- Sitting
- Driving
- Running
- Lunging Sports (Tennis, Skating, Cycling)
- Kicking (Soccer, Football, Martial Arts, Kickboxing)
- Heavy Lifting (Crossfit, Squats)
- Golf
- Stretching Sports (Yoga, Dance, Gymnastics)
- Hypermobility Syndrome (Ehlers-Danlos Syndrome, Marfan Syndrome, Down Syndrome)
- Hip Dysplasia
- Pregnancy
- Hip Arthritis
- Hip Replacement
- Hip Labrum Tears
- Hip Impingement Syndrome
- Hip Surgery
- Pelvic Pain
- Lower Back Pain
- Sacroiliac (SI) Joint Pain
- Lower Back, Knee, Foot Surgery
- Abdominal Issues (Digestive, Uterus, Urinary, Prostate, Ovary, Colon)
- Stress, Trauma, and Emotions
What issues can a tight hip flexor cause?
- Lower Back Pain
- Facet Joint Pain
- Herniated Discs
- Nerve Pain
- Back Muscle Spasm and Pain
- Scoliosis
- Sacroiliac (SI Joint) Pain
- Tailbone Pain
- Pelvic Pain
- Bowel, Bladder, and Reproductive Issues
- Constipation
- Abdominal Pain
- Weak Abdominals
- Hernia
- Hip Arthritis
- Hip Labrum
- Groin Pain
- Psoas Tightness
- Hip Flexor (Iliopsoas) Tendonitis
- Hip Flexor (Iliopsoas) Bursitis
- Hip Flexor (Iliopsoas) Strain
- Psoas syndrome
- Piriformis Tightness
- Glute Tightness
- Weak Glutes
- Hip Bursitis
- Adductor Muscle Pain
- Pain Getting Up From Sitting
- Pain with Marching
- Pinch in Hip When Bringing Knee to Chest
- Hip Pop When Lowering the Leg
- Snapping Hip
- IT (Iliotibial Band) Syndrome
- Nerve Pain
- Sciatica
- Hamstring Issues
- Quadricep (Rectus Femoris) Pain
- Leg Length Differences
- MCL Strain
- Knee Arthritis
- Meniscus Tear
- Kneecap (Patellofemoral) Pain
- Ankle Pinch
- Achilles Strain
- Plantar Fasciitis
- Overpronation
- Bunion
- Shoe Wear Issues
- Difficulty Breathing
- Vagus Nerve Issues
- Sympathetic Nervous System Activation
- Rib Pain
- Rib Cage Twist
- Shoulder and Neck Pain
- Headaches
- Jaw Pain
Ready to learn more now? Buy your very own copy of my bestselling book, Tight Hip, Twisted Core – The Key to Unresolved Pain or Order the Hip Hook to release the tension in your very own hip flexor.
Summary FAQs:
What is hip flexion?
Hip flexion describes the motion of swinging the thigh forward like when you lift your leg to march or step forward
Is the iliacus a hip flexor? Is the psoas the same as a hip flexor? Is the iliopsoas a hip flexor?
The word “hip flexor” is commonly used to describe two muscles together, iliacus and psoas, even though there are other muscles that also contribute to the motion of hip flexion. Technically, these 2 muscles are more accurately called “iliopsoas” when referred to together.
Is the iliacus the same as the psoas? What muscles make up the iliopsoas?
“Iliopsoas” refers to both the iliacus and psoas major muscles together although they are two separate muscles.
Is the psoas minor a hip flexor? Does everyone have a psoas minor?
The psoas minor is not a hip flexor and is only present in 40% of the population. The psoas major is a hip flexor along with the iliacus and a handful of other muscles.